
Sit-Up
The sit-up is a classic abdominal exercise that targets the rectus abdominis muscle, commonly known as the “six-pack” muscles. This exercise is a staple in core strengthening routines and can be performed with various modifications to suit different fitness levels and preferences.
Execution
- Setup: Begin by positioning yourself on a decline bench specifically designed for sit-ups. Secure your feet under the provided footpad and sit on the bench with your torso upright.
- Lowering Phase: Slowly lower your torso backward while maintaining control. Continue lowering until your upper body is almost parallel to the floor. Your back should make an angle of approximately 30 to 45 degrees with the horizontal plane.
- Return Phase: To complete the sit-up, engage your abdominal muscles and bend at the waist, bringing your upper body back to the upright position. This movement primarily involves flexing the spine.
Muscles Involved
Primary Muscles: The primary muscle targeted during sit-ups is the rectus abdominis, which runs vertically along the front of your abdomen.
Secondary Muscles: Sit-ups also engage secondary muscles, including the quadriceps (specifically the rectus femoris, vastus lateralis, vastus medialis, and vastus intermedius) and the hip flexors (sartorius and iliopsoas).
Anatomic Focus
- Hand Position: During sit-ups, you have flexibility in your hand placement. You can hold your hands together behind your lower back, cross them in front of your chest, or interlock them behind your head. The resistance experienced varies depending on the placement of your hands.
- Foot Position: Your feet should be securely anchored under a roller pad or similar support to ensure stability during the exercise.
- Body Position: For added comfort and to reduce stress on the lower back, it is recommended to bend your knees. This knee bend helps protect the lower back from unnecessary strain.
- Range of Motion: In the starting position, your torso should be upright, with your abdomen almost touching your thighs. As you lower your torso backward, aim to reach an angle of about three-quarters of the way down to the floor. Avoid leaning back too far to prevent excessive stress on the lower back.
- Trajectory: The decline bench typically has an angle of 30 to 45 degrees. Adjusting the bench to a steeper angle increases the difficulty of the exercise.
- Resistance: You can increase the intensity of the sit-up by adding resistance. This can be done by tilting the bench at a steeper angle or by holding a weight plate to your chest while performing the exercise.
Variation
Floor Sit-Up: If you don’t have access to a decline bench, or if you prefer a different approach, you can perform a floor sit-up. To do this variation, sit on the floor with your knees bent and your feet securely anchored to the ground. This modification allows you to target your abdominal muscles without the need for specialized equipment.
Incorporate sit-ups into your core workout routine to strengthen your abdominal muscles and enhance your overall core stability.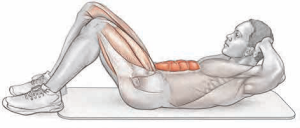
Remember to maintain proper form, use controlled movements, and breathe regularly throughout the exercise to maximize its effectiveness and minimize the risk of injury.
Crunch
The crunch is a popular and effective abdominal exercise that targets the upper rectus abdominis muscles. It is commonly included in core strengthening routines and is particularly known for its ability to isolate and strengthen the upper part of the abdominal wall. Below, we’ll delve into the execution, muscles involved, and variations of the crunch exercise.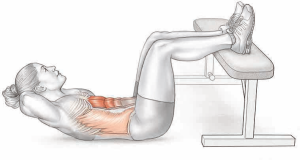
Execution
- Starting Position: Begin by lying flat on your back on the floor. Bend your hips at a 90-degree angle so that your lower legs are parallel to the ground. Place your hands behind your head, with your fingers gently supporting your neck. Avoid pulling on your neck during the exercise.
- Crunch Motion: Engage your abdominal muscles by contracting your upper rectus abdominis. Lift your shoulders off the floor and crunch your chest forward towards your knees. Keep your lower back in contact with the floor throughout the movement.
- Return to Starting Position: After reaching the peak of the contraction, lower your shoulders back down to the starting position in a controlled manner, while maintaining tension in your abdominal muscles.
Muscles Involved
Primary Muscles: The primary muscle targeted during crunches is the upper rectus abdominis, which runs vertically along the front of your abdomen.
Secondary Muscles: Crunches also engage the secondary muscles, particularly the external obliques and internal obliques, which are responsible for the rotation and stabilization of the trunk.
Anatomic Focus
- Hand Position: You have flexibility in hand placement during crunches. You may position your hands at your sides, across your chest, or interlock them behind your head. The resistance experienced varies depending on the placement of your hands. Placing your hands behind your head increases the resistance and intensity of the exercise.
- Foot Position: You can place your feet on the floor close to your buttocks or elevate them on a bench. Elevating your legs on a bench increases resistance and requires greater abdominal engagement.
- Body Position: Ensure that your thighs are positioned at a 90-degree angle to your torso. You may choose to support your lower legs on top of a flat bench, or you can position your feet on the floor close to your buttocks. This helps stabilize your lower body during the exercise.
- Range of Motion: The crunch primarily targets the upper spine. During the exercise, your shoulders should rise a few inches off the floor. Importantly, your lower back must remain in contact with the floor throughout the movement, and no motion should occur at the hips. This distinguishes the crunch from the sit-up, where movement occurs at the waist and hips.
- Resistance: To increase the difficulty of the exercise, you can place your hands behind your head or elevate your legs on a bench. These modifications add resistance to the exercise and intensify the work on the upper rectus abdominis.
Variation
Legs-Elevated Crunch: Elevating your legs on a bench while performing crunches increases the resistance and places more demand on your abdominal muscles. This variation is an effective way to challenge your core strength further.
Incorporate crunches into your core workout routine to target the upper rectus abdominis and improve your abdominal strength. Focus on maintaining proper form, using controlled movements, and avoiding excessive neck strain by keeping your hands gently supporting your neck rather than pulling on it. Including a variety of abdominal exercises in your routine can help you achieve a well-rounded and strong core.
Rope Crunch
The rope crunch is an effective and popular abdominal exercise that specifically targets the rectus abdominis, helping you develop a strong and well-defined core. This exercise is often used in strength and conditioning programs, bodybuilding, and general fitness routines. In this article, we’ll delve into the execution, muscles involved, and variations of the rope crunch exercise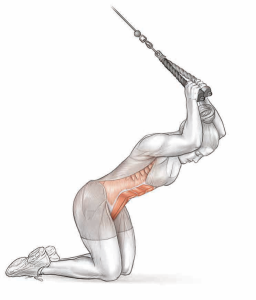 Execution
- Starting Position: Begin by kneeling on the floor beneath a high pulley machine, facing either away from or toward the weight stack. Position yourself at a distance from the pulley that allows for a comfortable range of motion. Grasp the rope attachment with both hands, holding it behind your head. Your hands can be positioned above your head, on either side of your head, or in front of your upper chest, depending on your preference.
- Crunch Motion: Engage your abdominal muscles by contracting your rectus abdominis. Begin the movement by curling your torso forward and bending at the waist. Keep your lower back in a stable position. This motion involves flexing the spine as you bring your chest towards your thighs.
- Return to Starting Position: After reaching the peak of the contraction, slowly and in a controlled manner, return your torso to the upright position. Your abdominal muscles should remain engaged throughout the exercise.
Muscles Involved
Primary Muscles: The primary muscle targeted during rope crunches is the rectus abdominis, which is responsible for flexing the spine and bringing the chest towards the thighs.
Secondary Muscles: Rope crunches also engage secondary muscles, including the external oblique and internal oblique muscles, which play a role in trunk rotation and stabilization, as well as the serratus anterior, which assists in scapular movement and shoulder stability.
Anatomic Focus
- Hand Position: You have flexibility in your hand placement during rope crunches. Adjust the position of your hands to vary the resistance and intensity of the exercise. Holding the rope higher above your head increases the difficulty.
- Body Position: You can perform this exercise while facing either away from or toward the weight stack, depending on your personal preference and comfort. Both variations effectively target the rectus abdominis.
- Range of Motion: During the exercise, your torso should move from the upright position to a position that is almost parallel to the floor. Maintaining a full range of motion is crucial for targeting the abdominal muscles effectively.
- Trajectory: By positioning yourself a short distance away from the pulley, you can benefit from a greater range of motion when you crunch, allowing for a more comprehensive abdominal contraction.
- Resistance: Adjust the resistance by changing the weight stack on the machine. Start with a weight that allows you to perform the exercise with proper form and gradually increase it as your strength improves.
Variation
Machine Rope Crunch: Various machines are available that replicate the rope crunch exercise. Some of these machines provide additional support, such as a lumbar pad, to protect and support the lower back during the torso motion. Resistance in these machines is typically provided by an overhead cable pulley system.
Incorporate rope crunches into your abdominal workout routine to target the rectus abdominis and develop a strong and defined core. Proper form, controlled movements, and full range of motion are essential for maximizing the effectiveness of this exercise. Adjust the resistance level to challenge your abdominal muscles appropriately and avoid using excessive momentum during the movement.
Machine Crunch
The machine crunch is an effective and convenient abdominal exercise performed using a specialized machine typically found in gyms. This exercise is designed to target the rectus abdominis, helping you develop core strength and definition. In this article, we will explore the execution, muscles involved, and variations of the machine crunch exercise
Execution
- Starting Position: Begin by sitting in the seat of the machine designated for crunches. Ensure that your back is comfortably against the backrest and that your feet are securely placed under the ankle pads or on the floor, depending on the machine’s design. Your knees should be bent at a 90-degree angle.
- Grasp the Handles: Depending on the specific machine’s design, you may find handles alongside your head, or you may simply rest your hands on a chest pad provided by the machine. If handles are present, grasp them securely with your hands.
- Crunch Motion: Initiate the exercise by contracting your abdominal muscles. Begin to curl your torso forward and downward, bringing your chest toward your knees. Maintain a controlled and deliberate pace throughout the movement.
- Return to the Upright Position: After reaching the peak of the contraction, slowly and under control, return your torso to the upright position. Your abdominal muscles should remain engaged throughout the exercise.
Muscles Involved
Primary Muscles: The primary muscle targeted during machine crunches is the rectus abdominis, which is responsible for flexing the spine and bringing the chest toward the pelvis.
Secondary Muscles: Machine crunches also engage secondary muscles, including the external oblique and internal oblique muscles, which play a role in trunk rotation and stabilization, as well as the serratus anterior, which assists in scapular movement and shoulder stability.
Anatomic Focus
- Hand Position: Depending on the machine’s design, your hand placement may vary. You may grasp handles located alongside your head or simply rest your hands on a chest pad provided by the machine. The choice of hand placement does not significantly affect the primary muscle engagement but may influence comfort and grip.
- Foot Position: The positioning of your feet can also vary based on the machine’s design. Some machines have ankle pads where you can secure your feet, while others allow you to place your feet flat on the floor. Ensure that your feet are stable and comfortable in your chosen position.
- Body Position: On some machines, the resistance is provided by the handles, while on others, it is transmitted through a chest pad. The machine’s design determines which part of your body provides resistance during the exercise.
- Range of Motion: During the exercise, your torso should move from the upright starting position to a position that is almost parallel to the floor. It’s essential to maintain a full range of motion to effectively target the abdominal muscles.
- Resistance: Adjust the resistance level on the machine by either holding the handles or adjusting the weight stack, depending on the machine’s design. Start with a weight that allows you to perform the exercise with proper form and gradually increase it as your strength improves.
Variation
Machine Crunch with Chest Pad: Some abdominal machines are designed to provide resistance through a chest pad instead of handles. The mechanics of this variation are similar to the standard machine crunch, but the resistance is applied differently. Depending on the available equipment in your gym, you can choose the variation that best suits your preferences.
Incorporate machine crunches into your core workout routine to target the rectus abdominis and improve core strength. Focus on maintaining proper form, controlled movements, and a full range of motion to maximize the effectiveness of this exercise. Adjust the resistance level to match your fitness level and gradually progress as you become stronger.
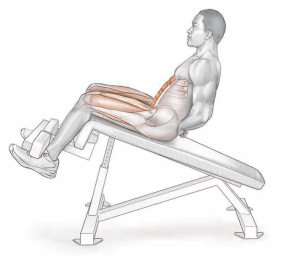
Seated Sit-Up
The seated sit-up is an effective abdominal exercise performed using a specialized apparatus that provides support and resistance. This exercise is designed to target the rectus abdominis and the oblique muscles, helping you build core strength and definition. In this article, we’ll explore the execution, muscles involved, and a variation of the seated sit-up exercise.

Execution
- Starting Position: Begin by sitting upright on the seated sit-up apparatus. Bend your knees at a 90-degree angle and secure your feet under the support pad or a comparable support structure provided by the machine.
- Lowering Phase: Initiate the exercise by slowly lowering your torso backward while maintaining control. Continue lowering until your upper body is almost parallel to the floor. Your back should make an angle of approximately 60 to 90 degrees with the horizontal plane.
- Return Phase: To complete the sit-up, engage your abdominal muscles and bend at the waist, bringing your upper body back to the upright position. This movement primarily involves flexing the spine.
Muscles Involved
Primary Muscles: The primary muscles targeted during seated sit-ups are the rectus abdominis, which runs vertically along the front of your abdomen, and the oblique muscles (both external and internal). The oblique muscles are responsible for trunk rotation and lateral flexion.
Secondary Muscles: Seated sit-ups also engage secondary muscles, including the quadriceps (specifically the rectus femoris, vastus lateralis, vastus medialis, and vastus intermedius) and the hip flexors (such as the sartorius and iliopsoas).
Anatomic Focus
- Body Position: Sit on the seated sit-up apparatus with your knees bent at a 90-degree angle. Ensure that your back is in contact with the backrest or support provided by the machine.
- Foot Position: Secure your feet under a roller pad or a support structure designed to hold your feet in place. This helps stabilize your lower body during the exercise.
- Hand Position: You have flexibility in hand placement during seated sit-ups. You may hold your hands together behind your lower back, cross them in front of your chest, or interlock them behind your head. The relative resistance experienced varies depending on the placement of your hands.
- Range of Motion: In the starting position, your torso should be close to vertically upright. During the exercise, lower your torso backward approximately 60 to 90 degrees. Avoid leaning too far back or bending too far forward, as excessive motion can reduce tension on the abdominal muscles.
- Resistance: To increase the difficulty of the exercise, you can hold a weight plate to your chest while performing seated sit-ups. This added resistance intensifies the work on the abdominal muscles.
Variation
Twisting Seated Sit-Up: To involve the oblique muscles more in the exercise, you can add a twisting motion during the sit-up. As you sit up, twist your torso and direct your right elbow toward your left knee. Lower your torso back to the starting position. During the next repetition, direct your left elbow toward your right knee. This twisting motion engages the oblique muscles and adds a rotational component to the exercise, making it more challenging.
Incorporate seated sit-ups into your core workout routine to target the rectus abdominis, external and internal obliques, and other core muscles. Focus on maintaining proper form, controlled movements, and a full range of motion to maximize the effectiveness of this exercise. Adjust the resistance level and explore variations to continually challenge your core strength and stability.
Incline Leg Raise
The incline leg raise is a targeted abdominal exercise that primarily engages the lower rectus abdominis while also involving secondary muscles like the external and internal obliques, iliopsoas, and rectus femoris. This exercise is performed on an incline abdominal bench, and it is an effective way to strengthen and define the lower abdominal muscles. In this article, we will delve into the execution, muscles involved, and a variation of the incline leg raise exercise.
Execution
- Starting Position: Begin by lying supine (face up) on an incline abdominal bench. Ensure that your upper torso remains in contact with the bench. Extend your legs downward and hold onto the bench above and behind your head with your hands. Your hands serve to stabilize your torso during the exercise.
- Leg Raise Motion: Initiate the exercise by raising your legs at the hips. As you lift your legs, pull your thighs toward your chest while keeping your knees slightly bent. This motion involves flexing the hips and knees simultaneously.
- Return to Starting Position: After reaching the peak of the contraction, slowly lower your legs back to the starting position in a controlled manner. To maintain tension on the abdominal muscles and maximize muscle engagement, avoid lowering your legs all the way down or allowing your feet to touch the floor.
Muscles Involved
Primary Muscles: The primary muscle targeted during incline leg raises is the lower rectus abdominis, which runs along the lower part of the abdomen.
Secondary Muscles: In addition to the lower rectus abdominis, incline leg raises also engage secondary muscles, including the external and internal obliques (responsible for trunk rotation and stabilization), iliopsoas (a hip flexor), and rectus femoris (a quadriceps muscle that assists in leg flexion).
Anatomic Focus
- Hand Position: Your hands play a crucial role in stabilizing your torso during incline leg raises. Hold onto the bench or handles above your head with your hands. This grip helps you maintain balance and control throughout the exercise.
- Foot Position: Keep your feet together during the exercise. Your knees should be slightly bent to facilitate the movement.
- Body Position: While performing incline leg raises, your upper torso should remain in contact with the bench. To maximize the contraction in the lower abdominals, lift your pelvis off the bench slightly as you raise your legs.
- Range of Motion: To maximize the contraction of the lower rectus abdominis, raise your knees as high as possible toward your chest during the leg raise motion. Maintain tension on the abdominal muscles by not lowering your legs all the way down or allowing your feet to touch the floor.
- Trajectory: The angle of the bench relative to the floor affects the degree of difficulty of the exercise. Tilting the bench at a steeper angle increases the challenge.
- Resistance: You can adjust the resistance level of the exercise by modifying the incline of the bench. Reducing the incline makes the exercise easier, while increasing the incline adds difficulty.
Variation
Dumbbell Incline Leg Raise: For added resistance and a more challenging workout, you can perform the incline leg raise while holding a dumbbell between your feet. This variation increases the workload on the lower rectus abdominis and intensifies the exercise.
Incorporate incline leg raises into your abdominal workout routine to target the lower rectus abdominis and improve core strength. Focus on maintaining proper form, controlled movements, and a full range of motion to maximize the effectiveness of this exercise. Adjust the incline of the bench to match your fitness level and gradually progress as you become stronger.
Hanging Leg Raise
The hanging leg raise is an effective abdominal exercise that primarily targets the rectus abdominis, helping to develop strength and definition in the abdominal region. This exercise involves lifting your legs while hanging from a chin-up bar or using ab slings. In this article, we will explore the execution, muscles involved, and a variation of the hanging leg raise exercise.
Execution
- Starting Position: Begin by hanging from a chin-up bar using an overhand grip with your hands spaced about shoulder-width apart. Alternatively, you can use a pair of ab slings, which attach to the bar to support your body weight. Allow your legs to hang straight down.
- Leg Raise Motion: Initiate the exercise by lifting both knees together, keeping them slightly bent, toward your chest. The motion involves flexing the hips and knees simultaneously, bringing your knees as close to your chest as possible.
- Return to Starting Position: After reaching the peak of the contraction, slowly lower your legs back to the starting position without swinging. Maintain control throughout the movement to maximize the engagement of the abdominal muscles.
Muscles Involved
Primary Muscles: The primary muscle targeted during hanging leg raises is the rectus abdominis, which runs vertically along the front of your abdomen and is responsible for flexing the spine and bringing the pelvis toward the ribcage.
Secondary Muscles: Hanging leg raises also engage secondary muscles, including the external and internal obliques (responsible for trunk rotation and stabilization), iliopsoas (a hip flexor), and rectus femoris (one of the quadriceps muscles involved in knee extension).
Anatomic Focus
- Hand Position: When performing hanging leg raises, take an overhand grip on the chin-up bar with your hands spaced about shoulder-width apart. Alternatively, use a pair of supportive upper-arm sleeves, like ab sling devices, to support your body weight.
- Foot Position: Keep your feet together and your knees slightly bent throughout the exercise. This position helps maintain proper form and control.
- Body Position: Your torso should hang vertically, perpendicular to the floor. This position allows for a full range of motion and proper engagement of the abdominal muscles.
- Range of Motion: To maximize the muscular effort and engagement of the rectus abdominis, raise your knees as high as possible toward your chest during the leg raise motion. As you lower your legs, it’s essential to keep your knees slightly bent to maintain tension on the abdominals.
- Trajectory: As you raise your legs, focus on lifting your pelvis to maximize the contraction in the lower abdominals. Avoid excessive swinging or momentum during the exercise to isolate the target muscles effectively.
- Resistance: The level of difficulty of hanging leg raises can be adjusted by the degree of knee bend. Keeping your legs straight throughout the movement makes the exercise harder, while bending your knees slightly can make it easier.
Variation
Vertical Leg Raise: On the vertical leg raise apparatus, your back is supported against a backrest, and your elbows rest on pads. This design prevents your legs and torso from swinging, providing better stability and isolation of the abdominal muscles during the exercise. It is an excellent option if you find it challenging to maintain stability when performing hanging leg raises.
Incorporate hanging leg raises into your abdominal workout routine to target the rectus abdominis and improve core strength. Focus on maintaining proper form, controlled movements, and a full range of motion to maximize the effectiveness of this exercise. Adjust the degree of knee bend to match your fitness level, gradually progressing to straight legs as you become stronger.
Knee-Up
The knee-up is an effective abdominal exercise that primarily targets the rectus abdominis, helping to build core strength and enhance abdominal definition. This exercise can be performed on a secure bench or platform, and it involves raising your knees toward your chest while maintaining proper form and control. In this article, we will explore the execution, muscles involved, and a variation of the knee-up exercise.
Execution
- Starting Position: Begin by sitting on the edge of a flat, secure bench or platform. Let your legs hang down, and maintain a slight bend in your knees. Grasp the bench behind you with your hands, ensuring a secure and stable grip.
- Knee Raise Motion: Initiate the exercise by raising both knees toward your chest while keeping your legs together. The motion involves flexing the hips and bending the knees as you bring your thighs closer to your abdomen.
- Return to Starting Position: After reaching the peak of the contraction, slowly lower your legs back down until your heels almost touch the floor. Maintain control throughout the descent to keep tension on the abdominal muscles.
Muscles Involved
Primary Muscles: The primary muscle targeted during knee-ups is the rectus abdominis, which is responsible for flexing the spine and bringing the pelvis toward the ribcage.
Secondary Muscles: Knee-ups also engage secondary muscles, including the external and internal obliques (responsible for trunk rotation and stabilization), iliopsoas (a hip flexor), and rectus femoris (a quadriceps muscle involved in knee extension).
Anatomic Focus
- Hand Position: When performing knee-ups, maintain a secure grip on the bench or platform behind you with your hands. This hand position provides stability and support for your upper body during the exercise.
- Foot Position: Keep your feet together and your knees slightly bent throughout the exercise. This position allows for controlled movement and proper muscle engagement.
- Body Position: Lean back slightly so that your torso makes an angle of approximately 45 to 60 degrees with the bench. This angle helps optimize the range of motion and engagement of the abdominal muscles. You may rest your feet on the floor for stability while getting into position.
- Range of Motion: To maximize the muscular effort and engage the rectus abdominis effectively, raise your knees until your thighs almost touch your abdomen. When lowering your legs, stop just short of your heels making contact with the floor to maintain tension on the muscles.
- Trajectory: Leaning your torso back slightly allows you to increase the range of motion during knee-ups. This angle enhances the contraction of the abdominal muscles throughout the exercise.
- Resistance: To intensify the exercise and add resistance, you can hold a small dumbbell between your ankles while performing knee-ups. This added weight challenges the abdominal muscles and enhances the workout’s effectiveness.
Variation
Weighted Knee-Up: Hold a small dumbbell or ankle weight between your ankles while performing knee-ups to add resistance and increase the difficulty of the exercise. This variation is suitable for those looking to progress and further challenge their abdominal muscles.
Incorporate knee-ups into your abdominal workout routine to target the rectus abdominis and improve core strength. Focus on maintaining proper form, controlled movements, and a full range of motion to maximize the effectiveness of this exercise. Adjust the level of resistance as needed to match your fitness level, gradually increasing it as you become stronger.
Reverse Crunch
The reverse crunch is a highly effective abdominal exercise that primarily targets the rectus abdominis, helping to strengthen and tone the lower portion of your abdominal muscles. This exercise involves lifting your pelvis off a bench or the floor while keeping your upper torso in contact with the surface. In this article, we will delve into the execution, muscles involved, safety tips, and a variation of the reverse crunch exercise.
Execution
- Starting Position: Begin by lying flat on a secure bench or on the floor, facing upward. Position your feet so that your knees and hips are bent at a 90-degree angle, creating a “L” shape with your legs. Grasp the bench behind your head with your hands, providing support for your upper body.
- Reverse Crunch Motion: Initiate the exercise by contracting your lower abdominal muscles. Lift your pelvis off the bench or the floor while keeping your upper torso in contact with the surface. As you raise your pelvis, your feet should move upward toward the ceiling.
- Return to Starting Position: After reaching the peak of the contraction, slowly lower your legs back to the starting position in a controlled manner. Maintain tension on the abdominal muscles throughout the movement.
Muscles Involved
Primary Muscles: The primary muscle targeted during reverse crunches is the rectus abdominis, which runs vertically along the front of your abdomen. It is responsible for flexing the spine and bringing the pelvis toward the ribcage.
Secondary Muscles: Reverse crunches also engage secondary muscles, including the external and internal obliques (responsible for trunk rotation and stabilization), hip flexors (such as the iliopsoas and rectus femoris), which assist in raising the pelvis.
Anatomic Focus
- Hand Position: When performing reverse crunches, place your hands behind your head and grasp the bench or surface for support. This hand placement provides stability for your upper body during the exercise.
- Foot Position: In the starting position, your thighs should be vertical, and your lower legs should be parallel to the bench or floor, creating a 90-degree bend at your knees and hips. Keep your feet and legs together throughout the exercise.
- Body Position: Keep your upper torso in contact with the bench or surface at all times. This contact is essential for maintaining proper form and ensuring that the exercise effectively targets the lower abdominal muscles.
- Range of Motion: Contract your lower abdominal muscles to lift your pelvis off the bench or floor. Raise your legs until your toes point directly toward the ceiling. This full range of motion optimizes the engagement of the lower rectus abdominis.
Safety Tip
If you have difficulty balancing on a bench or prefer a more stable surface, you can perform the reverse crunch exercise while lying on the floor. This modification allows you to focus solely on the movement and muscle engagement without the need for a bench.
Variation
Hip Flexor Machine: Some gyms offer specialized hip flexor machines for performing reverse crunches. These machines provide resistance via a strap or pad positioned across your lower thighs. While using a machine adds resistance to the exercise, the fundamental motion of raising your pelvis remains the same.
Incorporate reverse crunches into your abdominal workout routine to target the lower rectus abdominis and improve core strength. Focus on maintaining proper form, controlled movements, and a full range of motion to maximize the effectiveness of this exercise. Whether you choose to perform it on a bench or the floor, the reverse crunch can be a valuable addition to your abdominal training regimen.
Straight-Leg Sit-Up
The straight-leg sit-up is an effective abdominal exercise that primarily targets the lower rectus abdominis while also engaging secondary muscles such as the external obliques, internal obliques, upper rectus abdominis, and hip flexors. This exercise involves lifting your torso off the floor with your legs straight, promoting core strength and definition. In this article, we will explore the execution, muscles involved, range of motion, and variations of the straight-leg sit-up exercise.
Execution
- Starting Position: Begin by lying flat on the floor with your legs fully extended and your feet secured, either by a partner or by securing them under a roller pad or comparable support. Keep your arms at your sides, palms facing downward.
- Sit-Up Motion: Keeping your back straight, initiate the exercise by raising your torso off the floor. This motion involves flexing at the waist and hips while keeping your legs straight. As you lift your torso, your hands will slide along your thighs toward your knees.
- Return to Starting Position: After reaching the peak of the contraction or when your hands touch your knees, lower your torso back to the starting position in a controlled manner. Maintain proper form and avoid jerky movements.
Muscles Involved
Primary Muscles: The primary muscle targeted during straight-leg sit-ups is the lower rectus abdominis, which runs along the lower part of the abdomen and is responsible for flexing the spine and bringing the pelvis toward the ribcage.
Secondary Muscles: Straight-leg sit-ups also engage secondary muscles, including the external and internal obliques (which assist in trunk rotation and stabilization), upper rectus abdominis (targeted as you raise your torso), and hip flexors (such as the sartorius, iliopsoas, and rectus femoris).
Anatomic Focus
- Range of Motion: During straight-leg sit-ups, raise your torso off the floor while maintaining a straight spine. Your shoulders should rise about 6 to 12 inches (15-30 cm) off the floor or until your hands touch your knees. Unlike crunches, where the movement occurs in the upper spine, this exercise involves movement at the waist and hips.
- Body Position: Keep your legs fully extended and straight throughout the exercise. Ensure that the backs of your knees and your heels remain in contact with the floor at all times.
- Foot Position: Secure your feet under a roller pad or a comparable support structure. Alternatively, you can have a workout partner hold your ankles to keep your feet in place.
- Hand Position: As you raise your torso, keep your arms straight and let your hands slide along your thighs. Terminate the motion when your hands touch your knees, as this focus point emphasizes the lower abdominal muscles.
- Resistance: To increase the difficulty of the exercise, you can modify your hand position. Placing your hands behind your head or holding a weight plate to your chest adds resistance and intensifies the work on the abdominal muscles.
Variations
Weighted Straight-Leg Sit-Up: Incorporate a weight plate to increase resistance during straight-leg sit-ups. Hold the weight plate against your chest while performing the exercise to challenge your abdominal muscles further.
Incorporate straight-leg sit-ups into your abdominal workout routine to target the lower rectus abdominis and enhance core strength. Focus on maintaining proper form, controlled movements, and a full range of motion to maximize the effectiveness of this exercise. Experiment with hand positions and resistance levels to continuously challenge your core muscles and achieve your fitness goals.
Twisting Sit-Up
The twisting sit-up is a dynamic abdominal exercise that effectively engages the rectus abdominis, external oblique, and internal oblique muscles. This exercise is performed on a decline bench and involves a twisting motion, directing one elbow toward the opposite knee during each repetition. In this article, we will explore the execution, muscles involved, anatomic focus, resistance options, and a variation of the twisting sit-up exercise.
Execution
- Starting Position: Begin by sitting on a decline bench with your feet securely hooked under the pad. Lean back until your torso is at an inclined angle. Position your hands behind your head, with your elbows pointing outward.
- Twisting Motion: As you perform the sit-up, twist your torso to one side, directing your right elbow toward your left knee. Simultaneously, raise your upper body toward your knees. This twisting motion engages the oblique muscles and targets the rectus abdominis.
- Return to Starting Position: After reaching the peak of the contraction on one side, lower your torso back to the starting position. During the next repetition, twist in the opposite direction, directing your left elbow toward your right knee. Continue alternating sides for the desired number of repetitions.
Muscles Involved
Primary Muscles: The primary muscles targeted during twisting sit-ups include the rectus abdominis, which flexes the spine, and the external and internal obliques, responsible for trunk rotation and stabilization.
Secondary Muscles: The secondary muscles involved in this exercise include the serratus anterior (a muscle that helps stabilize the shoulder blades) and hip flexors (such as the sartorius, iliopsoas, and rectus femoris).
Anatomic Focus
- Hand Position: Position your hands behind your head with your elbows pointing outward. This hand placement provides support for your head and neck during the exercise.
- Foot Position: Secure your feet under a roller pad or a comparable support structure to prevent them from lifting off the bench during the exercise.
- Body Position: To reduce stress on the lower back, keep your knees bent as you perform the twisting sit-ups. Maintain a controlled and stable posture throughout the exercise.
- Range of Motion: In the top position of the sit-up, your torso should be vertically upright, with one elbow almost touching the opposite knee. Lower your torso until it is almost parallel to the floor, approximately three-quarters of the way down. Avoid leaning back too far, as this can release tension from the abdominal muscles and place more stress on the lower back.
- Trajectory: Adjust the angle of the bench to control the difficulty of the exercise. A steeper incline makes the exercise more challenging, while a shallower incline is less demanding.
- Resistance: Increase resistance during twisting sit-ups by tilting the bench at a steeper incline. Alternatively, you can hold a small weight plate behind your head to intensify the workout and further engage the abdominal muscles.
Variation
Broomstick Twist: For an alternative oblique exercise, try the broomstick twist. Sit upright on the edge of a flat bench and hold a broomstick or similar object behind your neck. Twist your upper body from side to side, directing your right elbow toward the left side and vice versa. This exercise targets the oblique muscles and helps improve trunk rotation and flexibility.
Incorporate twisting sit-ups into your abdominal workout routine to target the rectus abdominis and oblique muscles effectively. Focus on maintaining proper form, controlled movements, and a full range of motion to maximize the effectiveness of this exercise. Adjust the resistance and bench angle to match your fitness level and continually challenge your core muscles.
Oblique Crunch
The oblique crunch is a targeted abdominal exercise designed to strengthen the external and internal oblique muscles, which are responsible for trunk rotation and core stability. This exercise is performed on your side, focusing on one oblique at a time. In this article, we will explore the execution, muscles involved, anatomic focus, range of motion, and variations of the oblique crunch exercise.
Execution
- Starting Position: Begin by lying on your left side with your knees bent and held together. Position your right hand behind your head, supporting your head without pulling on your neck. Your left arm can be placed out to the side for balance.
- Crunch Motion: Slowly lift your upper body off the floor by contracting the oblique muscles on your right side. As you perform the crunch, focus on directing your right elbow toward your right hip. This movement engages the obliques and targets the right side of your core.
- Return to Starting Position: After reaching the peak of the contraction, lower your torso back down to the floor in a controlled manner. Maintain proper form and avoid rapid or jerky movements.
- Switch Sides: To work the left oblique, simply switch to your right side and repeat the exercise, with your left hand behind your head and your left elbow directed toward your left hip.
Muscles Involved
Primary Muscles: The primary muscles targeted during oblique crunches include the external obliques (responsible for trunk rotation and side bending), internal obliques (which aid in rotation and core stability), and a portion of the rectus abdominis (located along the front of the abdomen).
Secondary Muscles: The serratus anterior, located on the sides of the ribcage, assists in the movement, providing support to the chest and trunk.
Anatomic Focus
- Hand Position: Place your upper-side hand (right hand when lying on your left side and vice versa) behind your head. This hand position is essential for supporting your head without straining your neck. The other hand can rest out to the side or gently touch your knee for balance, but avoid pulling on your neck with your hand.
- Foot Position: Position your feet so that your knees and hips are bent at almost 90 degrees. Keep your legs together during the exercise to maintain stability and focus on the oblique muscles.
- Body Position: Lie on your side to target the right obliques, and then switch to your other side to work the left obliques. It’s crucial to perform this exercise on a cushioned exercise mat placed on the floor for comfort and support.
- Range of Motion: During the crunch, lift your torso approximately 30 to 45 degrees upward from the floor. This range of motion effectively engages the oblique muscles without overexerting the lower back.
Variations
Incline Oblique Crunch: Use an incline abdominal chair or bench to perform oblique crunches at an angle. Secure your feet on the support platform and lean back sideways into the seat, resting on one buttock at a time. Place your uppermost hand behind your head and perform the crunch motion, focusing on one side at a time. This variation adds an element of challenge by introducing an incline.
Machine Oblique Crunch: Perform the oblique crunch exercise while sitting obliquely in the seat of a dedicated crunch machine. This variation works one side of the obliques at a time, providing a controlled and guided motion. It’s a great option for those who prefer machine-based exercises or want to isolate each oblique separately.
Incorporate oblique crunches into your abdominal workout routine to target and strengthen the external and internal oblique muscles effectively. Focus on proper form, controlled movements, and a full range of motion to maximize the benefits of this exercise. Experiment with variations to add variety to your routine and continually challenge your core muscles.
Cable Oblique Crunch
The cable oblique crunch is a highly effective abdominal exercise that primarily targets the external and internal oblique muscles. It’s performed using a cable machine, which provides adjustable resistance to challenge your core muscles. This exercise involves a crunching motion with a twist, helping you develop strong and defined obliques. In this article, we will delve into the execution, muscles involved, anatomic focus, range of motion, resistance options, and variations of the cable oblique crunch.
Execution
- Handle Grip: Begin by grabbing a D-handle attached to the high pulley of a cable machine. You can choose to grasp the handle above or alongside your head, depending on your comfort and equipment setup.
- Crunch Motion: Initiate the exercise by performing a crunching motion, directing your elbow toward the opposite knee. For example, if you’re holding the handle with your right hand, crunch down and bring your right elbow toward your left knee. This twisting motion engages the oblique muscles effectively.
- Return to Starting Position: After reaching the peak of the contraction, slowly return to the starting position in a controlled manner. Maintain proper form throughout the exercise, and avoid using momentum or swinging.
Muscles Involved
Primary Muscles: The cable oblique crunch primarily targets the external obliques and internal obliques, which are responsible for trunk rotation, lateral bending, and core stability.
Secondary Muscles: While the primary focus is on the oblique muscles, this exercise also engages the serratus anterior, a muscle that helps stabilize the scapulae and ribcage. Additionally, a portion of the rectus abdominis is involved in stabilizing the core.
Anatomic Focus
- Hand Position: You can grasp the D-handle above or alongside your head, depending on your preference and the cable machine setup. Ensure a secure grip on the handle throughout the exercise.
- Foot Position: The cable oblique crunch can be performed in various positions, including standing, kneeling, or sitting. Choose the position that is most comfortable and effective for you.
- Body Position: You can face either toward or away from the weight stack, depending on your personal preference. Experiment with both directions to see which one provides better stability and range of motion for your oblique crunch.
- Range of Motion: During the exercise, your torso should move from an upright position to almost parallel to the floor. The crunching motion involves bringing your elbow toward the opposite knee, creating a diagonal contraction in the oblique muscles.
- Resistance: Adjust the resistance level on the cable machine by selecting an appropriate weight stack. Ensure that the resistance is challenging but allows you to maintain proper form and complete the desired number of repetitions.
Variations
Cable Standing Oblique Crunch: Stand sideways to the weight stack and grab the D-handle with your nearside hand. Crunch downward, directing your elbow to the hip on the same side. This variation isolates the obliques on one side at a time and adds variety to your workout.
Rope Oblique Crunch: Instead of using a D-handle, you can perform the cable oblique crunch using a rope attachment. Hold the rope with both hands and perform a crunch with a twist to one side and then the other. This motion resembles the twisting sit-up exercise and effectively targets the oblique muscles.
Incorporate the cable oblique crunch into your abdominal workout routine to strengthen your external and internal oblique muscles. Focus on maintaining proper form, controlled movements, and a full range of motion to maximize the benefits of this exercise. Experiment with different hand positions, foot positions, and variations to continually challenge your core muscles and achieve your fitness goals.
Dumbbell Side Bend
The dumbbell side bend is a simple yet effective exercise for targeting the external oblique muscles, which run along the sides of your abdomen. This exercise helps strengthen and define your obliques, contributing to a more sculpted waistline. In this article, we will explore the execution, muscles involved, anatomic focus, range of motion, and tips for effective performance of the dumbbell side bend.
Execution
- Starting Position: Begin by standing upright with your feet hip-width apart. Hold a dumbbell in your right hand, keeping your arm fully extended down by your side. Place your left hand behind your head, with your elbow pointing outward.
- Bend to the Side: Initiate the exercise by bending your torso to the right side while holding the dumbbell. Lower the dumbbell toward your right knee. This bending motion engages the right external oblique muscles.
- Return to Starting Position: After reaching the peak of the contraction on the right side, straighten your torso back up to the starting position. Contract the left oblique muscles as you return to an upright stance.
- Switch Sides: To target the left external oblique muscles, switch the dumbbell to your left hand and place your right hand behind your head. Perform the same bending motion, this time to the left side.
Muscles Involved
Primary Muscles: The primary muscles targeted during the dumbbell side bend are the external obliques. These muscles are responsible for trunk rotation and lateral bending, helping to create a sculpted and defined waistline.
Secondary Muscles: The exercise also engages the internal obliques, which assist in trunk rotation and core stability. Additionally, the serratus anterior muscles located on the sides of the ribcage are involved in stabilizing the movement.
Anatomic Focus
- Hand Position: Hold a dumbbell at arm’s length by your side in one hand while placing the other hand behind your head. The hand behind your head provides support and stability to your neck and upper back.
- Foot Position: Maintain a stable stance with your feet hip-width apart to ensure balance and support during the exercise.
- Body Position: When you bend to the right side, you primarily work the left external oblique muscles, and vice versa. It’s essential to maintain proper form and focus on isolating the oblique muscles throughout the movement.
- Range of Motion: During the exercise, your torso should bend approximately 45 degrees or until the dumbbell becomes level with your knee. Avoid overextending the range of motion to prevent excessive strain on the lower back.
- Trajectory: Keep your torso moving directly sideways without leaning forward or backward. This ensures that the obliques are the primary muscles being worked.
- Resistance: It’s advisable not to use a heavy dumbbell for this exercise. Overdeveloped oblique muscles can make your waist appear bulky. Choose a weight that allows you to perform controlled repetitions while maintaining proper form.
Tips for Effective Execution
- Maintain a controlled pace during the exercise to avoid jerky or rapid movements.
- Focus on squeezing and contracting the oblique muscles as you bend to the side.
- Breathe naturally throughout the movement, exhaling as you bend and inhaling as you return to the starting position.
- Perform an equal number of repetitions on each side to maintain balanced development of the oblique muscles.
Incorporate the dumbbell side bend into your abdominal and oblique workout routine to target and strengthen the external oblique muscles. Proper form and controlled movements are key to maximizing the effectiveness of this exercise and achieving a well-defined waistline.
Cable Side Bend
The cable side bend is a targeted oblique exercise that effectively strengthens and sculpts the external and internal oblique muscles. By using a cable machine, you can adjust the resistance to challenge your core muscles while performing lateral bending movements. This exercise helps create a more defined waistline and enhances overall core stability. In this article, we will delve into the execution, muscles involved, anatomic focus, range of motion, and resistance options for the cable side bend.
Execution
- Handle Grip: Begin by standing upright with your feet slightly wider than hip-width apart. Hold a D-handle attached to the low pulley of a cable machine in your left hand. Ensure that your arm is fully extended down by your side.
- Hand Placement: Place your right hand behind your head, with your elbow pointing outward. This hand position provides support to your neck and upper back during the exercise.
- Bend to the Side: Initiate the exercise by bending your torso to the right side, contracting your right oblique muscles. As you perform this lateral bending motion, lower the D-handle toward your right knee. This movement targets the right obliques.
- Return to Starting Position: After reaching the peak of the contraction on the right side, straighten your torso back up to the starting position in a controlled manner. During this phase, contract the left oblique muscles as you return to an upright stance.
- Switch Sides: To target the left oblique muscles, switch the D-handle to your right hand and place your left hand behind your head. Perform the same lateral bending motion, this time to the left side.
Muscles Involved
Primary Muscles: The primary muscles targeted during the cable side bend are the external obliques, which are responsible for trunk rotation and lateral bending. This exercise helps create definition along the sides of your waist.
Secondary Muscles: The internal obliques are also engaged during this exercise, assisting in trunk rotation and core stability. Additionally, the serratus anterior muscles, located on the sides of the ribcage, contribute to the stabilization of the movement.
Anatomic Focus
- Hand Position: Hold the D-handle attached to the low pulley at arm’s length in one hand while placing your other hand behind your head. This hand positioning ensures proper form and support during the exercise.
- Foot Position: Stand with your feet slightly wider than your hips to provide a stable base of support. Your legs and arms should resemble a four-pointed star when viewed from above.
- Body Position: Stand a sufficient distance away from the pulley so that the arm holding the weight remains outstretched. When you hold the weight in your right hand, you work the left oblique muscles, and vice versa.
- Range of Motion: During the exercise, your torso should bend sideways back and forth through approximately 60 degrees or between the 10 and 2 o’clock positions when looking in a mirror. You may choose to bend toward the weight stack to stretch the oblique before contracting the muscle in the opposite direction.
- Trajectory: Keep your torso moving directly sideways without leaning forward or backward. This ensures that the oblique muscles are the primary focus of the exercise.
- Resistance: The cable machine allows you to adjust the resistance on the weight stack according to your ability and fitness level. Use caution with heavier weights, as excessive development of the oblique muscles can create a bulky appearance in the waistline.
Tips for Effective Execution
- Maintain a controlled and deliberate pace throughout the exercise.
- Focus on contracting the oblique muscles during the bending phase and engaging them fully during the return to the starting position.
- Breathe naturally throughout the movement, exhaling as you bend and inhaling as you return to an upright stance.
- Perform an equal number of repetitions on each side to ensure balanced development of the oblique muscles.
Incorporate the cable side bend into your core and oblique workout routine to strengthen and define your waistline effectively. Proper form, controlled movements, and a balanced approach to resistance will help you maximize the benefits of this exercise and achieve your fitness goals.