
Barbell Shrug:
The Barbell Shrug is a classic exercise designed to target the upper and middle fibers of the trapezius muscles, helping you build impressive trapezius development. This comprehensive guide will provide you with detailed instructions on how to perform the Barbell Shrug, its anatomical focus, variations, and tips to maximize its effectiveness in your shoulder and upper back training routine.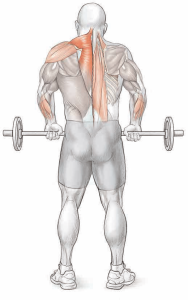 Execution:
- Barbell Setup: Begin by holding a barbell at arms’ length in front of your thighs using an overhand grip, with your hands spaced at shoulder width.
- Initiate the Shrug: Keep your arms stiff and slowly shrug your shoulders as high as possible, pulling the barbell vertically upward toward your chin. Focus on lifting your shoulders toward your ears.
- Full Contraction: At the top of the movement, pause for a brief moment to achieve a full contraction in your trapezius muscles. Squeeze your trapezius muscles tightly.
- Lower the Bar: Lower the barbell slowly back down to the starting position, allowing your trapezius muscles to stretch fully. Maintain control throughout the descent.
Muscles Involved:
- Primary: Upper and middle trapezius
- Secondary: Levator scapulae, deltoid, erector spinae (iliocostalis, longissimus, spinalis), forearms (wrist flexors, finger flexors)
Anatomic Focus:
- Hand Spacing: The placement of your hands on the barbell can influence the emphasis of the exercise. A shoulder-width or narrower grip predominantly targets the trapezius, while a wider grip also engages the deltoid muscles.
- Trajectory: Lift the barbell straight up and down in a vertical path. Avoid rolling or rotating the shoulders during the exercise to ensure proper muscle engagement.
- Body Position: Your body position can affect which part of the trapezius is primarily targeted. Standing vertically upright hits the trapezius centrally. Tilting your torso slightly back at the waist places more emphasis on the upper trapezius in the neck, while leaning slightly forward targets the midsection of the trapezius behind the shoulders.
- Range of Motion: The higher you raise the barbell during the shrug, the more intense the work on the trapezius muscles. Strive for a complete and controlled range of motion.
Variations:
- Rear Shrug: Perform the exercise with the barbell positioned behind your hips. This variation causes scapular retraction, pulling the shoulders backward and emphasizing the middle fibers of the trapezius.
- Machine Shrug: Utilize a specialized shrug machine that offers the option of a pronated (thumbs pointing in) or neutral (thumbs pointing forward) grip. A neutral grip emphasizes the upper trapezius in the neck, while a pronated grip targets the middle trapezius in the back.
Tips for Maximizing Effectiveness:
- Focus on achieving full and controlled contractions at the top of the movement. Squeeze your trapezius muscles for a brief moment before lowering the barbell.
- Maintain a controlled tempo throughout the exercise. Avoid using momentum to lift the weight.
- Gradually increase the resistance over time to promote trapezius muscle growth. Start with a weight that allows you to complete your desired repetitions with proper form.
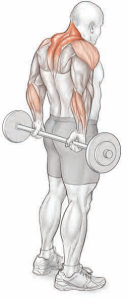
Dumbbell Shrug:
The Dumbbell Shrug is a fundamental exercise designed to target the upper and middle trapezius muscles, assisting in the development of a robust upper back and neck region. This comprehensive guide provides detailed instructions on how to perform the Dumbbell Shrug, its anatomical focus, variations, and tips to maximize its effectiveness in your shoulder and upper back training routine.
Execution:
- Dumbbell Setup: Begin by standing upright with a dumbbell in each hand, allowing your arms to hang naturally at your sides.
- Initiate the Shrug: Maintain straight arms and, without bending them, shrug your shoulders upward as high as possible. Focus on lifting your shoulders toward your ears.
- Full Contraction: At the top of the movement, hold for a brief moment to achieve a full contraction in your trapezius muscles. Squeeze your trapezius muscles firmly.
- Lower the Dumbbells: Lower the dumbbells slowly back down to the starting position, allowing your trapezius muscles to stretch fully. Maintain control during the descent.
Muscles Involved:
- Primary: Upper and middle trapezius
- Secondary: Levator scapulae, deltoid, erector spinae (iliocostalis, longissimus, spinalis), forearms (wrist flexors, finger flexors)
Anatomic Focus:
- Grip: The positioning of your hands and grip on the dumbbells can influence the muscle engagement. A neutral grip (thumbs pointing forward) primarily targets the upper trapezius in the neck, while a pronated grip (thumbs pointing in) directs the effort towards the middle trapezius in the back.
- Body Position: The angle of your torso and body position play a role in targeting specific areas of the trapezius. Tilting your torso slightly back at the waist places greater emphasis on the upper trapezius, whereas leaning slightly forward shifts the focus lower on the neck. Performing the shrug while standing vertically upright effectively engages both the upper and middle sections of the trapezius.
- Range of Motion: Raising the dumbbells as high as possible increases the intensity of the exercise by challenging the trapezius muscles further. Lowering the dumbbells farther down during the descent creates a deeper stretch at the bottom of the movement.
Variation:
- Retracting Shrug: For this variation, hold the dumbbells in front of your body using a pronated grip. During the shrug, perform two motions: first, lift the dumbbells upward (scapular elevation), which primarily targets the upper trapezius, and then retract your shoulder blades, pulling the dumbbells backward (scapular retraction), which engages the middle trapezius.
Tips for Maximizing Effectiveness:
- Concentrate on achieving full and controlled contractions at the peak of the movement. Squeeze your trapezius muscles firmly before lowering the dumbbells.
- Maintain a controlled tempo throughout the exercise. Avoid using momentum to lift the weights, ensuring that the trapezius muscles do the work.
- Gradually increase the weight as you progress to stimulate trapezius muscle growth. Begin with a weight that allows you to complete your desired repetitions with proper form.
Barbell Upright Row:
The Barbell Upright Row is a potent exercise designed to target the trapezius and deltoid muscles, fostering the development of a robust upper body. In this comprehensive guide, you’ll find detailed instructions on executing the Barbell Upright Row, its anatomical focus, variations, and tips to maximize its effectiveness in your shoulder and upper back training routine.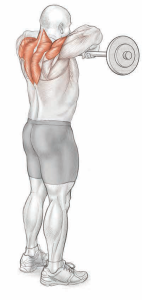 Execution:
- Barbell Setup: Begin by holding a barbell at arm’s length in front of your thighs, adopting an overhand grip that is shoulder-width apart.
- Initiate the Upright Row: Pull the barbell vertically upward until it reaches your chin. During this motion, focus on raising your elbows as high as possible while keeping the barbell close to your body.
- Full Contraction: At the peak of the movement, hold for a brief moment to achieve a full contraction in your trapezius and deltoid muscles. Ensure your elbows are elevated as high as comfortably possible.
- Lower the Barbell: Gradually lower the barbell back down to the starting position, maintaining control throughout the descent.
Muscles Involved:
- Primary: Trapezius, deltoid
- Secondary: Levator scapulae, erector spinae (iliocostalis, longissimus, spinalis), forearms (wrist extensors, finger extensors)
Anatomic Focus:
- Hand Spacing: The positioning of your hands and grip width on the barbell plays a significant role in targeting specific muscle groups. A shoulder-width grip or narrower predominantly emphasizes the trapezius muscles, while a wider grip also engages the deltoids.
- Body Position: Your body’s angle and position impact the areas of the trapezius targeted. Maintaining an upright standing position primarily engages the central portion of the trapezius. Slightly tilting your torso back at the waist intensifies the focus on the upper trapezius, while leaning slightly forward directs the effort lower down the neck region.
- Trajectory: For optimum emphasis on the trapezius rather than the deltoid, it’s crucial to raise the barbell close to your body throughout the exercise. This minimizes deltoid involvement and maximizes trapezius engagement.
- Range of Motion: The height to which you raise the barbell significantly impacts the level of work your trapezius muscles undergo. However, it’s essential to be cautious as raising the barbell too high can increase the risk of shoulder impingement pain. Strive for a range of motion that maximizes trapezius engagement while ensuring your comfort and safety.
Tips for Maximizing Effectiveness:
- Focus on achieving complete and controlled contractions at the peak of the movement. Elevate your elbows as high as possible to target the trapezius and deltoid muscles effectively.
- Maintain a steady tempo and avoid using momentum to lift the barbell. Concentrate on the muscle contraction, not the speed of execution.
- Gradually increase the weight as you progress to promote muscle growth. Start with a weight that allows you to complete your desired repetitions with proper form.
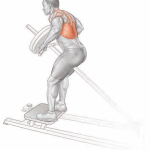
Machine Upright Row:
The Machine Upright Row is a powerful exercise designed to enhance the strength and definition of your trapezius and deltoid muscles. In this comprehensive guide, we will provide detailed instructions on how to perform the Machine Upright Row, the primary muscles involved, anatomical focus, and variations to diversify your upper body workout routine.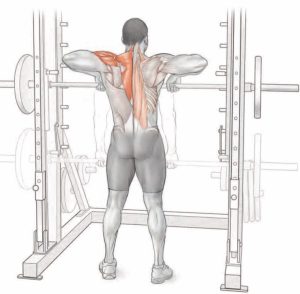
Execution:
- Smith Machine Setup: To begin, use a Smith machine and hold the bar at arm’s length using an overhand grip. Ensure that your grip is shoulder-width apart.
- Lift the Barbell: Initiate the movement by pulling the barbell vertically upward until it reaches your chin. During this phase, elevate your elbows as high as possible while maintaining control and balance.
- Full Contraction: At the peak of the movement, pause momentarily to achieve a full contraction in your trapezius and deltoid muscles. Focus on lifting your elbows as high as comfort allows.
- Lower the Barbell: Slowly and with control, lower the barbell back down to the starting position, completing the repetition.
Muscles Involved:
- Primary: Trapezius, posterior deltoid
- Secondary: Levator scapulae, erector spinae (iliocostalis, longissimus, spinalis), supraspinatus, forearms (wrist extensors, finger extensors)
Anatomic Focus:
- Resistance: The use of a Smith machine in this exercise provides a single plane of vertical motion, allowing you to precisely target your trapezius and deltoid muscles.
- Hand Spacing: The positioning of your hands on the barbell influences the muscles engaged. A shoulder-width grip or narrower primarily emphasizes the trapezius muscles, while a wider grip also engages the deltoids.
- Body Position: Your body’s position and angle during the exercise impact which areas of the trapezius are targeted. Maintaining an upright standing position primarily engages the central portion of the trapezius. Slightly tilting your torso back at the waist intensifies the focus on the upper trapezius, while leaning slightly forward shifts the effort lower down the neck.
- Range of Motion: The height to which you raise the barbell significantly affects the work your trapezius muscles undergo. However, be cautious about raising the barbell too high, as it can increase the risk of shoulder impingement pain. Strive for a range of motion that maximizes trapezius engagement while ensuring your comfort and safety.
Variations:
- Cable Upright Row: Another variation involves performing this exercise using a straight bar attached to the low pulley of a cable machine. This variation offers an alternative way to target your trapezius and deltoids.
Tips for Maximizing Effectiveness:
- Focus on achieving complete and controlled contractions at the peak of the movement. Lift your elbows as high as comfort allows to target the trapezius and deltoid muscles effectively.
- Maintain a steady tempo and avoid using momentum to lift the barbell. Concentrate on the muscle contraction, not the speed of execution.
- Gradually increase the weight as you progress to promote muscle growth. Start with a weight that allows you to complete your desired repetitions with proper form.
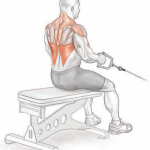
Cable Seated Row:
The Cable Seated Row is a highly effective exercise for building a strong and well-defined back. By targeting the middle and lower trapezius, latissimus dorsi, rhomboid muscles, and posterior deltoids, this exercise contributes significantly to overall upper body strength and stability. In this comprehensive guide, we will provide detailed instructions on how to perform the Cable Seated Row, the primary muscles involved, anatomical focus, and variations to diversify your back workout routine.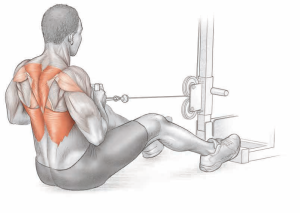
Execution:
- Machine Setup: Begin by sitting at a cable machine equipped with a low pulley. Ensure that the cable handles are attached to the low pulley, and grasp them using a neutral (thumbs-up) grip. Your arms should be fully extended in front of your body.
- Pull Towards Chest: Initiate the movement by pulling the cable handles toward your chest. Keep your spine straight, shoulders back, and chest up. Focus on contracting your back muscles throughout the motion.
- Full Contraction: At the peak of the movement, pause briefly to achieve a full contraction in your middle and lower trapezius, latissimus dorsi, rhomboid muscles, and posterior deltoids. Squeeze your shoulder blades together to maximize the muscle engagement.
- Return to Starting Position: Slowly and with control, extend your arms and return the handles to the starting position, completing the repetition.
Muscles Involved:
- Primary: Middle and lower trapezius, latissimus dorsi
- Secondary: Rhomboid major, rhomboid minor, posterior deltoid
Anatomic Focus:
- Hand Spacing: The spacing of your hands on the cable handles influences the specific areas of your back muscles engaged. Spacing your hands farther apart targets the outer trapezius, while bringing your hands closer together focuses on the inner portion of the trapezius.
- Grip: The choice of grip can also alter the muscle emphasis. A pronated (overhand) grip tends to target the upper and middle trapezius, while a neutral grip (thumbs up) primarily hits the middle and lower trapezius. If you opt for a supinated (underhand) grip, the focus shifts to the latissimus dorsi.
- Trajectory: The path along which you pull the handles plays a crucial role in targeting specific muscle groups. Pulling the handles through a high trajectory toward your chest effectively engages the trapezius, whereas a low trajectory toward the abdomen primarily targets the latissimus dorsi.
- Body Position: It’s essential to maintain proper form throughout the exercise. Keep your back straight, and ensure your torso remains upright without excessive leaning forward or backward.
- Range of Motion: Maximize the range of motion by pulling your elbows up and back as far as possible during the exercise. This action effectively activates the targeted muscles and contributes to their development.
Variations:
- Wide Grip vs. Close Grip: Alter your hand spacing on the handles to focus on different portions of your back muscles. A wide grip emphasizes the outer trapezius, while a close grip intensifies the engagement of the inner trapezius.
- Handle Types: Experiment with different handle attachments, such as V-bars or straight bars, to diversify your training and target specific areas of your back.
Tips for Maximizing Effectiveness:
- Concentrate on proper form and controlled movements. Avoid using momentum to pull the handles, as this can reduce the effectiveness of the exercise and increase the risk of injury.
- Gradually increase the weight resistance as you progress to promote muscle growth and strength development.
- Remember to breathe throughout the exercise. Inhale during the eccentric (lengthening) phase and exhale during the concentric (contracting) phase.
Wide-Grip Pull-Down:
The Wide-Grip Pull-Down is a staple exercise in any back training regimen, specifically targeting the outer section of the latissimus dorsi, often referred to as the “wings” of the back. This exercise helps create a broader and more V-shaped appearance by developing width across the upper and mid-back. In this comprehensive guide, we will provide detailed instructions on how to perform the Wide-Grip Pull-Down, the primary and secondary muscles involved, anatomic focus, and variations to optimize your back workout.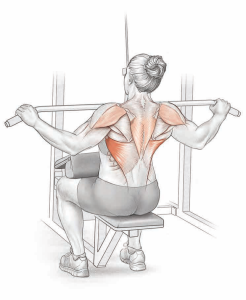
Execution:
- Grab the High Bar: Begin by taking an overhand grip on the high bar with your hands approximately 6 inches (15 cm) wider than shoulder-width apart.
- Pull to Upper Chest: Pull the bar down toward your upper chest while focusing on squeezing the latissimus dorsi. Maintain control throughout the movement.
- Return to Starting Position: Slowly and in a controlled manner, release the tension on the bar and return it to the overhead starting position.
Muscles Involved:
- Primary: Outer section of the latissimus dorsi
- Secondary: Posterior deltoid, lower trapezius, rhomboid major, rhomboid minor
Anatomic Focus:
- Hand Spacing: The positioning of your hands on the bar significantly influences the targeted muscle group. Wider hand spacing emphasizes the outermost section of the latissimus dorsi, contributing to a wider back appearance.
- Grip: Opt for an overhand (pronated) grip when performing this exercise. For a more effective contraction in the latissimus dorsi, grasp the angled section at the outer edges of the handlebar.
- Trajectory: Your choice of torso position impacts the trajectory of the exercise. When your torso is upright, pulling the bar vertically downward through shoulder adduction emphasizes the outer latissimus. Leaning your torso back approximately 30 degrees from vertical creates a trajectory that utilizes shoulder extension, placing emphasis on the inner lower latissimus.
- Range of Motion: To maximize the range of motion, focus on stretching the latissimus dorsi at the top position by fully extending your arms and then squeezing the latissimus dorsi at the bottom of the movement. Pull your elbows down and back as far as possible to achieve this contraction.
Variations:
- Handlebar Pull-Down: Utilizing the angled ends of a wide-grip pull-down bar provides several advantages. It offers an improved trajectory, reduces stress on the wrist joint, and allows for a few extra inches of motion before the bar touches the chest.
- Behind-the-Neck Pull-Down: Although less favorable and potentially risky, some individuals perform the Wide-Grip Pull-Down by pulling the bar behind the neck. This variation requires caution, as it can increase the risk of shoulder joint injury.
Tips for Maximizing Effectiveness:
- Maintain proper form and avoid using momentum to execute the movement. Focus on controlled repetitions to target the intended muscle group effectively.
- Gradually increase the weight resistance as your strength progresses, but always prioritize form and control.
- Breathe consistently throughout the exercise. Inhale during the eccentric (lengthening) phase and exhale during the concentric (contracting) phase.
Close-Grip Pull-Down:
The Close-Grip Pull-Down is an essential exercise in any back workout routine, focusing primarily on the inner section of the latissimus dorsi. This exercise is designed to build thickness and depth in the middle back, helping to create a well-rounded and impressive back profile. In this comprehensive guide, we’ll provide detailed instructions on how to perform the Close-Grip Pull-Down, discuss the primary and secondary muscles involved, explore anatomic focus points, and present variations to optimize your back training. Execution:
- Underhand Grip: Begin by taking an underhand (reverse) grip on the high straight bar, with your hands spaced approximately 6 to 12 inches (15-30 cm) apart.
- Pull to Upper Chest: Pull the bar down toward your upper chest, concentrating on squeezing the inner section of the latissimus dorsi. Maintain control throughout the movement.
- Return to Starting Position: Slowly and deliberately release the tension on the bar, returning it to the overhead starting position.
Muscles Involved:
- Primary: Inner section of the latissimus dorsi
- Secondary: Lower trapezius, rhomboid major, rhomboid minor, posterior deltoid, biceps brachii
Anatomic Focus:
- Hand Spacing: The width of your hand spacing significantly influences which part of the latissimus dorsi is targeted. Narrower hand spacing emphasizes the innermost section of the latissimus dorsi, promoting thickness and depth in the middle back.
- Grip: In this exercise, shoulder extension is employed rather than shoulder adduction. As you pull the bar down and backward, it specifically targets the inner lower sections of the latissimus dorsi.
- Trajectory: To isolate and work the latissimus dorsi effectively, lean your torso back approximately 30 degrees from vertical. However, avoid excessive leaning or using momentum to pull the weight down.
- Range of Motion: Make the most of your range of motion by fully stretching the latissimus dorsi at the top position and then squeezing it at the bottom of the movement. Focus on pulling your elbows down and back as far as possible to achieve this contraction.
Variations:
- Handlebar Variation: Implementing handlebar attachments provides versatility in your grip. A neutral grip (palms facing each other) offers a midway point between a pronated (overhand) grip and a supinated (underhand) grip. While an overhand grip targets the outer latissimus dorsi and an underhand grip isolates the inner latissimus dorsi, a neutral grip effectively engages the muscle centrally.
Tips for Maximum Effectiveness:
- Maintain proper form throughout the exercise, avoiding any use of momentum. Focus on executing controlled repetitions to effectively target the intended muscle group.
- Gradually increase the weight resistance as you progress in strength, but always prioritize control and technique.
- Consistent breathing is essential. Inhale during the eccentric (lengthening) phase and exhale during the concentric (contracting) phase.
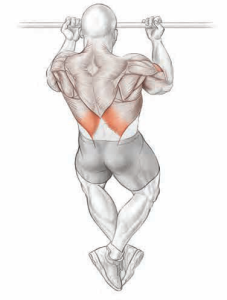
Wide-Grip Pull-Up:
The Wide-Grip Pull-Up is a classic and highly effective exercise for building width in the latissimus dorsi, commonly referred to as the “lats.” This compound movement, which utilizes your body weight as resistance, is renowned for sculpting a broad and powerful back. In this comprehensive guide, we will provide detailed instructions on how to perform the Wide-Grip Pull-Up, discuss the primary and secondary muscles involved, explore anatomic focus points, and present variations to optimize your back training.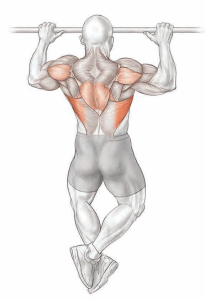
Execution:
- Overhand Grip: Begin by taking an overhand grip on the pull-up bar, with your hands spaced approximately 6 inches (15 cm) wider than shoulder width apart. Hang freely with your arms extended.
- Pull-Up Motion: Initiate the pull-up by pulling your torso upward until your chin touches the bar. Maintain control throughout the entire movement.
- Lowering Phase: Lower your torso slowly and steadily back down to the starting position. Avoid sudden drops or jerky movements.
Muscles Involved:
- Primary: Outer section of the latissimus dorsi (lats)
- Secondary: Posterior deltoid, lower trapezius, rhomboid major, rhomboid minor
Anatomic Focus:
- Resistance: Pull-ups rely on your body weight as resistance, which cannot be easily adjusted. However, for those seeking to increase the challenge, weighted belts can be used to add resistance.
- Hand Spacing: The width of your hand spacing significantly influences which part of the latissimus dorsi is targeted. Wider hand spacing places greater emphasis on the outermost section of the lats, creating width across the back.
- Grip: An overhand (pronated) grip is typically employed for this exercise. It encourages shoulder adduction, primarily working the outer latissimus dorsi. An underhand (supinated) grip can be used during a close-grip pull-up and emphasizes the inner lower section of the lats. A neutral grip is also an option with certain equipment (see variations).
- Trajectory: Because the torso remains vertical during the movement, wide-grip pull-ups primarily use shoulder adduction, targeting the outer lats.
- Range of Motion: Maximize your range of motion by fully stretching the latissimus dorsi at the bottom position and squeezing the lats at the top of the movement. Focus on pulling your elbows down and back to achieve this contraction.
- Body Position: To minimize body swing during the exercise, consider crossing one foot over the other and slightly bending the knees.
Variations:
- Close-Grip Pull-Up: Using an underhand (supinated) grip facilitates a closer hand spacing, emphasizing shoulder extension rather than adduction. This narrows the focus to target the inner lower section of the latissimus dorsi. The added contribution from the biceps brachii provides extra strength.
- Handlebar Pull-Up: Some equipment offers a handlebar attachment, allowing a neutral grip with palms facing each other. This grip position sits between a pronated (overhand) grip and a supinated (underhand) grip. While a wide overhand grip targets the outer lats and a close underhand grip isolates the inner lats, a neutral grip centrally activates the muscle.
- Behind-the-Neck Pull-Up: Pulling up with the back of your neck touching the bar is a less recommended trajectory, as it may cause shoulder joint irritation. Exercise caution if attempting this variation.
Tips for Maximum Effectiveness:
- Prioritize proper form throughout the exercise. Avoid using momentum or excessive swinging to complete repetitions.
- As your strength improves, consider increasing resistance using a weighted belt for added challenge.
- Maintain consistent breathing. Inhale during the eccentric (lengthening) phase and exhale during the concentric (contracting) phase.
Barbell Row:
The Barbell Row is a fundamental compound exercise renowned for its effectiveness in building a strong, V-shaped back. This exercise primarily targets the latissimus dorsi, often referred to as the “lats,” which are responsible for much of your back’s width and thickness. In this comprehensive guide, we will provide detailed instructions on how to perform the Barbell Row, discuss the primary and secondary muscles involved, explore anatomic focus points, and present variations to optimize your back training.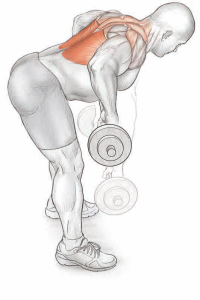
Execution:
- Grip and Stance: Begin by taking an overhand shoulder-width grip on the barbell with your arms fully extended. Position your feet shoulder-width apart and maintain a slight bend in your knees.
- Torso Position: Bend your torso forward approximately 45 degrees to the floor while keeping your spine straight. This forward lean is essential for proper execution.
- Pulling Motion: Initiate the exercise by pulling the barbell vertically upward, aiming to touch your lower chest. Maintain control throughout the entire movement.
- Lowering Phase: Lower the barbell back down to the starting position, allowing your arms to fully extend.
Muscles Involved:
- Primary: Latissimus dorsi (lats)
- Secondary: Erector spinae (iliocostalis, longissimus, spinalis), trapezius, rhomboid major, rhomboid minor, posterior deltoid
Anatomic Focus:
- Hand Spacing: The width of your hand spacing significantly influences which part of the latissimus dorsi is targeted. A shoulder-width or closer grip targets the central inner section of the latissimus dorsi, while a wider grip emphasizes the outer lats.
- Grip: An underhand (supinated) grip on the bar allows for a closer hand spacing and places more emphasis on shoulder extension. This targets the central inner section of the latissimus dorsi. The use of an underhand grip also recruits the biceps brachii, providing added strength during the row.
- Trajectory: The trajectory of the barbell can be adjusted to target different portions of the latissimus dorsi. Pulling the bar up higher toward the chest targets the upper latissimus dorsi and trapezius, while pulling the bar through a lower trajectory to touch the abdomen targets the lower latissimus dorsi.
- Body Position: Maintaining a straight spine is crucial throughout the exercise. Avoid rounding the lower back, as this can lead to injury.
Variation:
- T-Bar Row: This variation is an effective alternative to the traditional Barbell Row. It requires less effort to stabilize body position during the movement because one end of the bar pivots at a fixed point on the floor. Stand facing the loaded end of the T-bar with feet positioned on either side of the bar. With a straight spine and slightly bent knees, lift the loaded end using the T-bar attachment. Some row apparatuses provide an inclined chest pad that supports the torso and minimizes load on the lower spine.
Tips for Maximum Effectiveness:
- Ensure that your torso maintains the 45-degree forward lean to engage the lats effectively.
- Focus on pulling the barbell with your back muscles rather than relying on momentum.
- Use proper breathing techniques, inhaling during the eccentric (lengthening) phase and exhaling during the concentric (contracting) phase.
Dumbbell Row:
The Dumbbell Row is an essential strength training exercise that targets the latissimus dorsi, commonly referred to as the “lats.” It’s a versatile compound movement that can help you develop a strong, well-defined back. In this comprehensive guide, we’ll provide detailed instructions on how to perform the Dumbbell Row, delve into the primary and secondary muscles involved, explore anatomic focus points, and present a variation to optimize your back training. Execution:
- Starting Position: Begin by grasping a dumbbell in one hand with your palm facing inward. Support your opposite hand and knee on a bench, ensuring your spine remains straight and just above parallel to the floor.
- Lifting Phase: Pull the dumbbell vertically upward alongside your torso. Focus on raising your elbow as high as possible while maintaining control over the movement.
- Lowering Phase: Gradually lower the dumbbell back down to the starting position, allowing your arm to extend fully.
Muscles Involved:
- Primary: Latissimus dorsi (lats)
- Secondary: Trapezius, rhomboid major, rhomboid minor, posterior deltoid, erector spinae (iliocostalis, longissimus, spinalis), biceps brachii
Anatomic Focus:
- Grip: Employ a neutral grip with the dumbbell parallel to your torso for optimal results. Attempting a pronated (palms-down) or supinated (palms-up) grip may cause the dumbbell to jam against your torso.
- Trajectory: Adjust the trajectory of the dumbbell to target different parts of the latissimus dorsi. Pulling the dumbbell toward the chest emphasizes the upper latissimus dorsi and lower trapezius. Raising the dumbbell through a lower trajectory, toward the abdomen, targets the lower latissimus dorsi.
- Range of Motion: Maximize your range of motion by fully stretching the latissimus dorsi at the bottom of the movement and raising your elbow as high as possible at the top. This ensures that you’re engaging the latissimus dorsi effectively.
- Body Position: Supporting your torso on the bench minimizes stress on the spine, allowing you to concentrate on working the targeted muscles.
Variation:
- One-Arm Cable Seated Row: In this variation, you’ll use a low pulley cable machine. Grab the handle with one hand, using a neutral (thumb-up) grip. Pull the handle high toward your chest while keeping your spine straight. Return the handle to the starting position with your arm fully extended. Rowing one arm at a time enables you to pull the elbow back farther, maximizing muscle contraction in the latissimus dorsi.
Tips for Maximum Effectiveness:
- Maintain a neutral spine throughout the exercise to protect your lower back.
- Focus on a controlled, deliberate motion rather than using momentum.
- Breathe correctly, inhaling during the eccentric (lengthening) phase and exhaling during the concentric (contracting) phase.
Machine Row:
The Machine Row is a highly effective strength training exercise for developing a strong and well-defined back. It provides a controlled and isolated environment, making it an excellent choice for both beginners and advanced lifters. In this comprehensive guide, we’ll offer detailed instructions on how to perform the Machine Row, delve into the primary and secondary muscles engaged, explore anatomic focus points, and provide tips for optimizing your back training.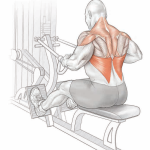 Execution:
- Starting Position: Begin by gripping the handles of the machine with your arms fully extended in front of your body. If the machine features a chest pad, position your torso against it for added support.
- Lifting Phase: Pull the handles toward your upper abdomen, focusing on maintaining a straight spine throughout the movement.
- Lowering Phase: Slowly return the weight to the starting position, allowing your arms to fully extend.
Muscles Involved:
- Primary: Latissimus dorsi (lats)
- Secondary: Trapezius, rhomboid major, rhomboid minor, posterior deltoid
Anatomic Focus:
- Hand Spacing: Adjusting your hand spacing on the machine can emphasize different portions of the latissimus dorsi. A wider grip targets the outer latissimus dorsi, while a narrower grip isolates the inner latissimus dorsi.
- Grip: The grip you choose influences which part of the back is primarily engaged. A pronated (overhand) grip tends to target the upper and outer latissimus dorsi. Opting for a neutral (thumbs up) grip focuses on the central section of the back, and a supinated (underhand) grip directs the effort toward the lower latissimus dorsi. As you transition from pronation to neutral to supination, your elbows move progressively closer to the sides of your body.
- Trajectory: The trajectory of the handles can be adjusted to target specific areas of the back. Pulling the handles through a high trajectory toward the chest engages the upper latissimus dorsi and trapezius. Conversely, a lower trajectory toward the abdomen targets the lower latissimus dorsi. Alter the seat height to change the trajectory: raising the seat creates a lower trajectory, while lowering it provides a higher trajectory.
- Range of Motion: To maximize the effectiveness of the exercise, focus on pulling your elbows back as far as possible and squeezing your shoulder blades together. This motion enhances muscle contraction in the targeted areas.
- Body Position: Utilizing a chest pad, if available on the machine, reduces the load on your spine and provides support to your torso. This feature ensures a safer and more controlled execution of the exercise.
Tips for Maximum Effectiveness:
- Maintain a controlled tempo throughout the movement, avoiding the use of momentum.
- Pay attention to your breathing. Inhale during the eccentric (lengthening) phase and exhale during the concentric (contracting) phase.
- Gradually increase the weight as you become more comfortable with the exercise to continue challenging your back muscles.
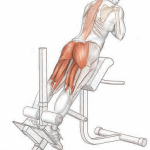
Lumbar Extension:
The Lumbar Extension exercise is a vital component of any well-rounded fitness routine, particularly for those aiming to strengthen and stabilize their lower back. In this comprehensive guide, we will provide you with detailed instructions on how to perform the Lumbar Extension exercise correctly. We will also explore the primary and secondary muscles involved, highlight key anatomic focus points, and discuss variations to customize your workout.
Execution:
- Starting Position: Begin by lying facedown on the lumbar extension bench, with your hips well-supported by the bench and your ankles securely fastened under the pads.
- Body Position: Your torso should start in a hanging position, bent at approximately 90 degrees at the waist.
- Lifting Phase: Engage your lower back muscles (erector spinae) to lift your upper body until your torso is just above parallel to the floor.
Muscles Involved:
- Primary: Erector spinae (iliocostalis, longissimus, spinalis) – These muscles play a crucial role in stabilizing and straightening the spine.
- Secondary: Latissimus dorsi, gluteus maximus, hamstrings (semitendinosus, semimembranosus, biceps femoris) – These muscles contribute to hip extension and support your lower back during the exercise.
Anatomic Focus:
- Hand Position: You have options for hand placement during the Lumbar Extension exercise. You can interlock your hands behind your lower back or fold your arms across your chest. Choose a position that feels comfortable and maintains proper form.
- Resistance: To increase the challenge of this exercise, you can hold a weight plate against the front of your chest. Gradually increase the weight as your strength improves.
- Trajectory: The Lumbar Extension exercise involves a controlled motion through an arc of approximately 90 degrees. Avoid hyperextending your spine, as this can lead to injury. Focus on using your erector spinae muscles to stabilize and straighten the spine while engaging the gluteus maximus and hamstrings for hip extension.
Tips for Maximum Effectiveness:
- Maintain a controlled tempo throughout the movement, avoiding jerky or sudden motions.
- Concentrate on proper form and range of motion to avoid any unnecessary stress on your lower back.
- Breathe steadily and exhale as you lift your upper body.
Variations:
- Incline Lumbar Extension: If you find the traditional Lumbar Extension too challenging, you can perform this exercise at an incline. In this variation, your hips are supported higher, and your ankles are closer to the floor. While this makes the exercise somewhat easier, it shifts the focus more towards the buttocks and hamstrings.
- Machine Lumbar Extension: Some fitness facilities offer a specialized machine for Lumbar Extensions. These machines provide variable resistance and support for the exercise. When using this equipment, be sure to maintain proper form and avoid excessive spinal flexion or extension to prevent injury.
Incorporating the Lumbar Extension exercise into your workout routine can significantly improve the strength and stability of your lower back. It’s particularly valuable for individuals seeking to prevent or rehabilitate lower back issues. Always perform this exercise with a focus on safety, proper form, and gradual progression in weight or difficulty to achieve the best results while minimizing the risk of injury.
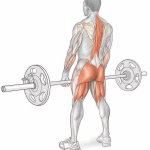
Deadlift:
The Deadlift is a fundamental compound exercise that targets a wide range of muscles, making it a staple in strength training and powerlifting programs. In this comprehensive guide, we will provide you with detailed instructions on how to perform the Deadlift correctly, explore the primary and secondary muscles involved, highlight key anatomic focus points, and discuss variations to help you maximize your strength gains.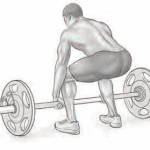
Execution:
- Starting Position: Begin by taking a shoulder-width overhand grip on the barbell with your arms fully extended. Squat down, bending at the knees and hips. Keep your spine straight and maintain a neutral position.
- Lifting Phase: With a controlled motion, stand upright, lifting the barbell upward to hip level. Keep your spine straight, elbows stiff, and the barbell close to your body.
- Lowering Phase: Slowly lower the barbell back to the floor by bending at the knees and hips while maintaining a straight back.
Muscles Involved:
- Primary: Erector spinae (iliocostalis, longissimus, spinalis), gluteus maximus, hamstrings (semitendinosus, semimembranosus, biceps femoris) – These muscles play a crucial role in hip extension and maintaining spinal stability.
- Secondary: Trapezius, latissimus dorsi, quadriceps (rectus femoris, vastus lateralis, vastus medialis, vastus intermedius), forearms (wrist flexors, finger flexors) – These muscles contribute to maintaining grip strength and providing support during the lift.
Anatomic Focus:
- Hand Spacing: Your hands should be spaced shoulder-width apart to ensure that your arms hang vertically, allowing the bar to pass along the outer thighs as you lift.
- Grip: Use an over-under grip with one palm facing forward and the other facing backward. This grip helps prevent the barbell from rolling during the lift.
- Stance: Position your feet directly below your hips with your toes pointing straight ahead. This stance provides a stable base for the lift.
- Trajectory: Focus on keeping the barbell’s path straight up and down, staying as close to your body as possible throughout the movement.
- Range of Motion: Lift the barbell from the floor to the tops of your thighs while keeping your arms extended and elbows stiff. Maintain a straight spine throughout the entire movement, avoiding rounding your lower back forward or extending your spine too far backward.
Tips for Maximum Effectiveness:
- Maintain a neutral spine position throughout the lift to protect your lower back.
- Engage your core muscles to provide additional support to your spine.
- Keep the barbell close to your body to maximize leverage and minimize stress on your lower back.
- Exhale as you exert force to lift the barbell.
Variations:
- Barbell Stiff-Legged Deadlift: Performing the Deadlift with your legs kept stiff shifts the focus from the lower back to the buttocks and hamstrings. This variation is excellent for targeting these muscle groups.
- Sumo-Style Deadlift: In this variation, you use a wider-than-hip-width stance, which places more emphasis on the thigh muscles (quadriceps).
Incorporating Deadlifts into your fitness routine can have a significant impact on your overall strength and muscle development. However, it’s essential to prioritize proper form and technique to avoid injury. Start with a manageable weight and gradually increase it as you become more comfortable with the exercise. As one of the most effective compound movements, the Deadlift can help you build a solid foundation of strength and power.
Machine Deadlift (Smith):
The Machine Deadlift using a Smith machine is a valuable variation of the traditional Deadlift exercise. It provides a controlled and guided approach to Deadlifting, offering benefits such as targeted muscle engagement and reduced risk of injury. In this comprehensive guide, we will provide detailed instructions on how to perform the Machine Deadlift (Smith) correctly, explore the primary and secondary muscles involved, highlight key anatomic focus points, and discuss its benefits.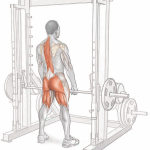
Execution:
- Starting Position: Begin by standing upright in front of the Smith machine. Hold the bars of the Smith machine at arm’s length using an overhand shoulder-width grip. Your feet should be positioned directly below your hips, with toes pointing straight ahead.
- Lifting Phase: Bend forward at the waist while maintaining a straight spine. Lower the bar downward, focusing on keeping your elbows stiff and your spine straight throughout the movement.
- Return Phase: Lift the bar back up to the starting position by extending your hips and straightening your torso. Maintain proper form and control during this phase.
Muscles Involved:
- Primary: Erector spinae (iliocostalis, longissimus, spinalis), gluteus maximus, hamstrings (semitendinosus, semimembranosus, biceps femoris) – These muscles are primarily responsible for hip extension and spinal stability during the Machine Deadlift.
- Secondary: Trapezius, latissimus dorsi, quadriceps (rectus femoris, vastus lateralis, vastus medialis, vastus intermedius) – These muscles play a supportive role in maintaining grip strength and overall stability.
Anatomic Focus:
- Resistance: The Smith machine provides a single plane of vertical motion, allowing for controlled and focused effort during the exercise.
- Hand Spacing: Maintain a shoulder-width grip on the bars, ensuring that your arms hang vertically and the hands pass along the outer thighs. This grip promotes proper alignment and control.
- Grip: Use an overhand grip to keep the Smith machine bar in the unlocked position, ensuring that the bar’s latches remain clear of the uprights.
- Stance: Position your feet directly below your hips with toes pointing straight ahead. This stance provides stability and control during the exercise.
- Trajectory: Keep the bar’s path straight up and down, staying close to the body. This vertical trajectory helps engage the targeted muscle groups effectively.
- Body Position: Maintain a slight bend in the knees to aid in execution. It’s crucial to keep your spine straight throughout the movement, avoiding both rounding of the lower back and excessive backward spinal extension.
- Range of Motion: Move the bar from hip level down beyond the knees and back up again. Keep your arms extended and elbows stiff during the entire movement. The erector spinae muscles stabilize and straighten the spine, while the gluteus maximus and hamstrings generate hip extension.
Variation:
Cable Pull-Through: To add variety to your workout routine, you can perform a cable pull-through. Stand facing away from a low pulley and use a short bar with the cable passing between your legs. This exercise engages similar muscle groups and provides a different angle of resistance.
Incorporating the Machine Deadlift (Smith) into your fitness routine can offer several benefits, including targeted muscle engagement and improved stability. Proper form and technique are essential to maximize the effectiveness of this exercise and reduce the risk of injury. Gradually increase the weight as you progress to continue challenging your muscles and achieving your fitness goals.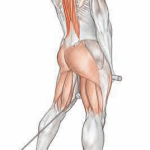
Good Morning:
The Good Morning is a compound exercise that targets the erector spinae, lower back, glutes, and hamstrings. In this comprehensive guide, we will provide detailed instructions on how to perform the Good Morning exercise correctly, discuss the primary and secondary muscles involved, explore anatomic focus points, and highlight the benefits of incorporating this exercise into your fitness routine. Execution:
- Starting Position: Stand upright with a barbell resting across your shoulders. Ensure that the barbell is securely placed and balanced on your upper back.
- Bending Phase: Keeping your spine straight and knees stiff (they can be kept straight or slightly bent), begin to bend forward at the waist. Lower your torso gradually until it is just above parallel to the floor. Maintain control and focus on proper form during this phase.
- Return Phase: Raise your torso back to the upright position. Keep your spine straight, head up, and maintain control throughout the movement.
Muscles Involved:
- Primary: Erector spinae (iliocostalis, longissimus, spinalis) – These muscles are primarily responsible for stabilizing and straightening the spine during the Good Morning exercise.
- Secondary: Latissimus dorsi, gluteus maximus, hamstrings (semitendinosus, semimembranosus, biceps femoris) – These muscles play a supportive role in maintaining proper form and providing hip extension during the exercise.
Anatomic Focus:
- Grip: Place your hands slightly wider than shoulder-width apart on the barbell, using an overhand grip to secure it across your shoulders. Proper hand placement ensures that the barbell remains stable throughout the movement.
- Trajectory: Execute the exercise with a slight bend in the knees to facilitate proper form and alignment. This bending of the knees helps ensure that the focus remains on the targeted muscle groups.
- Range of Motion: Your torso should move up and down through an arc of about 90 degrees. It’s essential to maintain a straight spine and avoid bending your torso below parallel to the floor. This controlled range of motion engages the erector spinae muscles while the gluteus maximus and hamstrings perform hip extension.
Variation:
Machine Lift: A variation of the Good Morning exercise involves performing it while seated, using a pad across your upper back to provide resistance. This variation can help individuals who are new to the exercise or need additional support and stability while focusing on the targeted muscle groups.
Incorporating Good Mornings into your workout routine can help strengthen your lower back, improve spinal stability, and enhance overall posterior chain development. It is crucial to prioritize proper form and start with lighter weights to ensure safety and effectiveness. As you progress, gradually increase the weight to challenge your muscles and achieve your fitness goals.
Dumbbell Pullover:
The Dumbbell Pullover is a classic exercise that primarily targets the serratus anterior, intercostals, and latissimus dorsi muscles. In this comprehensive guide, we will provide detailed instructions on how to perform the Dumbbell Pullover exercise correctly, discuss the primary and secondary muscles involved, explore anatomic focus points, and highlight variations of this exercise.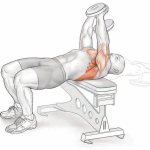 Execution:
- Starting Position: Lie with your upper back resting across a flat bench. Your feet should be firmly planted on the floor for stability. Hold a dumbbell with both hands, keeping your palms against the inside of the weight plate at one end. This hand position should create a diamond shape around the bar with your thumbs and index fingers.
- Lowering Phase: Begin by holding the dumbbell straight above your chest. Lower the dumbbell down and back towards the bench while inhaling deeply. As you lower the weight, focus on stretching your rib cage and expanding your chest.
- Return Phase: After reaching bench level, pull the dumbbell back up to the vertical position while exhaling. Maintain control throughout the movement and concentrate on engaging the targeted muscle groups.
Muscles Involved:
- Primary:
- Serratus Anterior: The primary muscle worked during the Dumbbell Pullover. It helps in scapular stabilization and expansion of the ribcage.
- Intercostals: Muscles between the ribs that assist in ribcage expansion and contraction.
- Latissimus Dorsi: Engaged as a secondary muscle, the latissimus dorsi assists in the extension of the shoulder joint during the pullover.
- Secondary:
- Pectoralis Major and Minor: These chest muscles are engaged as secondary muscles during the lifting phase of the exercise.
- Triceps Brachii: These muscles assist in the extension of the elbow joint during the return phase of the pullover.
Anatomic Focus:
- Grip: Ensure your grip on the dumbbell follows the prescribed method, with palms against the inside of the weight plate and thumbs and index fingers forming a diamond shape around the bar. This grip provides stability and control.
- Body Position: Maintain a still and parallel torso to the floor throughout the exercise. Your upper back should remain firmly rested on the bench, and your feet should be planted on the floor for stability.
- Range of Motion: The Dumbbell Pullover involves moving the dumbbell through an arc of about 90 degrees. Focus on achieving a full stretch in your rib cage as you lower the weight, and contract the serratus anterior as you lift it back up.
- Resistance: It is advisable not to use heavy weights for this exercise because the shoulder joint is vulnerable to injury during the Dumbbell Pullover. Start with a manageable weight and progressively increase it as you become more comfortable with the movement.
Variation:
Barbell or Machine Pullover: The Dumbbell Pullover can also be performed using a barbell or a dedicated machine. These variations provide slightly different angles and experiences but still target the same muscle groups. Experiment with different equipment to find what works best for your fitness routine.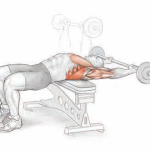
Incorporating the Dumbbell Pullover into your workout routine can help improve ribcage expansion, scapular stability, and latissimus dorsi development. It’s essential to prioritize proper form and choose an appropriate weight to ensure safety and effectiveness. As with any exercise, consult with a fitness professional or trainer if you are unsure about your form or have any concerns about your fitness level.