
Barbell Incline Press:
The barbell incline press is a classic exercise that’s fundamental to any comprehensive chest workout routine. It primarily targets the upper pectoralis major muscle group while also engaging secondary muscles like the anterior deltoid and triceps brachii. In this article, we’ll break down the execution of the exercise, discuss the muscles involved, and explore variations to help you get the most out of your upper chest training.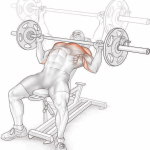
Execution:
- Proper Setup: Begin by sitting on an incline bench. Ensure the bench is adjusted to your preferred angle, typically between 30 to 45 degrees for optimal upper pectoral engagement. Set your feet firmly on the ground for stability.
- Grip: Take a shoulder-width overhand grip on the barbell. Your hands should be positioned slightly wider than your shoulders for balance and control.
- Lowering the Bar: Slowly lower the barbell towards your upper chest. Keep your elbows flared out to the sides as you lower the weight. The bar should gently touch your upper chest.
- Pressing Up: Push the barbell upward in a controlled manner until your elbows lock out. Ensure a smooth and steady motion throughout the movement.
Muscles Involved:
- Primary Muscle: The barbell incline press primarily targets the upper pectoralis major. This exercise is particularly effective at developing the upper portion of your chest, helping to create a well-rounded and sculpted chest appearance.
- Secondary Muscles: Alongside the upper pecs, the incline press also engages the anterior deltoid (front shoulder muscle) and the triceps brachii (muscles on the back of your upper arm). These secondary muscles play a supportive role in the movement.
Anatomic Focus:
- Trajectory: The angle of incline determines the trajectory of the exercise and the specific area of the pectoral muscle being targeted. A moderate incline of around 30 to 45 degrees focuses predominantly on the upper pectoral region. Steeper inclines of 60 degrees or more shift the emphasis toward the anterior deltoids.
- Hand Spacing: Your hand spacing on the barbell affects which areas of the upper pectoral muscle are activated. A shoulder-width grip or slightly wider targets the entire upper chest. Narrower hand spacing places more emphasis on the inner central portion of the chest and increases triceps involvement. Conversely, wider grips provide a greater stretch and target the outer portion of the muscle while reducing triceps contribution. However, wider grips also come with an increased risk of injury, so caution is necessary.
- Range of Motion: To maximize pectoral engagement, flare your elbows out wide as you lower the barbell. For increased tension on the pectorals and reduced triceps assistance, consider terminating each repetition just before fully locking out your elbows.
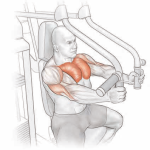
Variation: Machine Incline Press
If you’re looking for added stability and safety, the machine incline press is a viable alternative to the standard barbell press. This variation is particularly beneficial for beginners or those with limited equipment experience. Machine incline presses typically offer a choice of grips, with a neutral grip (thumbs up, palms facing each other) being effective at emphasizing the pectorals. Unlike the pronated grip (palms forward) on a standard barbell, this grip provides a more direct focus on the upper chest muscles.
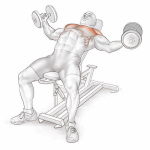
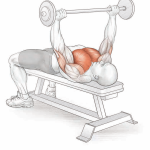
Dumbbell Incline Press:
The dumbbell incline press is a versatile and effective exercise for developing the upper chest muscles, offering unique benefits compared to the barbell incline press. In this comprehensive guide, we’ll delve into the execution of the dumbbell incline press, examine the muscles involved, explore key anatomical considerations, and introduce a variation to maximize your upper chest gains. 
Execution:
- Proper Setup: Begin by sitting on an incline bench. Adjust the bench to your desired angle, typically ranging from 30 to 45 degrees. Ensure your feet are firmly planted on the ground for stability.
- Dumbbell Hold: Hold a dumbbell in each hand at chest level with your palms facing forward. This position allows you to target the upper chest effectively.
- Pressing Motion: Start by pressing the dumbbells vertically upward until your elbows fully extend and lock out. Maintain control and avoid any sudden jerking movements.
- Lowering Phase: Lower the dumbbells back down to your upper chest in a controlled manner. Keep your elbows slightly flared out to the sides.
Muscles Involved:
- Primary Muscle: The primary target of the dumbbell incline press is the upper pectoralis major. This exercise is particularly beneficial for isolating and developing this area, contributing to a well-balanced and defined chest.
- Secondary Muscles: Secondary muscles engaged during this exercise include the anterior deltoid (front shoulder muscle) and the triceps brachii (muscles on the back of your upper arm). These muscles provide support and stability during the movement.
Anatomic Focus:
- Trajectory: Similar to the barbell incline press, the angle of incline in the bench determines the trajectory of the dumbbell incline press. An incline angle of 30 to 45 degrees effectively targets the upper pectoral muscles. Steeper inclines of 60 degrees or more shift the focus towards the anterior deltoids.
- Grip: The orientation of the dumbbells significantly impacts hand positioning and muscle engagement. Using a pronated grip (palms facing forward) allows for a greater stretch as you lower the dumbbells to the starting position. Conversely, adopting a neutral grip (palms facing each other) generates a stronger contraction at the lockout position, emphasizing the upper chest muscles.
- Range of Motion: To optimize pectoral engagement, flare your elbows out wide as you lower the dumbbells. At the top of the movement, you can enhance the contraction by bringing the dumbbells together. Maintaining tension on the pectorals throughout the exercise is crucial. While lowering the dumbbells deeper provides a more substantial chest muscle stretch, it’s important to avoid excessive depth to prevent potential shoulder injury. A safe practice is to halt the descent when the dumbbells reach chest level.
Variation: Variable-Grip Dumbbell Press
For added variety and a nuanced challenge to your upper chest workout, consider the variable-grip dumbbell press. This exercise begins with a pronated grip (palms facing forward) and transitions into a neutral grip (palms facing each other) at the lockout position. This grip transition introduces a unique dynamic to the exercise, targeting the upper chest from different angles and engaging the muscles in distinct ways.
Incorporating the variable-grip dumbbell press into your routine can provide an additional stimulus for upper chest development and enhance overall chest aesthetics.
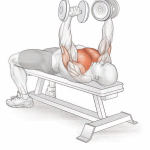
Dumbbell Incline Fly:
The dumbbell incline fly is a targeted exercise designed to isolate and develop the upper pectoralis major muscles, contributing to a well-rounded and aesthetically pleasing chest. In this comprehensive guide, we’ll explore the proper execution of the dumbbell incline fly, the key muscles engaged, anatomical considerations, and a variation to further enhance your upper chest workout.
Execution:
- Set Up for Success: Begin by sitting on an incline bench adjusted to your desired angle. The optimal incline typically ranges from 30 to 45 degrees. Ensure your feet are firmly planted on the ground for stability.
- Dumbbell Hold: Hold a dumbbell in each hand directly above your chest, with your palms facing each other. Keep your arms fully extended, ensuring that the dumbbells are aligned with your chest.
- Lowering Phase: Initiate the movement by lowering the dumbbells outward in a controlled manner. Slightly bend your elbows as the weights descend towards chest level. Keep your elbows slightly below your shoulders to optimize chest engagement.
- Raising Phase: Raise the dumbbells back up and together, bringing them as close as possible without touching. Maintain a controlled motion throughout.
Muscles Involved:
- Primary Muscle: The primary target of the dumbbell incline fly is the upper pectoralis major. This exercise excels at isolating and strengthening this area, contributing to a balanced chest development.
- Secondary Muscle: The anterior deltoid (front shoulder muscle) is engaged as a secondary muscle during the incline fly, assisting in controlling the movement and stabilizing the shoulder joint.
Anatomic Focus:
- Trajectory: The trajectory of the incline fly largely depends on the angle of the incline bench. As the backrest is raised, the focus shifts progressively higher up the pectoral muscle. For optimal upper pectoral targeting, an incline angle of 30 to 45 degrees is recommended.
- Grip: The orientation of the dumbbells plays a significant role in hand positioning during the incline fly. The exercise is most effective when performed with a neutral grip (palms facing each other). However, for variety and variation, a pronated grip (palms facing forward) can be used to challenge the muscles from different angles.
- Range of Motion: Achieving a full range of motion is essential for reaping the maximum benefits from the incline fly. The lower you allow the dumbbells to descend, the greater the stretch on the pectoral muscles. However, it’s crucial to exercise caution and not overstretch the muscles or strain the shoulder joint. It is generally safer to stop the descent when the dumbbells reach chest level.
Variation: Machine Fly for Upper Pectorals
To further target and intensify your upper pectorals, consider the machine fly exercise. By setting the machine’s seat to a low position and adjusting the handles to eye level, you can effectively engage the upper chest muscles. This variation allows for a controlled and consistent movement pattern, making it an excellent option for isolating the upper pectorals.
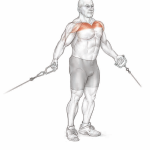
Cable Low-Pulley Fly:
The cable low-pulley fly is an effective exercise designed to isolate and develop the upper pectoralis major muscles, contributing to a well-rounded and aesthetically pleasing chest. In this comprehensive guide, we’ll explore the proper execution of the cable low-pulley fly, the key muscles engaged, anatomical considerations, and tips to maximize its effectiveness.
Execution:
- Get Ready: Start by standing upright, positioning yourself midway between the cable machine’s weight stacks. Face forward and grasp a D-handle attached to the low pulleys with each hand. Your hands should be slightly behind your body to optimize the trajectory for targeting the pectoral muscles.
- Initiate the Movement: Begin the exercise by raising your arms in a forward arc. Bring the handles together at head height, focusing on squeezing your chest muscles at the peak of the movement. Ensure that your elbows remain relatively stiff throughout this phase.
- Return to the Starting Position: After reaching the peak of the motion, reverse the movement by lowering the handles back to the starting position. Maintain control and a steady pace throughout the exercise.
Muscles Involved:
- Primary Muscle: The cable low-pulley fly primarily targets the upper pectoralis major. By isolating this muscle group, the exercise contributes to a balanced development of the chest.
- Secondary Muscle: The anterior deltoid, located at the front of the shoulder, is engaged as a secondary muscle during the cable low-pulley fly. It assists in controlling the movement and stabilizing the shoulder joint.
Anatomic Focus:
- Trajectory: To effectively target the pectoral muscles, it’s crucial to position yourself so that the pulleys are slightly behind your body. This orientation allows for a better trajectory that emphasizes the upper chest muscles. By doing so, you can maximize the activation of the upper pectoral area, contributing to a well-defined and sculpted chest.
Tips for Optimal Performance:
- Mind-Muscle Connection: Focus on contracting and engaging your upper chest muscles throughout the entire range of motion. Visualize the muscles working as you bring the handles together at head height.
- Controlled Movement: Maintain a controlled and deliberate pace throughout the exercise. Avoid using momentum to swing the handles, as this can reduce the effectiveness of the workout.
- Proper Breathing: Coordinate your breathing with the movement. Inhale as you prepare to raise the handles, exhale as you bring them together, and inhale again as you return to the starting position.
- Adjusting Resistance: To challenge yourself and progressively overload the muscles, adjust the weight on the cable machine. Start with a manageable weight and gradually increase it as you become more comfortable with the exercise.
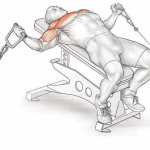
Cable Incline Fly:
The cable incline fly is a powerful exercise designed to target and sculpt the upper pectoralis major muscles, providing a well-defined and balanced chest. In this comprehensive guide, we’ll delve into the correct execution of the cable incline fly, the key muscles involved, anatomical considerations, and strategies to maximize your upper chest development.
Execution:
- Setting Up for Success: Start by positioning yourself on an incline bench placed centrally between the cable machine’s pulleys. The incline bench should be adjusted to your preferred angle, with the backrest typically inclined at 30 to 45 degrees. Grasp a D-handle attached to the low pulleys with each hand, ensuring that the handles are level with your chest.
- Initiate the Movement: Begin the exercise by raising your arms in an upward arc. Bring the handles together above your head, focusing on squeezing your upper chest muscles at the peak of the movement. Keep your elbows slightly bent but not locked.
- Return to the Starting Position: After reaching the peak of the motion, slowly and deliberately lower the handles back to the starting position, ensuring they remain level with your chest. Maintain control throughout the exercise.
Muscles Involved:
- Primary Muscle: The cable incline fly primarily targets the upper pectoralis major. By isolating this muscle group, the exercise contributes to a balanced and well-developed upper chest.
- Secondary Muscles: The secondary muscles engaged during the cable incline fly include the anterior deltoid (front shoulder muscle) and the biceps brachii (front upper arm muscle). These muscles play a supportive role in controlling the movement and stabilizing the shoulder joint.
Anatomic Focus:
- Trajectory: The trajectory of the incline fly is influenced by the angle of the incline bench. As the backrest is raised, the focus progressively shifts higher up the pectoral muscle. For optimum targeting of the upper pectorals, it’s recommended to set the bench at an incline of 30 to 45 degrees. This allows you to maximize the activation of the upper chest, contributing to a sculpted and well-defined appearance.
- Grip: Maintaining a slight bend in your elbows during the descent phase of the exercise can help alleviate strain on the biceps. This modification ensures that the primary focus remains on the upper pectoral muscles while reducing the risk of overloading the biceps.
- Range of Motion: Achieving an effective range of motion is essential for maximizing the benefits of the incline fly. Lowering the handles deeper can result in a greater pectoral stretch, but it’s important to exercise caution to prevent potential muscle and shoulder joint injuries. A safe practice is to conclude the descent when the handles reach chest level.
Tips for Enhanced Performance:
- Mind-Muscle Connection: Focus on contracting and engaging your upper chest muscles throughout the entire range of motion. Visualize the muscles working as you bring the handles together above your head.
- Controlled Tempo: Maintain a controlled and deliberate tempo during the exercise. Avoid using momentum or jerky movements that can compromise muscle engagement.
- Breathing Rhythm: Coordinate your breathing with the movement. Inhale as you prepare to raise the handles, exhale as you bring them together above your head, and inhale again as you return to the starting position.
- Progressive Resistance: To continuously challenge your muscles and promote growth, adjust the weight on the cable machine as you progress. Begin with a manageable weight and gradually increase it as you become more comfortable with the exercise.
Barbell Bench Press:
The barbell bench press is the quintessential exercise for developing chest strength and size. In this comprehensive guide, we’ll explore the execution of the barbell bench press, the muscles involved, anatomical considerations, and variations to help you make the most of this fundamental movement.
Execution:
- Set Up Correctly: Begin by lying on a flat bench with your feet firmly planted on the floor. Your shoulders, buttocks, and head should be in contact with the bench throughout the exercise. This ensures stability and proper muscle engagement.
- Grip the Bar: Take a shoulder-width overhand grip on the barbell. Your hands should be slightly wider than shoulder-width apart for balance and control.
- Lower the Bar: Slowly lower the barbell to your chest, aiming for the middle chest area. Your elbows should flare out slightly as you lower the weight.
- Push the Bar Up: Push the barbell straight up until your elbows fully extend and lock out. Maintain control and a steady pace during both the lowering and lifting phases.
Muscles Involved:
- Primary Muscle: The barbell bench press primarily targets the pectoralis major, which is the large chest muscle. This exercise is crucial for building chest strength and size.
- Secondary Muscles: Secondary muscles engaged during the bench press include the anterior deltoid (front shoulder muscle) and the triceps brachii (muscles on the back of your upper arm). These muscles provide support and stability during the movement.
Anatomic Focus:
- Body Position: Proper body positioning is essential. Your torso should be flat on the bench, with your shoulders and buttocks in contact with it. Plant your feet firmly on the floor for stability. Avoid arching your lower back or lifting your buttocks off the bench, as this can shift the focus to the lower pectorals. Maintaining contact between your feet and the floor is crucial for stability and balance.
- Hand Spacing: The ideal hand spacing is shoulder width or slightly wider. A narrower (close) grip places more emphasis on the inner pectorals and increases triceps involvement. Conversely, a wider grip targets the outer section of the chest muscle while minimizing triceps contribution.
- Trajectory: For effective chest isolation, the bar should move vertically up and down from the middle chest area (around the nipple line). Flaring your elbows out slightly as you lower the bar helps maximize pectoral engagement.
- Range of Motion: Optimal range of motion is essential. A shorter repetition that terminates just before lockout helps maintain tension on the pectorals and minimizes triceps assistance.
- Grip: An underhand (supinated) grip on the bar switches the focus to the triceps and can be used as a variation.
Variations:
- Machine Chest Press: Machines offer enhanced stability and safety compared to the standard barbell bench press. Many machines provide various grip options. A neutral grip (thumbs up, palms facing each other) typically isolates the pectorals better than a pronated grip (palms forward).
- Close-Grip Bench Press: This variation involves performing the exercise with your hands spaced approximately 6 inches (15 cm) apart. The narrow grip targets the inner pectorals and places additional emphasis on the triceps.
Dumbbell Bench Press:
The dumbbell bench press is a versatile and effective exercise for developing chest strength and size. In this comprehensive guide, we will delve into the proper execution of the dumbbell bench press, the muscles involved, anatomical considerations, and variations to help you maximize the benefits of this essential movement.
Execution:
- Set Up Correctly: Begin by lying on a flat bench with your feet firmly planted on the floor. Hold a dumbbell in each hand at chest level, with your palms facing forward. Your upper arms should be perpendicular to your body.
- Initiate the Movement: Press the dumbbells vertically upward until your elbows fully extend and lock out. Maintain control throughout the motion.
- Return to Starting Position: Slowly lower the dumbbells to the middle chest area. Keep your elbows slightly below your shoulders and maintain control during the descent.
Muscles Involved:
- Primary Muscle: The primary focus of the dumbbell bench press is the pectoralis major, the large chest muscle. This exercise is crucial for building chest strength and size.
- Secondary Muscles: Secondary muscles engaged during the dumbbell bench press include the anterior deltoid (front shoulder muscle) and the triceps brachii (muscles on the back of your upper arm). These muscles play a supportive role in controlling the movement and stabilizing the shoulder joint.
Anatomic Focus:
- Grip: The orientation of the dumbbells significantly influences hand positioning and muscle engagement. Holding the dumbbells with palms facing forward (pronated grip) provides a deeper stretch as the weight is lowered to the starting position. Conversely, holding the dumbbells with palms facing each other (neutral grip) allows for a better contraction at the lockout position, emphasizing the chest muscles.
- Trajectory: To optimize chest isolation, your torso should lie flat on the bench, and the dumbbells should move vertically up and down from the middle chest area (around the nipple line). To achieve maximum pectoral engagement, flare your elbows out wide during the descent and aim to touch the dumbbells together at lockout.
- Range of Motion: Proper range of motion is essential. A shorter repetition that terminates just before lockout maintains tension on the pectorals and minimizes triceps assistance. While lowering the dumbbells deeper can provide a more substantial chest muscle stretch, it’s crucial to avoid excessive depth to prevent potential shoulder injury. A safe practice is to halt the descent when the dumbbells reach chest level.
Variation: Variable-Grip Dumbbell Bench Press
For added variety and a unique challenge to your chest workout, consider the variable-grip dumbbell bench press. This exercise begins with a pronated grip (palms forward) on the dumbbells and transitions into a neutral grip (palms facing each other) at lockout. This grip transition introduces a dynamic element to the exercise, targeting the chest muscles from different angles and engaging them differently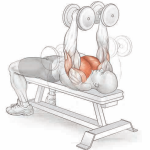
Tips for Enhanced Performance:
- Mind-Muscle Connection: Focus on contracting and engaging your chest muscles throughout the entire range of motion. Visualize the muscles working as you press the dumbbells.
- Controlled Tempo: Maintain a controlled and deliberate tempo during the exercise. Avoid using momentum to swing the dumbbells, as this can compromise muscle engagement.
- Breathing Rhythm: Coordinate your breathing with the movement. Inhale as you prepare to press the dumbbells, exhale as you push them up, and inhale again as you return to the starting position.
- Progressive Resistance: To continually challenge your muscles and stimulate growth, adjust the weight of the dumbbells as needed. Start with a manageable weight and gradually increase it as you become more comfortable with the exercise.
Dumbbell Fly:
The dumbbell fly is a potent exercise for isolating and sculpting the pectoralis major, the primary muscle of the chest. In this comprehensive guide, we will explore the proper execution of the dumbbell fly, the muscles involved, key anatomical considerations, and variations to help you achieve optimal results from this essential chest-building movement.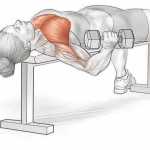
Execution:
- Prepare for Action: Begin by lying flat on a bench with your feet firmly planted on the floor. Hold a dumbbell in each hand directly above your middle chest. Your palms should be facing each other, and your arms should be fully extended.
- Initiate the Movement: Lower the dumbbells out wide to the sides while bending your elbows slightly as the weight descends to chest level. Maintain control throughout the movement, and focus on the stretch in your chest muscles.
- Return to Starting Position: Raise the dumbbells in an upward arc, bringing them back to the vertical position above your middle chest. Keep your arms slightly bent as you return to the starting position.
Muscles Involved:
- Primary Muscle: The primary target of the dumbbell fly is the pectoralis major, the largest chest muscle. This exercise is highly effective for isolating and developing the chest.
- Secondary Muscle: The anterior deltoid, which is the front part of your shoulder muscle, is engaged as a secondary muscle during the dumbbell fly. It plays a supporting role in controlling the movement and stabilizing the shoulder joint.
Anatomic Focus:
- Grip: Hand positioning is a critical factor in the dumbbell fly. While the exercise is most effective when performed with a neutral grip (palms facing each other), you can also use a pronated grip (palms facing forward) to add variety and target the chest muscles from different angles.
- Range of Motion: The depth of your descent in the dumbbell fly affects the stretch on your pectoral muscles and the risk of injury. While a deeper descent provides a more significant stretch, it also increases the chances of injury, especially to the shoulder joint. To prioritize safety, it is advisable to terminate the descent when the dumbbells reach chest level. This helps maintain muscle tension while minimizing the risk of overextension.
Variations:
- Incline Dumbbell Fly: Performing the dumbbell fly on an incline bench changes the angle of the exercise and emphasizes the upper chest muscles.
- Machine Fly: Using a machine for the fly exercise provides stability and safety, making it an excellent choice for beginners or those concerned about joint health. The machine often offers a choice of grips, with a neutral grip being a common option.
Tips for Enhanced Performance:
- Mind-Muscle Connection: Focus on contracting and engaging your chest muscles throughout the entire range of motion. Visualize the muscles working as you perform the exercise.
- Controlled Tempo: Maintain a controlled and deliberate tempo during the exercise. Avoid using momentum to swing the dumbbells, as this can reduce the effectiveness of the movement.
- Breathing Rhythm: Coordinate your breathing with the movement. Inhale as you lower the dumbbells, exhale as you bring them back up, and inhale again as you return to the starting position.
- Progressive Resistance: To continually challenge your chest muscles and promote growth, consider adjusting the weight of the dumbbells as you progress. Start with a manageable weight and gradually increase it as you become more comfortable with the exercise.
Cable Flat-Bench Fly:
The cable flat-bench fly is a dynamic exercise designed to hone and define the pectoralis major, making it an invaluable addition to your chest workout routine. In this comprehensive guide, we will explore the proper execution of the cable flat-bench fly, the muscles engaged, key anatomical considerations, and how variations can help you tailor your training to achieve your chest development goals.
Execution:
- Set Up for Success: Begin by positioning yourself on a flat bench placed centrally between the pulleys of a cable machine. Adjust the bench so that it is level with the low pulleys. Lie face-up on the bench with your feet flat on the floor. Grasp the D-handles attached to the low pulleys with each hand, ensuring the handles are level with your chest.
- Initiate the Movement: Commence the exercise by raising your arms in an upward arc. Bring the handles together above your chest, focusing on squeezing your pectoral muscles as they contract. Keep your elbows slightly bent but not locked during this phase.
- Return to Starting Position: After reaching the peak of the motion, slowly and deliberately lower the handles back to the starting position, ensuring they remain level with your chest. Maintain control and a steady pace throughout the exercise.
Muscles Involved:
- Primary Muscle: The cable flat-bench fly primarily targets the pectoralis major, emphasizing the mid-chest area. This exercise is instrumental in sculpting and strengthening this portion of the chest.
- Secondary Muscles: Secondary muscles engaged during the cable flat-bench fly include the anterior deltoid (front shoulder muscle) and the biceps brachii (front upper arm muscle). These muscles provide support and stabilization during the movement.
Anatomic Focus:
- Trajectory: The choice of a flat bench ensures that the mid pectoral muscles receive optimal attention. However, you can modify the focus by adjusting the bench angle. An incline bench shifts the emphasis towards the upper chest, while a decline bench targets the lower chest muscles.
- Grip: Maintaining a slight bend in your elbows during the descent phase of the exercise can help alleviate strain on the biceps, ensuring that the primary focus remains on the pectoral muscles. This modification helps you balance the engagement of various muscle groups and prevent overloading the biceps.
- Range of Motion: Achieving the right range of motion is vital for reaping the benefits of the cable flat-bench fly. Lowering the handles too far can lead to excessive pectoral stretching and potential injury to the chest and shoulder joint. It is advisable to conclude the descent when the handles reach chest level to maintain muscle tension while prioritizing safety.
Variations:
- Incline Cable Fly: By adjusting the bench angle to an incline, you can shift the focus towards the upper chest muscles, offering variety to your chest workout routine.
- Decline Cable Fly: Conversely, altering the bench angle to a decline position targets the lower chest, enhancing the overall chest development.
Tips for Enhanced Performance:
- Mind-Muscle Connection: Concentrate on contracting and engaging your chest muscles throughout the entire range of motion. Visualize the chest muscles working as you bring the handles together above your chest.
- Controlled Tempo: Maintain a controlled and deliberate tempo during the exercise. Avoid using momentum to swing the handles, as this can compromise muscle engagement.
- Breathing Rhythm: Coordinate your breathing with the movement. Inhale as you prepare to raise the handles, exhale as you bring them together above your chest, and inhale again as you return to the starting position.
- Progressive Resistance: To consistently challenge your muscles and stimulate growth, adjust the weight on the cable machine as you progress. Start with a manageable weight and gradually increase it as you become more comfortable with the exercise.
Barbell Decline Press:
The barbell decline press is a powerful exercise designed to target the lower pectoralis major (sternal head) and enhance the overall development of your chest. In this comprehensive guide, we’ll delve into the proper execution of the barbell decline press, the muscles involved, anatomical considerations, and variations that can help you effectively engage and strengthen the lower chest muscles.

Execution:
- Setting Up: Begin by lying on a decline bench with your feet secured firmly at the end of the bench. Take a shoulder-width overhand grip on the barbell, positioning your hands slightly wider than shoulder-width apart.
- Lower the Bar: Slowly lower the barbell until it touches your lower chest. Maintain control over the descent to ensure proper muscle engagement and safety.
- Press It Up: Push the barbell straight up until your elbows lock out. Focus on squeezing your chest muscles as you complete the pressing motion.
Muscles Involved:
- Primary Muscle: The primary focus of the barbell decline press is the lower pectoralis major, particularly the sternal head. This exercise is instrumental in targeting and sculpting the lower chest region.
- Secondary Muscles: Secondary muscles engaged during the barbell decline press include the triceps brachii (muscles on the back of your upper arm) and the anterior deltoid (front shoulder muscle). These muscles play a supportive role in controlling the movement and stabilizing the shoulder joint.
Anatomic Focus:
- Trajectory: The angle of the decline bench significantly influences the trajectory and muscle engagement. As the bench tilts head-down and the decline becomes steeper, the focus shifts progressively lower down the pectoral muscle. For optimal targeting of the lower pectorals, it is recommended to use a decline angle of approximately 20 to 40 degrees to the floor. Steeper declines will shift the emphasis from the chest to the triceps. During the exercise, flare your elbows out as you lower the bar to maximize pectoral isolation.
- Hand Spacing: The ideal hand spacing for the barbell decline press is shoulder width. Wider grips target the outer section of the chest muscle, offer a deeper stretch, and minimize triceps contribution. Conversely, a narrow (close) grip places more emphasis on the inner pectorals and requires greater effort from the triceps.
- Range of Motion: Optimal range of motion is essential. A shorter repetition that terminates just before lockout keeps tension on the lower pectorals and reduces the amount of triceps assistance. It is important to balance depth and safety during the descent to prevent overextension and potential shoulder injury.
Variation: Machine Decline Press
For individuals seeking enhanced stability and safety, the machine decline press, often performed using a Smith machine or similar equipment, is an excellent option. This variation minimizes the need for balancing the barbell, making it a suitable choice for beginners and those who prioritize safety during their workouts.
Tips for Enhanced Performance:
- Mind-Muscle Connection: Concentrate on contracting and engaging your lower chest muscles throughout the entire range of motion. Visualize the lower chest muscles working as you press the barbell.
- Controlled Tempo: Maintain a controlled and deliberate tempo during the exercise. Avoid using momentum to lift the barbell, as this can compromise muscle engagement.
- Breathing Rhythm: Coordinate your breathing with the movement. Inhale as you prepare to lower the barbell, exhale as you press it up, and inhale again as you return to the starting position.
- Progressive Resistance: To continually challenge your muscles and promote growth, consider adjusting the weight on the barbell as you progress. Start with a manageable weight and gradually increase it as you become more comfortable with the exercise.
Dumbbell Decline Press:
The dumbbell decline press is a targeted exercise designed to emphasize and strengthen the lower portion of the pectoralis major (sternal head), providing a well-rounded chest development. In this comprehensive guide, we will explore the proper execution of the dumbbell decline press, the muscles involved, key anatomical considerations, and variations that can enhance your lower chest workout.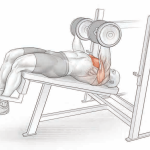
Execution:
- Starting Position: Begin by lying on a decline bench, ensuring your feet are securely anchored at the lower end of the bench. Hold a dumbbell in each hand at chest level with your palms facing forward.
- Press Upward: Press the dumbbells vertically upward until your elbows fully extend and lock out. Focus on squeezing your chest muscles as you push the weights upward.
- Return to Starting Position: Slowly lower the dumbbells back to the middle chest area, maintaining control over the descent. Keep your elbows slightly bent during this phase.
Muscles Involved:
- Primary Muscle: The primary target of the dumbbell decline press is the lower pectoralis major, specifically the sternal head. This exercise is crucial for isolating and developing the lower chest.
- Secondary Muscles: Secondary muscles engaged during the dumbbell decline press include the anterior deltoid (front shoulder muscle) and the triceps brachii (muscles on the back of your upper arm). These muscles assist in controlling the movement and stabilizing the shoulder joint.
Anatomic Focus:
- Grip: The orientation of the dumbbells plays a pivotal role in hand positioning and muscle engagement. Holding the dumbbells with palms facing forward (pronated grip) provides a deeper stretch as the weights are lowered to the starting position. Conversely, holding the dumbbells with palms facing each other (neutral grip) allows for a better contraction at the lockout position, emphasizing the chest muscles.
- Trajectory: The angle of the decline bench is a crucial factor in determining the exercise trajectory and muscle engagement. As the bench tilts head-down and the decline becomes steeper, the focus shifts progressively lower down the pectoral muscle. To maximize the isolation of the lower pectorals, it is recommended to use a decline angle of approximately 20 to 40 degrees to the floor. The movement should involve vertical motion, with the dumbbells moving up and down from the middle chest (nipple area). During the exercise, flaring your elbows out wide during the descent and touching the dumbbells together at lockout can enhance pectoral engagement.
- Range of Motion: Achieving the right range of motion is critical. A shorter repetition that terminates just before lockout keeps tension on the lower pectorals and reduces triceps assistance. While lowering the dumbbells deeper can provide a more substantial chest muscle stretch, it is essential to avoid overextension that could lead to shoulder injury. To prioritize safety, it is advisable to halt the descent when the dumbbells reach chest level.
Variation: Variable-Grip Dumbbell Decline Press
For added variety and a unique challenge to your lower chest workout, consider the variable-grip dumbbell decline press. This exercise begins with a pronated grip (palms forward) on the dumbbells and transitions into a neutral grip (palms facing each other) at lockout. This grip transition introduces a dynamic element to the exercise, targeting the lower chest muscles from different angles and engaging them differently.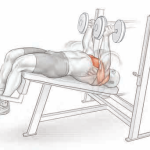
Tips for Enhanced Performance:
- Mind-Muscle Connection: Concentrate on contracting and engaging your lower chest muscles throughout the entire range of motion. Visualize the lower chest muscles working as you press the dumbbells.
- Controlled Tempo: Maintain a controlled and deliberate tempo during the exercise. Avoid using momentum to lift the dumbbells, as this can compromise muscle engagement.
- Breathing Rhythm: Coordinate your breathing with the movement. Inhale as you prepare to lower the dumbbells, exhale as you press them up, and inhale again as you return to the starting position.
- Progressive Resistance: To continually challenge your lower chest muscles and promote growth, consider adjusting the weight of the dumbbells as you progress. Start with a manageable weight and gradually increase it as you become more comfortable with the exercise.
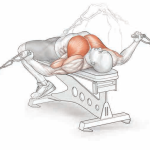
Dumbbell Decline Fly:
The dumbbell decline fly is a targeted exercise designed to emphasize and strengthen the lower portion of the pectoralis major, particularly the sternal head. This exercise is invaluable for individuals seeking well-rounded chest development. In this comprehensive guide, we will delve into the proper execution of the dumbbell decline fly, the muscles involved, anatomical considerations, and variations that can enhance your lower chest workout.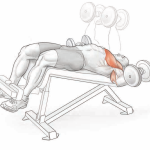
Execution:
- Starting Position: Begin by lying on a decline bench, ensuring that your feet are securely anchored at the lower end of the bench. Hold a dumbbell in each hand directly above your chest, with your palms facing each other.
- Lower the Dumbbells: Initiate the movement by lowering the dumbbells outward, bending your elbows slightly as the weights descend to chest level. Maintain control throughout this phase, focusing on a deep stretch in the chest.
- Return to the Starting Position: Raise the dumbbells back up and together in a controlled manner. Visualize your chest muscles working as you bring the dumbbells back to the starting position.
Muscles Involved:
- Primary Muscle: The primary target of the dumbbell decline fly is the lower pectoralis major, specifically the sternal head. This exercise is instrumental in isolating and developing the lower chest.
- Secondary Muscles: Secondary muscles engaged during the dumbbell decline fly include the anterior deltoid (front shoulder muscle) and the triceps brachii (muscles on the back of your upper arm). These muscles assist in controlling the movement and stabilizing the shoulder joint.
Anatomic Focus:
- Trajectory: The angle of the decline bench plays a pivotal role in determining the trajectory and muscle engagement during the exercise. As the bench tilts head-down and the decline becomes steeper, the focus shifts progressively lower down the pectoral muscle. To maximize the isolation of the lower pectorals, it is recommended to use a decline angle of approximately 20 to 40 degrees to the floor. The movement should involve lowering the dumbbells outward and then raising them back together. This motion targets the lower chest effectively.
- Grip: The orientation of the dumbbells’ grip is an important consideration for hand positioning and muscle engagement. While the fly exercise works optimally with a neutral grip (palms facing each other), you can introduce variety by using a pronated grip (palms facing forward) as a variation. A neutral grip tends to emphasize the lower chest more effectively.
- Range of Motion: Achieving the right range of motion is crucial. While lowering the dumbbells deeper provides a more significant pectoral stretch, it also increases the risk of injury. To prioritize safety, it is advisable to terminate the descent when the dumbbells reach chest level. Focus on maintaining proper form and muscle engagement rather than excessive depth.
Variation: Variable-Grip Dumbbell Fly
For added variety and a unique challenge to your lower chest workout, consider the variable-grip dumbbell fly. This exercise begins with a pronated grip (palms forward) on the dumbbells at the bottom of the movement and transitions into a neutral grip (palms facing each other) at the top of the movement. This grip transition introduces a dynamic element to the exercise, targeting the lower chest muscles from different angles and engaging them differently.
Tips for Enhanced Performance:
- Mind-Muscle Connection: Concentrate on contracting and engaging your lower chest muscles throughout the entire range of motion. Visualize the lower chest muscles working as you perform the dumbbell decline fly.
- Controlled Tempo: Maintain a controlled and deliberate tempo during the exercise. Avoid using momentum to lift the dumbbells, as this can compromise muscle engagement.
- Breathing Rhythm: Coordinate your breathing with the movement. Inhale as you prepare to lower the dumbbells, exhale as you bring them back together, and inhale again as you return to the starting position.
- Progressive Resistance: To continually challenge your lower chest muscles and promote growth, consider adjusting the weight of the dumbbells as you progress. Start with a manageable weight and gradually increase it as you become more comfortable with the exercise.
Cable Crossover:
The cable crossover is a versatile exercise that hones in on the lower pectoralis major (sternal head), contributing to a well-rounded and chiseled chest. In this comprehensive guide, we will delve into the proper execution of the cable crossover, the muscles involved, anatomical considerations, and a seated variation to enhance your chest workout routine.
Execution:
- Starting Position: Begin by standing upright in front of a cable machine, facing away from the machine. Grasp the D-handles attached to the high pulleys with both hands.
- Bring Your Hands Together: Squeeze the handles down and together until your hands touch in front of your waist. Maintain a slight bend in your elbows throughout the movement.
- Return to Starting Position: Slowly and in a controlled manner, release the tension on the cables and return your hands to the starting position.
Muscles Involved:
- Primary Muscle: The cable crossover primarily targets the lower pectoralis major, specifically the sternal head. This exercise is essential for isolating and strengthening the lower portion of the chest.
- Secondary Muscles: Secondary muscles engaged during the cable crossover include the anterior deltoid (front shoulder muscle) and the triceps brachii (muscles on the back of your upper arm). These muscles provide support and stability during the movement.
Anatomic Focus:
- Trajectory: The trajectory of the cable crossover can be adjusted to target different parts of the pectoral muscles. The level at which your hands meet in front of your body determines the focus. A low trajectory, where the handles meet in front of your hips or waist, primarily targets the lowest fibers of the pectoral muscle. In contrast, a high trajectory, where the handles meet at chest level, emphasizes the midsection of the pectorals.
- Range of Motion: To enhance the range of motion and target the inner central portion of the pectorals, you can cross your hands at the bottom of the movement. However, extending the starting position to allow your hands to pass above shoulder or head height increases the stretch but also places unnecessary stress on the shoulder joint. It’s essential to find a range of motion that challenges your chest muscles without straining your shoulders.
Variation: Seated Crossover
For individuals seeking a seated option with added back support, newer cable crossover machines allow you to perform the exercise while seated. This variation offers stability and comfort, making it a suitable choice for those who prefer seated workouts or require additional support during their chest routine.
Tips for Enhanced Performance:
- Mind-Muscle Connection: Focus on contracting and engaging your lower chest muscles throughout the entire range of motion. Visualize your lower chest muscles working as you bring your hands together.
- Controlled Tempo: Maintain a controlled and deliberate tempo during the exercise. Avoid using excessive force or momentum, as this can compromise muscle engagement and form.
- Breathing Rhythm: Coordinate your breathing with the movement. Inhale as you prepare to bring your hands together, exhale during the contraction phase, and inhale again as you return to the starting position.
- Progressive Resistance: To continually challenge your lower chest muscles and promote growth, consider adjusting the weight on the cable machine as you progress. Gradually increasing the resistance will help you advance in your chest training.
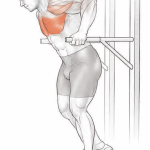
Chest Dip:
The chest dip is a potent compound exercise that serves as a cornerstone for building impressive chest and tricep strength. Whether you’re striving for a powerful upper body or seeking to refine your physique, this exercise offers a dynamic approach to achieving your fitness goals. In this comprehensive guide, we will delve into the proper execution of the chest dip, the muscles involved, anatomical considerations, and a machine variation to enhance your upper body workout routine.
Execution:
- Starting Position: Begin by grabbing the parallel bars of a dip station. Support your body weight with your elbows fully extended, ensuring that your feet are off the ground. Your hands should be placed on the bars, shoulder-width apart.
- Lower Your Torso: Bend your elbows to initiate the descent, lowering your torso until your upper arms are parallel to the floor. Maintain control throughout this phase, focusing on a deep stretch in the chest and tricep muscles.
- Return to Starting Position: Push yourself back up by extending your elbows until they are fully locked out. This completes one repetition.
Muscles Involved:
- Primary Muscle: The chest dip primarily targets the lower pectoralis major, specifically the sternal head. This exercise is instrumental in isolating and developing the lower portion of the chest.
- Secondary Muscles: Secondary muscles engaged during the chest dip include the triceps brachii (muscles on the back of your upper arm) and the anterior deltoid (front shoulder muscle). These muscles play a crucial role in controlling the movement and stabilizing the shoulder joint.
Anatomic Focus:
- Trajectory: The angle of your torso profoundly influences the focus of the chest dip exercise. Slight forward tilting of your torso is ideal for targeting the pectoral muscles. As you bend forward more, the intensity of the pectoral engagement increases. Conversely, maintaining an upright posture during the exercise shifts the focus toward the triceps. Straightening your torso further amplifies tricep engagement. To maximize pectoral isolation, it’s essential to maintain an appropriate forward tilt and flare your elbows out as you descend.
- Grip: The grip you employ on the parallel bars has a significant impact on muscle targeting. A standard grip with your thumbs pointing forward works best when your goal is to target the chest. In contrast, using a reverse grip with your thumbs pointing backward shifts the focus toward the triceps.
Variation: Machine Dip
For those seeking an alternative to traditional chest dips or looking to target the triceps more effectively, the machine dip offers a viable option. This exercise can be performed while seated on a machine equipped with dip handles. However, it’s important to note that many dip machines tend to restrict torso motion, leading to a greater emphasis on the triceps rather than the chest.
Tips for Enhanced Performance:
- Mind-Muscle Connection: Focus on contracting and engaging your chest and tricep muscles throughout the entire range of motion. Visualize your muscles working as you push yourself up.
- Controlled Tempo: Maintain a controlled and deliberate tempo during the exercise. Avoid using momentum to lift your body, as this can compromise muscle engagement and form.
- Breathing Rhythm: Coordinate your breathing with the movement. Inhale as you prepare to descend, exhale during the ascent, and inhale again as you reach the starting position.
- Progressive Resistance: To continually challenge your chest and tricep muscles and promote growth, consider adjusting the resistance or adding weight as you progress. Gradually increasing the intensity will help you advance in your upper body training.