Leg Extension:
Leg extension is a popular strength training exercise that primarily targets the quadriceps muscles, which are vital for activities such as walking, running, and jumping. This exercise is commonly performed using a leg extension machine and can be customized to target different areas of the quadriceps based on foot position, spacing, and body posture. In this article, we will explore the execution, muscles involved, anatomic focus, and variations of the leg extension exercise.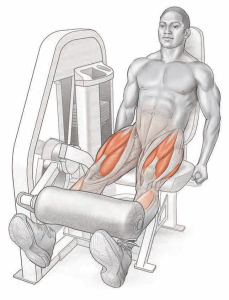
Execution:
- Machine Setup: Start by sitting on the leg extension machine with your back pressed firmly against the backrest. Adjust the machine so that the roller pads are in line with your ankles, and your knees are bent at approximately 90 degrees.
- Foot Placement: Position your ankles under the roller pads with your toes pointing directly upward. This position evenly engages all sections of the quadriceps. If you point your toes inward, it will target the inner quadriceps (vastus medialis), while outward toe positioning will focus on the outer quadriceps (vastus lateralis).
- Leg Extension: Begin the movement by raising your legs upward, straightening your knees completely. Ensure a controlled and deliberate movement as you extend your legs.
- Return to Starting Position: Lower your legs back down to the starting position, maintaining control throughout the descent.
Muscles Involved:
- Primary Muscles: The leg extension primarily targets the quadriceps, which include four muscles: the rectus femoris, vastus lateralis, vastus medialis, and vastus intermedius. These muscles play a crucial role in knee extension.
- Secondary Muscles: The tibialis anterior, a muscle located on the front of the shin, is also engaged to a lesser extent during the leg extension exercise.
Anatomic Focus:
- Foot Position: Your choice of foot positioning plays a significant role in which part of the quadriceps is emphasized. To target all sections of the quadriceps equally, point your toes directly upward. To focus on the inner quadriceps teardrop (vastus medialis), point your toes inward, and to target the outer quadriceps (vastus lateralis), point your toes outward.
- Foot Spacing: While the leg extension machine may limit your options, placing your feet closer together tends to engage the outer quadriceps more, whereas a wider spacing places greater emphasis on the inner quadriceps.
- Body Position: Adjust the backrest so that the backs of your knees fit snugly against the front edge of the seat, providing support to your entire thigh. Leaning your torso backward or lifting your buttocks off the seat can intensify the exercise by extending the hip joint, thereby stretching the rectus femoris and making it work harder.
- Range of Motion: Aim for a range of motion of approximately 90 degrees. Fully contract your quadriceps at the top of the movement when your knees are straight. Avoid overextending the knees, as this can put excessive stress on the kneecaps (patellae).
- Resistance: On most leg extension machines, resistance is relatively uniform, but it may increase slightly as the weight is lifted. Less resistance at the starting position can help minimize stress on the knees when they are bent.
One-Leg Extension:
Performing the leg extension exercise one leg at a time, known as the unilateral leg extension, can improve focus and help address thigh muscle imbalances. This variation is particularly beneficial for individuals recovering from leg injuries, as it allows them to strengthen one leg at a time and restore balance between the quadriceps muscles.
Barbell Squat:
The barbell squat is often hailed as the king of all lower body exercises due to its effectiveness in targeting a wide range of muscles, including the quadriceps, glutes, hamstrings, and more. It is a compound movement that can help individuals build strength, power, and functional fitness. In this comprehensive guide, we will explore the execution, muscles involved, anatomic focus, and variations of the barbell squat.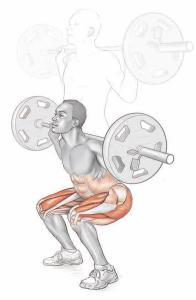
Execution:
- Stance: Begin by standing with your feet shoulder-width apart. This provides a stable base for the squat.
- Barbell Placement: Hold a barbell across the back of your shoulders with an overhand grip. The bar should be positioned on your upper back, resting on your trapezius muscles.
- Descent: Slowly bend your knees and lower your body until your thighs are parallel to the floor. Keep your back straight, chest up, and head facing forward throughout the movement. It’s essential to maintain proper form to avoid injury.
- Ascent: Straighten your legs to return to the starting position. Push through your heels to engage the quadriceps and glutes as you rise.
Muscles Involved:
- Primary Muscles: The barbell squat primarily targets the quadriceps (rectus femoris, vastus lateralis, vastus medialis, vastus intermedius) and the gluteus maximus (buttocks).
- Secondary Muscles: Secondary muscles engaged during the barbell squat include the hamstrings (semitendinosus, semimembranosus, biceps femoris), adductor muscles (longus, magnus, brevis), gracilis, tensor fasciae latae, spinal erectors (sacrospinalis), and abdominals (rectus abdominis, external oblique, internal oblique).
Anatomic Focus:
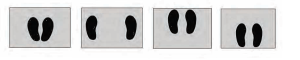
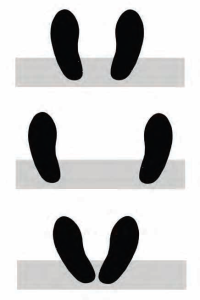
- Foot Spacing: The width of your stance can influence which muscles are emphasized. A narrow stance shifts focus to the outer quadriceps (vastus lateralis) and abductors (tensor fasciae latae). A shoulder-width stance targets the entire thigh. A wider stance places more emphasis on the inner quadriceps, adductor muscles, and sartorius.
- Foot Position: To maintain stability and proper tracking of your knees, point your toes forward or slightly outward in the same direction as your thighs and knees.
- Positioning: Some individuals benefit from placing a 1-inch (2.5 cm) block under both heels. This forward shift in weight places more emphasis on the quadriceps and less on the gluteals, which can be particularly useful for those with less flexible ankles and hips. Powerlifters often place the bar lower on the trapezius and shoulders to improve balance while emphasizing the gluteals.
- Body Position: Keep your spine straight and head up at all times. Ensure your hands are evenly spaced on the bar and maintain a firm grip. Inhale deeply during the downward phase and exhale on the way up. Avoid bending your torso forward, as this can lead to back injuries.
- Range of Motion: Lower the weight until your knees are bent to a 90-degree angle, and your thighs are parallel to the floor. Squatting below parallel can increase the risk of knee and spine injuries.
Front Squat:
The front squat is a variation of the traditional barbell squat that shifts the emphasis away from the gluteals and toward the quadriceps. In this variation, the barbell is held across the front of your shoulders, which requires a more upright torso position. Front squats are known for their higher level of difficulty and typically require lighter weights compared to traditional back squats.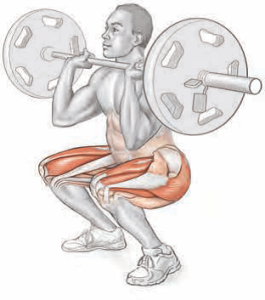
Machine Squat (Smith):
The machine squat, especially when performed on a Smith machine, is a valuable addition to any lower body workout routine. This exercise offers a controlled and guided movement that can help individuals target various leg muscles effectively while minimizing the risk of injury. In this comprehensive guide, we will explore the execution, muscles involved, anatomic focus, and the machine front squat variation.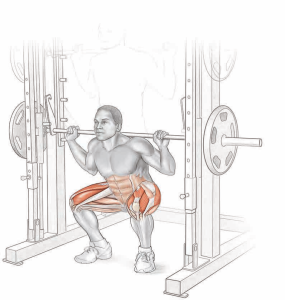
Execution:
- Starting Position: Begin by standing upright inside a Smith machine with the barbell resting across the back of your shoulders. Ensure that your feet are shoulder-width apart.
- Descent: Slowly bend your knees while keeping your back straight. Lower your body until your thighs are parallel to the floor. This controlled movement should engage your quadriceps and gluteus maximus.
- Ascent: Straighten your legs to return to the starting position. Maintain proper form throughout the exercise.
Muscles Involved:
- Primary Muscles: The machine squat primarily targets the quadriceps, including the rectus femoris, vastus lateralis, vastus medialis, and vastus intermedius. It also engages the gluteus maximus (buttocks).
- Secondary Muscles: Secondary muscles involved in the machine squat include the hamstrings (semitendinosus, semimembranosus, biceps femoris), adductor muscles (longus, magnus, brevis), tensor fasciae latae, spinal erectors (sacrospinalis), and abdominals (rectus abdominis, external oblique, internal oblique).
Anatomic Focus:
- Foot Position: The placement of your feet can influence the emphasis on different muscle groups. Placing your feet close to your body emphasizes the quadriceps, while positioning your feet forward, away from your body, shifts the focus to the gluteals and hamstrings.
- Foot Spacing: The width of your stance plays a role in which muscles are targeted. A narrow stance places more emphasis on the outer quadriceps (vastus lateralis) and abductors (tensor fasciae latae). A shoulder-width stance targets the entire thigh. A wider stance places greater emphasis on the inner quadriceps, adductor muscles, and sartorius.
- Foot Position: To maintain stability and proper knee tracking, point your toes forward or slightly outward in alignment with your thighs and knees.
- Hand Position: Ensure that your hands are evenly spaced on the bar, maintaining a firm overhand grip to keep the bar in the unlocked position.
- Body Position: Throughout the exercise, maintain a straight spine and keep your head up. Inhale deeply during the descent phase and exhale as you return to the upright position. Avoid bending your torso forward, as this can lead to back injuries.
- Range of Motion: Lower the weight until your knees reach a 90-degree angle, and your thighs are parallel to the floor. At the top of the movement, stopping a few degrees short of full lockout maintains tension on the quadriceps.
- Resistance: Compared to the barbell squat, the machine squat offers better balance and safety. The guided motion of the Smith machine can be advantageous for those who may struggle with balance during free weight squats.
- Trajectory: The Smith machine provides a single plane of vertical motion, which can help individuals focus their effort during the exercise, making it an excellent choice for targeting specific muscle groups.
Machine Front Squat:
For individuals seeking to emphasize their quadriceps over the gluteals, the machine front squat is an ideal variation. In this variation, the barbell is supported across the front of your shoulders, requiring a more upright torso position. This adjustment places greater emphasis on the quadriceps while offering a challenging workout experience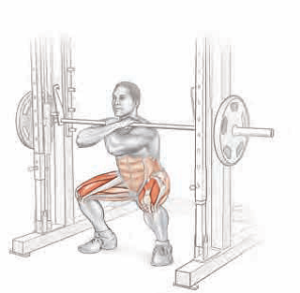 Leg Press:
The leg press is a highly effective lower body exercise that targets the quadriceps, along with several other muscle groups. Performed on a leg press machine, this exercise offers a controlled and guided movement, making it an excellent choice for developing leg strength and muscle mass while minimizing the risk of injury. In this comprehensive guide, we will explore the execution, muscles involved, anatomic focus, and the one-leg press variation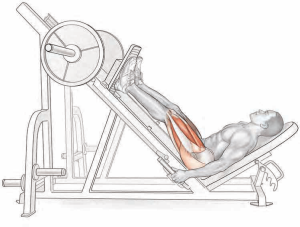
Execution:
- Starting Position: Begin by sitting in the leg press machine, ensuring that your back is comfortably pressed against the backrest. Place your feet shoulder-width apart on the footplate, ensuring they are properly aligned.
- Descent: Slowly lower the weight by bending your knees until they reach a 90-degree angle. Keep your back flat against the backrest throughout this controlled motion.
- Ascent: Push the weight back to the starting position by straightening your legs. Ensure that your movements are deliberate and controlled to maximize muscle engagement.
Muscles Involved:
- Primary Muscles: The leg press primarily targets the quadriceps, including the rectus femoris, vastus lateralis, vastus medialis, and vastus intermedius.
- Secondary Muscles: Secondary muscles involved in the leg press exercise include the gluteus maximus (buttocks), hamstrings (semitendinosus, semimembranosus, biceps femoris), adductor muscles (longus, magnus, brevis), gracilis, and tensor fasciae latae.
Anatomic Focus:
- Foot Position: The placement of your feet on the footplate can influence the muscle focus. Placing your feet lower on the footplate emphasizes the quadriceps, while positioning them higher on the footplate shifts the focus to the gluteals and hamstrings.
- Foot Spacing: A shoulder-width foot spacing effectively targets the entire thigh. However, a wider foot spacing places greater emphasis on the inner quadriceps (vastus medialis), adductor muscles, and sartorius, while a close foot spacing shifts the focus to the outer quadriceps (vastus lateralis) and abductors (tensor fasciae latae).
- Trajectory: Adjusting your foot placement on the footplate can influence the trajectory of your movements. Pushing the weight up using the balls of your feet and allowing your heels to rise off the footplate as the weight is lowered will target the quadriceps and reduce stress on the kneecaps. Conversely, pushing the weight through your heels targets the hamstrings and gluteals.
- Body Position: The angle your torso makes with your legs can influence the muscular focus and the stress on your lower back. An acute angle between the seat and backrest emphasizes the gluteals and hamstrings but may place more stress on your lower back. Tilting the backrest lower toward the floor results in a more reclined torso position, reducing stress on the lower spine and emphasizing the quadriceps.
- Range of Motion: Stopping just a few degrees short of full lockout at the top of the movement maintains tension on the quadriceps throughout the exercise.
- Resistance: Compared to the barbell squat, the leg press exercise reduces the axial load on your spine, reducing the risk of back discomfort. It also places a greater emphasis on the quadriceps rather than the gluteals
Variation: One-Leg Press
For individuals looking to focus their efforts on a lagging thigh or protect an injured leg, the one-leg press is a valuable variation. This exercise involves pressing the weight with one leg at a time, allowing for more concentrated effort on each leg individually.
Hack Squat:
The hack squat is an effective lower body exercise that primarily targets the quadriceps while engaging several other muscle groups. Performed using a hack squat machine, this exercise provides support for the back and offers a controlled movement that can help individuals build leg strength and muscle mass while minimizing the risk of injury. In this comprehensive guide, we will explore the execution, muscles involved, anatomic focus, and variations of the hack squat.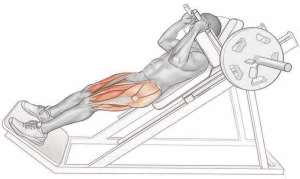
Execution:
- Starting Position: Begin by placing your back against the backrest of the hack squat machine, ensuring that your shoulders are under the pads. Stand with your feet shoulder-width apart on the footplate, and have your toes pointing forward.
- Descent: Slowly lower the weight by bending your knees to a 90-degree angle. Keep your back against the backrest throughout this controlled motion.
- Ascent: Push the weight back to the starting position by straightening your legs. Maintain proper form and control throughout the exercise.
Muscles Involved:
- Primary Muscles: The hack squat primarily targets the quadriceps, which include the rectus femoris, vastus lateralis, vastus medialis, and vastus intermedius.
- Secondary Muscles: Secondary muscles engaged during the hack squat exercise include the gluteus maximus (buttocks), hamstrings (semitendinosus, semimembranosus, biceps femoris), adductor muscles (longus, magnus, brevis), gracilis, and tensor fasciae latae.
Anatomic Focus:
- Foot Spacing: Placing your feet shoulder-width apart effectively targets the entire thigh. However, a wider foot spacing places more emphasis on the inner quadriceps (vastus medialis), adductor muscles, and sartorius. Conversely, placing your feet close together shifts the focus to the outer quadriceps (vastus lateralis) and abductors (tensor fasciae latae).
- Foot Position: Point your toes forward or slightly outward, aligning them with your thighs and knees. Placing your feet low on the footplate, closer to your body, emphasizes the quadriceps. Conversely, positioning your feet higher on the footplate requires greater effort from the gluteals and hamstrings.
- Trajectory: Adjusting your foot placement on the footplate can influence the trajectory of your movements. Pushing the weight using the forefoot and allowing your heels to rise off the footplate as the weight is lowered isolates the quadriceps and reduces stress on the kneecaps.
- Body Position: Maintain a flat spine against the backrest throughout the exercise to ensure proper form and minimize the risk of injury.
- Range of Motion: Stopping just a few degrees short of full lockout at the top of the movement keeps tension on the quadriceps.
- Resistance: Compared to the barbell squat, the hack squat exercise provides support for the spine and places more emphasis on the quadriceps while reducing the load on the gluteals.
Variations:
- Dumbbell Squat: To incorporate elements of both the barbell squat and the hack squat, perform the squat while holding a dumbbell in each hand at arm’s length at your sides. This variation, however, limits the amount of weight you can use due to the strength of your grip.
- Reverse Hack Squat: Performing the hack squat while facing the machine, rather than with your back to it, shifts the focus to the gluteals and hamstrings, offering a variation that targets different muscle groups.
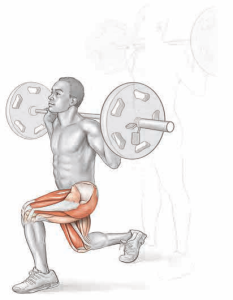
Lunges:
Lunges are a versatile lower body exercise that targets the quadriceps, glutes, and various other muscle groups. This exercise can be performed with a variety of equipment, including dumbbells, barbells, or using bodyweight alone. In this comprehensive guide, we will explore the execution, muscles involved, anatomic focus, and variations of lunges to help you build strength and stability in your lower body.
Execution:
- Starting Position: Begin by standing with your feet shoulder-width apart, holding a dumbbell in each hand at arm’s length by your sides. Ensure that your back is straight and your chest is up.
- Step Forward: Take a step forward with one foot, landing on the heel and then the ball of your foot. As you step forward, bend your front knee until your leading thigh is parallel to the floor. Your back knee should be hovering just above the ground.
- Return to Starting Position: Push through your front heel to return to the starting position, and then repeat the lunge with the opposite leg. Continue to alternate legs.
Muscles Involved:
- Primary Muscles: Lunges primarily target the quadriceps, including the rectus femoris, vastus lateralis, vastus medialis, and vastus intermedius, as well as the gluteus maximus (buttocks).
- Secondary Muscles: Secondary muscles engaged during lunges include the hamstrings (semitendinosus, semimembranosus, biceps femoris), adductor muscles (longus, magnus, brevis), gracilis, and tensor fasciae latae.
Anatomic Focus:
- Foot Spacing: To maintain balance and stability, maintain a shoulder-width stance during lunges.
- Foot Position: Point your toes straight ahead or slightly outward as you step forward. Your back foot should remain fixed to the floor in the same spot during each lunge.
- Trajectory: The size of your step plays a role in muscle emphasis. Taking a shorter step (smaller lunge) targets the quadriceps, while a larger step places greater emphasis on the gluteals and hamstrings.
- Body Position: As you lunge forward, shift your body weight onto the leading leg. Keep your torso upright and your back straight to ensure proper form and minimize the risk of injury.
- Range of Motion: During the lunge, your front knee should bend to approximately 90 degrees, and your leading thigh should be parallel to the floor.
- Resistance: Lunges typically require lighter weights compared to other leg exercises. Using a weight that is too heavy may put excessive strain on the kneecaps.
Variations:
- Barbell Lunge: Instead of holding dumbbells, you can rest a barbell across your shoulders for added resistance. This variation increases the difficulty of maintaining balance and stability.
- Walking Lunge: After each lunge, instead of returning to the starting position, take another step forward with the opposite leg, creating a walking motion. This continuous movement challenges endurance and coordination.
- Smith Machine Lunge: Perform lunges using a Smith machine, which provides stability and balance assistance. This can be beneficial for individuals who are new to lunges or working on form.
Lying Leg Curl:
The lying leg curl is an effective lower body exercise designed to target the hamstrings. This exercise helps develop strength and muscular balance in the back of the thigh while also engaging secondary muscle groups. In this comprehensive guide, we will delve into the execution, muscles involved, anatomic focus, and variations of the lying leg curl to help you build robust hamstrings and improve lower body performance
Execution:
- Starting Position: Begin by lying facedown on the leg curl machine, ensuring that your body is in a straight line. Hook your heels under the roller pads provided by the machine.
- Curling the Weight: To initiate the exercise, bend your knees and curl the weight by raising your heels towards your buttocks. Ensure that you maintain control over the movement.
- Lowering the Weight: After completing the curl, gently lower the weight back down to the starting position, fully extending your legs.
Muscles Involved:
- Primary Muscles: The primary focus of the lying leg curl exercise is on the hamstrings, including the semitendinosus, semimembranosus, and biceps femoris.
- Secondary Muscles: Secondary muscles involved in this exercise include the gluteus maximus (buttocks) and the gastrocnemius (calf muscles).
Anatomic Focus:
- Foot Position: Your foot placement can influence the engagement of different parts of the hamstrings. Pointing your toes straight targets all three hamstring muscles. Pointing your toes inward emphasizes the inner hamstrings (semitendinosus and semimembranosus), while pointing your toes outward focuses on the outer hamstrings (biceps femoris). Maintaining ankle dorsiflexion (90-degree angle) minimizes calf muscle involvement, helping to isolate the hamstrings. Conversely, plantar flexion of the feet allows the calf muscles to participate in the exercise.
- Foot Spacing: The standard foot spacing is hip-width apart. Wider foot spacing targets the inner hamstrings (semitendinosus and semimembranosus), while narrower foot spacing emphasizes the outer hamstrings (biceps femoris). The size of the roller pad on the machine can limit foot spacing options.
- Body Position: Most machines have a padded surface angled at hip level, slightly bending your torso forward. This body position tilts the pelvis, effectively stretching the hamstrings and isolating the muscles. Maintain a straight spine and avoid lifting your chest during the exercise.
- Range of Motion: During the upward phase of the exercise, bend your knees as far as possible. To keep tension on the hamstrings and minimize stress on the knee joints, stop a few degrees short of full knee extension at the bottom of the movement.
- Resistance: The resistance in the lying leg curl exercise is relatively uniform, although some modern machines may offer lower resistance at the starting position where the hamstrings are fully stretched. This design aims to minimize vulnerability to injury.

Variations:
- Seated Leg Curl: In the seated leg curl, the backrest of the machine creates a 90-degree hip flexion angle between your torso and thighs. This position provides a greater stretch to the hamstrings but limits hip extension, which is essential for achieving a maximum contraction in the hamstrings.
Standing Leg Curl:
The standing leg curl is an effective lower body exercise that specifically targets the hamstrings. This single-leg exercise helps individuals build strength and muscle balance in the posterior thigh area while also engaging secondary muscle groups. In this comprehensive guide, we will explore the execution, muscles involved, anatomic focus, and variations of the standing leg curl to help you enhance your hamstring strength and overall lower body performance.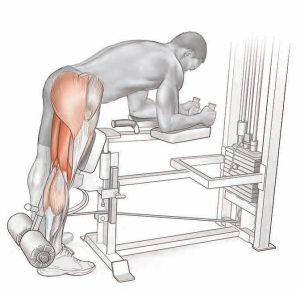
Execution:
- Starting Position: Face the leg curl machine and hook one heel under the roller pad while supporting your weight with the other leg.
- Curling the Weight: Begin the exercise by bending your knee and raising your heel toward your buttock. Maintain control over the movement throughout.
- Lowering the Weight: After completing the curl, gently lower the weight back down to the starting position, fully extending your leg.
Muscles Involved:
- Primary Muscles: The primary focus of the standing leg curl exercise is on the hamstrings, including the semitendinosus, semimembranosus, and biceps femoris.
- Secondary Muscles: Secondary muscles engaged during this exercise include the gluteus maximus (buttocks) and the gastrocnemius (calf muscles).
Anatomic Focus:
- Foot Position: The direction in which you point your toes can influence the engagement of different parts of the hamstrings. Pointing your toes straight down targets all three hamstring muscles. If you point your toes inward, it tends to emphasize the inner hamstrings (semitendinosus and semimembranosus), while pointing your toes outward focuses effort on the outer hamstrings (biceps femoris). Maintaining dorsiflexion of the ankle of the working leg (90-degree angle) minimizes the contribution from the calf muscles, helping to isolate the hamstrings.
- Body Position: Most machines have a padded surface angled at hip level, slightly bending your torso forward. This body position tilts the pelvis, effectively stretching the hamstrings, and helps isolate the muscles. Depending on the machine design, your supporting leg may take either a standing or kneeling position (see the variation).
- Range of Motion: During the upward phase of the exercise, bend your knee as much as possible. To keep tension on the hamstrings and minimize stress on the knee joint, stop a few degrees short of full knee extension at the bottom of the movement.
- Resistance: Unlike the lying leg curl, this exercise is performed with one leg at a time, which allows for better muscle isolation and focus. The resistance is typically uniform, but on many modern machines, the resistance may be lower at the starting position, where the hamstrings are fully stretched and most vulnerable to injury.

Variations:
- Kneeling Leg Curl: On the kneeling leg curl machine, a pad supports your nonworking leg, and your elbows support your torso. Due to the forward bend at the waist in this position, the hamstrings experience a greater stretch, making it an advantageous variation compared to performing the exercise on the standing leg curl machine.
Barbell Stiff-Legged Deadlift:
The barbell stiff-legged deadlift is a powerful lower body exercise that specifically targets the hamstrings while engaging other muscle groups for overall strength development. In this comprehensive guide, we will delve into the execution, muscles involved, anatomic focus, and variations of the barbell stiff-legged deadlift to help you enhance your hamstring strength and maintain proper form.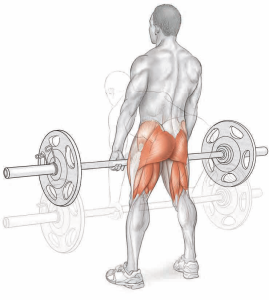 Execution:
- Starting Position: Begin by standing upright with your feet directly below your hips. Hold a barbell at arms’ length with an overhand grip (both palms facing you) or a mixed grip (one palm facing you and the other facing away from you).
- Bend at the Waist: Initiate the movement by bending forward at the waist while keeping your legs stiff and maintaining a slight bend in your knees. Lower the barbell toward the floor in a controlled manner.
- Lift and Return: Stop just before the weight touches the floor and return to the starting position by extending your hips and standing up straight.
Muscles Involved:
- Primary Muscles: The primary focus of the barbell stiff-legged deadlift is on the hamstrings, including the semitendinosus, semimembranosus, and biceps femoris. It also engages the gluteus maximus (buttocks).
- Secondary Muscles: Secondary muscles involved in this exercise include the spinal erectors (sacrospinalis) and the quadriceps (rectus femoris, vastus lateralis, vastus medialis, vastus intermedius).
Anatomic Focus:
- Foot Spacing: Position your feet directly below your hips for a stable base. A wider stance may place more emphasis on the inner hamstrings, but the standard stance is effective for overall hamstring development.
- Foot Position: Point your toes directly forward or slightly outward, depending on your comfort and natural stance.
- Grip: Space your hands shoulder-width apart on the barbell. The over-under grip, with one palm facing forward and the other facing backward, prevents the bar from rolling in your hands.
- Trajectory: Keep the barbell close to your body as it travels straight up and down during the exercise.
- Body Position: Maintain a straight back throughout the movement. While your knees may be slightly bent, they should remain stiff to isolate the hamstrings. It’s important to avoid rounding your spine.
- Range of Motion: Lower the barbell until your hamstrings reach a full stretch without compromising your spinal position. There’s no need to stand on a bench or block to increase the range of motion. When your pelvis achieves full forward tilt, your hamstrings are at full stretch. Bending your lower spine doesn’t enhance hamstring engagement but increases the risk of injury.
- Resistance: This exercise typically requires lighter weight than the standard barbell deadlift. The focus here is on strengthening the hamstrings rather than the lower back.
Dumbbell Stiff-Legged Deadlift:
The dumbbell stiff-legged deadlift is a versatile lower body exercise that effectively targets the hamstrings while engaging other muscle groups for overall lower body development. In this comprehensive guide, we will delve into the execution, muscles involved, anatomic focus, and variations of the dumbbell stiff-legged deadlift to help you enhance your hamstring strength and maintain proper form.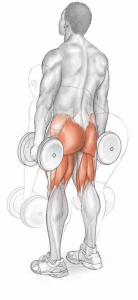 Execution:
- Starting Position: Stand upright with your feet directly below your hips, holding a dumbbell in each hand at arms’ length. Ensure your palms are facing your body, creating a neutral grip.
- Bend at the Waist: Begin the movement by bending forward at the waist while keeping your legs stiff and maintaining a slight bend in your knees. Lower the dumbbells toward the floor in a controlled manner.
- Lift and Return: Halt the descent just before the dumbbells touch the floor, and return to the starting position by extending your hips and standing up straight.
Muscles Involved:
- Primary Muscles: The dumbbell stiff-legged deadlift primarily targets the hamstrings, including the semitendinosus, semimembranosus, and biceps femoris. Additionally, it engages the gluteus maximus (buttocks).
- Secondary Muscles: Secondary muscles involved in this exercise include the spinal erectors (sacrospinalis) and the quadriceps (rectus femoris, vastus lateralis, vastus medialis, vastus intermedius).
Anatomic Focus:
- Foot Spacing: Maintain a foot position with your feet directly below your hips for stability. A wider stance may emphasize the inner hamstrings, but the standard stance effectively targets overall hamstring development.
- Foot Position: Point your toes directly forward or slightly outward, depending on your comfort and natural stance.
- Grip: Hold the dumbbells shoulder-width apart with your arms vertical, allowing the weights to pass up and down along your outer thighs. This grip keeps the dumbbells clear of your legs during the movement.
- Trajectory: Keep the dumbbells close to your body as they travel straight up and down throughout the exercise.
- Body Position: Maintain a straight back during the entire movement. While your knees may have a slight bend, they should remain stiff to isolate the hamstrings. It’s crucial to avoid rounding your spine.
- Range of Motion: Lower the dumbbells until your hamstrings reach a full stretch without compromising the natural arch of your spine. Depending on your flexibility, lower the dumbbells to a point below your knees or just above your ankles.
- Resistance: This exercise typically requires lighter weights compared to the standard barbell deadlift. The focus here is on strengthening the hamstrings and promoting muscle stability rather than the lower back.
Standing Calf Raise:
The standing calf raise is an essential lower body exercise designed to target and strengthen the calf muscles, primarily the gastrocnemius. This comprehensive guide explores the execution, muscles involved, anatomic focus, and variations of the standing calf raise to help you develop strong and well-defined calf muscles.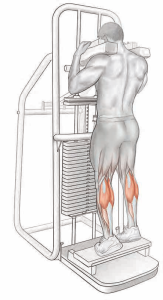
Execution:
- Starting Position: Begin by standing on the platform of the standing calf raise machine, positioning your toes at the edge and your shoulders under the pads. Allow your heels to drop as far as possible to achieve a full stretch in the calf muscles.
- Lift the Weight: Lift the weight by raising your heels as high as possible while keeping your legs straight. This upward movement should focus on contracting the calf muscles.
- Lower Your Heels: Gradually lower your heels back down to the starting position, ensuring controlled and deliberate movement throughout the exercise.
Muscles Involved:
- Primary Muscles: The primary target of the standing calf raise is the gastrocnemius, the larger, more visible calf muscle.
- Secondary Muscles: The soleus muscle, located beneath the gastrocnemius, plays a secondary role in this exercise.
Anatomic Focus:
- Foot Position: The direction of your toes during the exercise affects which part of the calf muscles is emphasized. Pointing your toes straight ahead targets the entire gastrocnemius muscle. Outward-pointing toes emphasize the inner (medial) head, while inward-pointing toes target the outer (lateral) head of the gastrocnemius.
- Foot Spacing: The spacing between your feet also influences which part of the calf muscles is worked. A hip-width stance targets the entire gastrocnemius. A wider stance tends to emphasize the inner (medial) head, whereas a narrower stance focuses on the outer (lateral) head.
- Body Position: Maintain stiff knees and a straight back throughout the exercise. Keeping your knees locked straight stretches the gastrocnemius, concentrating effort on this muscle and minimizing the contribution of the soleus. If your knees bend during the movement, the soleus will play a more significant role.
- Range of Motion: To maximize the effectiveness of the exercise, aim for a full stretch at the bottom of the movement and a full squeeze at the top. This ensures that the calf muscles are fully engaged throughout the range of motion.

Variation:
- Smith Machine Raise: For added variety, perform the standing calf raise using a Smith machine. To increase the range of motion, stand on a block of wood approximately 3 inches (7.5 cm) thick while using the Smith machine.
Dumbbell One-Leg Calf Raise:
The dumbbell one-leg calf raise is a targeted lower-body exercise designed to isolate and strengthen the calf muscles, primarily the gastrocnemius. In this comprehensive guide, we’ll explore the execution, muscles involved, anatomic focus, and benefits of this exercise, which is essential for building calf strength and improving balance.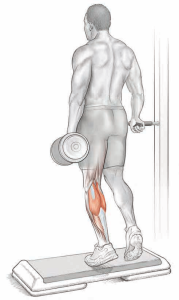 Execution:
- Starting Position: Begin by holding a dumbbell in one hand and placing the toes of the same-side foot on a block or raised surface that is approximately 3 inches (7.5 cm) thick. Allow your heel to drop as far as possible to achieve a full stretch in the calf muscle. Use your free hand to support your torso for balance.
- Lift the Weight: Lift the weight by raising your heel as high as possible while keeping your leg straight. This upward movement should focus on contracting the calf muscle.
- Lower Your Heel: Gradually lower your heel back down to the starting position in a controlled manner. Perform calf raises with one leg at a time. After completing the desired number of repetitions, switch to the other leg.
Muscles Involved:
- Primary Muscles: The primary target of the dumbbell one-leg calf raise is the gastrocnemius, the larger, more visible calf muscle.
- Secondary Muscles: The soleus muscle, located beneath the gastrocnemius, plays a secondary role in this exercise.
Anatomic Focus:
- Foot Position: The direction of your toes during the exercise influences which part of the calf muscles is emphasized. Pointing your toes straight ahead targets the entire gastrocnemius muscle. If you point your toes inward or outward, you can shift emphasis between the inner (medial) head and outer (lateral) head of the gastrocnemius.
- Body Position: To isolate the gastrocnemius, keep your knee fully straight throughout the exercise. This ensures that the movement primarily engages the calf muscle. However, if you allow a slight bend at the knee, the soleus will also contribute to the movement.
- Range of Motion: To maximize the effectiveness of the exercise, aim for a full stretch at the bottom of the movement and a full squeeze at the top. The movement should occur primarily at the ankle joint, not the knee joint.
- Trajectory: Ensure that the standing block or raised surface is thick enough to allow a full range of motion without your heel touching the floor during the downward phase. This prevents any break in the exercise’s continuity and maintains constant tension on the calf muscle.
Benefits:
- Calf Strength: The dumbbell one-leg calf raise is an excellent exercise for building calf strength, which can improve your athletic performance and everyday activities.
- Balance and Stability: By isolating one leg at a time, this exercise helps improve balance and stability, making it a valuable addition to your lower-body workout routine.
- Calf Definition: Regularly incorporating one-leg calf raises into your training can help sculpt and define your calf muscles for a more aesthetically pleasing lower leg appearance.
Donkey Calf Raise:
The Donkey Calf Raise is a powerful exercise that targets the calf muscles, particularly the gastrocnemius. This comprehensive guide will delve into the execution, muscles involved, anatomic focus, and benefits of this exercise, which is crucial for developing strong and defined calf muscles.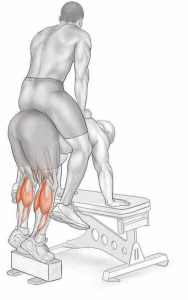 Execution:
- Starting Position: Begin by placing your toes on a block that is approximately 3 inches (7.5 cm) thick. To maintain balance, lean forward and rest your torso on a bench or support surface. Allow your heels to drop as far as possible to achieve a deep stretch in the calf muscles.
- Lift Your Heels: Lift your body weight by raising your heels as high as possible while keeping your legs straight. Focus on contracting the calf muscles during this upward movement.
- Lower Your Heels: Gradually lower your heels back down to the starting position in a controlled manner. Perform the Donkey Calf Raise with both legs simultaneously.
Muscles Involved:
- Primary Muscles: The primary target of the Donkey Calf Raise is the gastrocnemius, the large calf muscle that creates the characteristic “bulge” in well-defined calves.
- Secondary Muscles: The soleus, a smaller calf muscle beneath the gastrocnemius, plays a secondary role in this exercise.
Anatomic Focus:
- Foot Position: The orientation of your toes during the exercise affects which part of the calf muscles is emphasized. Pointing your toes straight ahead targets the entire gastrocnemius muscle. Turning your toes outward or inward can shift the emphasis to the inner (medial) or outer (lateral) head of the gastrocnemius, respectively.
- Foot Spacing: Position your feet hip-width apart for a balanced engagement of the entire gastrocnemius muscle. A wider stance places more emphasis on the inner (medial) head, while a narrower stance targets the outer (lateral) head.
- Body Position: To isolate the gastrocnemius, keep your spine straight and maintain a parallel torso to the floor. While performing the exercise, focus on keeping your knees fully extended to emphasize the calf muscles. However, a slight bend at the knees allows the soleus to contribute to the movement.
- Range of Motion: Aim for a full stretch at the bottom of the movement and a complete squeeze at the top to maximize the exercise’s effectiveness. The movement should primarily occur at the ankle joint, not the knee joint.
- Trajectory: Ensure that the block or raised surface you’re using is thick enough to enable a full range of motion without your heel touching the floor during the downward phase. This ensures constant tension on the calf muscles throughout the exercise.
- Resistance: To intensify the exercise, you can have a training partner straddle your hips, adding their body weight to provide additional resistance.
Benefits:
- Calf Strength: The Donkey Calf Raise is highly effective for building calf strength, which can enhance athletic performance and everyday activities.
- Calf Definition: Regularly incorporating this exercise into your routine can help create defined and aesthetically pleasing calf muscles.
- Improved Athletic Performance: Strong calf muscles are essential for activities that require explosive movements, such as sprinting and jumping.
Machine Calf Raise:
The Machine Calf Raise is a highly effective exercise for targeting the calf muscles, specifically the gastrocnemius, with precision and control. This guide will provide comprehensive information on how to perform the Machine Calf Raise, its anatomical focus, benefits, and tips for maximizing its effectiveness in your calf training routine.
Execution:
- Machine Setup: Begin by sitting in a leg press machine. Ensure that the machine is adjusted to your height and that the weight stack is set to your desired resistance level.
- Foot Placement: Place the balls of your feet on the edge of the footplate, ensuring that your toes are pointing straight ahead. Keep your knees straight throughout the exercise.
- Movement: Lower the weight as far as your calf muscles comfortably allow, feeling a stretch in the calves. This is your starting position.
- Calf Contraction: Push the weight up by raising your heels as high as you can, contracting your calf muscles at the top of the movement. Focus on a strong squeeze and a full contraction.
- Return to Starting Position: Slowly lower the weight back down to the starting position, ensuring that you maintain control throughout the descent.
Muscles Involved:
- Primary: Gastrocnemius
- Secondary: Soleus
Anatomic Focus:
- Foot Position: To target the entire gastrocnemius muscle, keep your toes pointing straight ahead. Adjusting the angle of your feet inward or outward can emphasize specific areas of the gastrocnemius.
- Foot Spacing: Positioning your feet hip-width apart targets the entire gastrocnemius. A wider stance emphasizes the inner (medial) head, while a narrower stance targets the outer (lateral) head.
- Body Position: This exercise is biomechanically similar to a seated straight-leg calf raise. Keep your knees straight, allowing movement to occur exclusively at the ankle. Maintaining straight knees isolates the gastrocnemius, while a slight bend at the knees may involve the soleus to some extent.
- Range of Motion: Maximize your range of motion by achieving a full stretch at the bottom of the movement and a complete contraction at the top.
Benefits:
- Targeted Calf Development: The Machine Calf Raise precisely targets the calf muscles, allowing you to focus on isolating and sculpting the gastrocnemius.
- Safety and Stability: This exercise provides a stable platform, reducing the risk of injury compared to free-weight calf exercises. It is particularly beneficial for those with balance or stability concerns.
- Ease of Use: The controlled motion of the leg press machine makes this exercise accessible to individuals at various fitness levels, ensuring that beginners and advanced trainees can benefit from it.
Tips for Maximizing Effectiveness:
- Full Contractions: Concentrate on achieving full contractions at the top of the movement. Squeeze your calf muscles for a brief moment before lowering the weight.
- Controlled Tempo: Perform the exercise with a controlled tempo, avoiding jerky movements. Focus on a smooth and deliberate cadence.
- Progressive Overload: Gradually increase the resistance over time to promote calf muscle growth. Start with a weight that allows you to complete your desired repetitions with proper form.
- Variation: To add variety to your calf training routine, consider incorporating the calf-sled machine, which offers a different footplate design and resistance transmission method.
Seated Calf Raise:
The Seated Calf Raise is a highly effective exercise for isolating and strengthening the calf muscles, with a primary focus on the soleus and secondary involvement of the gastrocnemius. This comprehensive guide will provide you with in-depth information on how to perform the Seated Calf Raise, its anatomical focus, variations, and tips to maximize its effectiveness in your calf training routine.
Execution:
- Machine Setup: Begin by adjusting the seated calf machine to your height and ensuring that the weight stack is set to your desired resistance level.
- Foot Placement: Place the balls of your feet on the platform provided by the machine. The platform should be positioned so that your toes are pointing straight ahead.
- Pads Placement: Position the pads of the machine across your lower thighs, just above your knees. This placement ensures proper alignment and support during the exercise.
- Heel Lowering: Lower your heels as far as possible, allowing your calf muscles to stretch fully. This is your starting position.
- Calf Contraction: Lift the weight by raising your heels as high as you can, contracting your calf muscles at the top of the movement. Focus on achieving a strong and complete contraction.
- Return to Starting Position: Slowly lower your heels back down to the starting position in a controlled manner, maintaining proper form throughout the exercise.
Muscles Involved:
- Primary: Soleus
- Secondary: Gastrocnemius
Anatomic Focus:
- Foot Position: To target the entire calf muscle, keep your toes pointing straight ahead. Adjusting the angle of your feet inward or outward can shift the emphasis to specific areas of the calf muscle.
- Foot Spacing: Position your feet hip-width apart to target the entire calf muscle. A wider stance emphasizes the inner (medial) head, while a narrower stance targets the outer (lateral) head.
- Body Position: The seated position with bent knees places emphasis on both the soleus and the gastrocnemius. Ensure that the pad placement is just above your knees, not too high on the thighs.
- Range of Motion: Maximize your range of motion by achieving a full stretch at the bottom of the movement and a complete squeeze at the top. This full range of motion is essential for effective calf development.
Variation: Barbell Seated Calf Raise
For added variety and a different training stimulus, you can perform the Barbell Seated Calf Raise. Here’s how to do it:
- Sit on a bench with your back straight and your toes on a block or step platform.
- Place a barbell across your lower thighs, just above your knees, and ensure it is secure.
- Follow the same principles of foot positioning, foot spacing, and range of motion as in the machine-based Seated Calf Raise.
Tips for Maximizing Effectiveness:
- Full Contractions: Concentrate on achieving full contractions at the top of the movement. Squeeze your calf muscles for a brief moment before lowering the weight.
- Controlled Tempo: Perform the exercise with a controlled tempo, avoiding rapid or jerky movements. A smooth and deliberate cadence is key.
- Progressive Overload: Gradually increase the resistance over time to promote calf muscle growth. Start with a weight that allows you to complete your desired repetitions with proper form.