Barbell Shoulder Press:
The barbell shoulder press, also known as the overhead press, is a fundamental exercise for developing robust and well-defined shoulder muscles. In this comprehensive guide, we’ll delve into the precise execution of the barbell shoulder press, explore the primary and secondary muscles involved, discuss anatomic focus, and introduce a variation to enhance your shoulder workout routine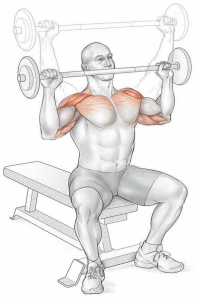
Executing the Barbell Shoulder Press:
- Execution:
- Start by seating yourself on a bench.
- Grasp the barbell with a shoulder-width grip, ensuring that your palms face forward.
- Slowly lower the weight in front of you until it lightly touches your upper chest.
- Push the barbell vertically upward until your elbows lock out, completing one repetition.
- Muscles Involved:
- Primary Muscle: The anterior deltoid is the primary target of the barbell shoulder press, working to lift the weight overhead.
- Secondary Muscles: Supporting the movement, the lateral deltoid, triceps brachii, trapezius, and upper pectoralis major are engaged to stabilize and assist in the exercise.
- Anatomic Focus: Tailoring the Exercise for Your Anterior Deltoid
- Hand Spacing: To effectively target the anterior deltoid, opt for a shoulder-width grip on the barbell. Wider grips may minimize triceps involvement but can increase the risk of shoulder injury.
- Range of Motion: A shorter repetition, where you terminate the press just before lockout, maintains constant tension on the anterior deltoid by limiting triceps contribution during the lockout phase.
- Positioning: Seated execution is stricter than standing, as it prevents leveraging leg momentum to lift the weight, ensuring a more focused workout for the shoulders.
Variation:
For those looking to diversify their shoulder workout routine, the behind-the-neck press is an alternative. In this version, the shoulder is placed in more external rotation. However, it’s essential to be cautious, as the risk of shoulder injury is higher when lifting the weight behind the neck. Therefore, proper form and adequate shoulder mobility are crucial prerequisites.
Incorporating the barbell shoulder press into your shoulder training regimen, with attention to form and grip, can help you achieve broader, more defined shoulders. Whether you choose to stick with the traditional front press or explore the behind-the-neck variation, this exercise is a valuable addition to your workout routine for building strong and sculpted shoulders.
Machine Shoulder Press:
The machine shoulder press is a highly effective exercise for developing well-rounded and powerful shoulder muscles. In this comprehensive guide, we’ll explore the proper execution of the machine shoulder press, discuss the primary and secondary muscles engaged, and delve into the anatomic focus to help you make the most of this exercise.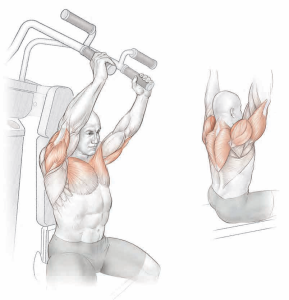
Executing the Machine Shoulder Press:
- Execution:
- Begin by seating yourself in the machine with your back straight and firmly against the backrest.
- Grip the handles provided by the machine.
- Push the weight stack vertically upward until your elbows fully lock out.
- Slowly lower the weight back down to shoulder level to complete one repetition.
- Muscles Involved:
- Primary Muscle: The machine shoulder press primarily targets the anterior deltoid, which is responsible for lifting the weight overhead.
- Secondary Muscles: Supporting and stabilizing this movement are the lateral deltoid, triceps brachii, trapezius, and upper pectoralis.
- Anatomic Focus: Enhancing Your Machine Shoulder Press
- Grip: Opt for a neutral grip, where your palms face each other. This grip orientation optimally targets the anterior deltoid while ensuring a safer and more effective workout.
- Range of Motion: Consider shorter repetitions that terminate just before full lockout. This approach maintains continuous tension on the deltoid, offering better muscle engagement.
- Body Position: Depending on the specific machine design, you will typically be seated upright with your back supported by a backrest. This ergonomic setup promotes proper form and reduces the risk of injury.
The machine shoulder press is an excellent exercise choice for individuals seeking to build shoulder strength and definition. It offers the advantage of controlled movement and back support, making it suitable for various fitness levels. By focusing on grip and range of motion, you can tailor your machine shoulder press to maximize the benefits and achieve well-developed, sculpted shoulders.
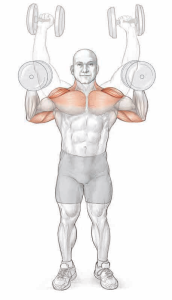
Dumbbell Shoulder Press:
The dumbbell shoulder press is a versatile and effective exercise for developing robust and well-shaped shoulder muscles. In this comprehensive guide, we’ll explore the proper execution of the dumbbell shoulder press, discuss the primary and secondary muscles engaged, and delve into the anatomic focus to help you make the most of this exercise.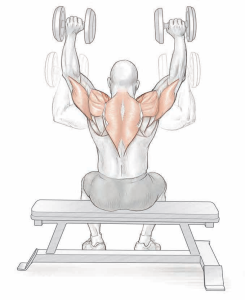
Executing the Dumbbell Shoulder Press:
- Execution:
- Begin by sitting on a bench, maintaining an upright posture.
- Hold a dumbbell in each hand at shoulder level, with your palms facing forward.
- Press the dumbbells vertically upward until your elbows fully lock out.
- Lower the dumbbells back down to shoulder level, ensuring they touch your shoulders to complete one repetition.
- Muscles Involved:
- Primary Muscle: The dumbbell shoulder press primarily targets the anterior deltoid, responsible for lifting the weight overhead.
- Secondary Muscles: Supporting and stabilizing this movement are the lateral deltoid, triceps brachii, trapezius, and upper pectoralis.
- Anatomic Focus: Enhancing Your Dumbbell Shoulder Press
- Grip: Dumbbell orientation significantly affects hand position (grip). To target both the anterior and lateral deltoid heads, press the dumbbells with palms facing forward (pronated grip). Opting for a neutral grip (palms facing each other) increases the workload on the anterior deltoid while minimizing lateral deltoid involvement. For maximal anterior deltoid engagement, use a supinated grip (palms facing back).
- Positioning: Seating yourself on a bench with an upright posture ensures strict and controlled execution. This prevents the use of momentum generated by the legs to cheat the dumbbells upward, providing a more effective workout.
- Variations: Fine-Tuning Your Dumbbell Shoulder Press
- Variable-Grip Dumbbell Press: This advanced version incorporates three different hand positions during each repetition. Begin with palms facing back (supination), rotate the dumbbells to palms facing each other (neutral grip) at the midpoint, and finish the upward press with palms facing forward (pronated grip) at lockout.
- Alternating One-Arm Dumbbell Press: Enhance balance and focus by pressing one dumbbell at a time, alternating between the right and left arms. This variation offers unique benefits for symmetry and stability.
The dumbbell shoulder press is a versatile exercise that can be adapted to various fitness levels and goals. By adjusting your grip and maintaining proper positioning, you can tailor your dumbbell shoulder press to target specific areas of the shoulder complex, ultimately leading to stronger, more sculpted shoulders.
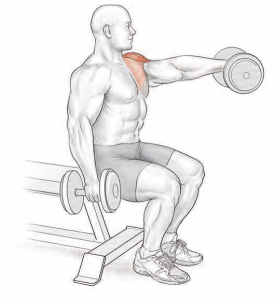
Dumbbell Front Raise:
The dumbbell front raise is a fundamental exercise that targets the anterior deltoid muscles, helping you develop strong, well-defined shoulders. In this comprehensive guide, we’ll delve into the proper execution of the dumbbell front raise, the primary and secondary muscles engaged, and explore variations to enhance your shoulder workout.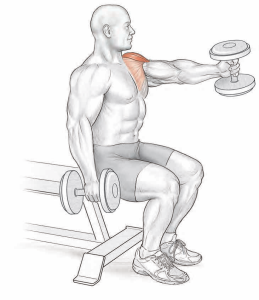
Executing the Dumbbell Front Raise:
- Execution:
- Begin by sitting upright on the edge of an exercise bench.
- Hold a dumbbell in each hand at arms’ length by your sides, ensuring your thumbs point forward.
- Lift one dumbbell out in front of your body and raise it toward shoulder level while keeping your elbow stiff.
- Lower the weight to the starting position and repeat the movement with the other dumbbell.
- Muscles Involved:
- Primary Muscle: The dumbbell front raise primarily targets the anterior deltoid, which is responsible for lifting the weight in front of your body.
- Secondary Muscles: Supporting and stabilizing this movement are the upper pectoralis and the trapezius muscles.
- Anatomic Focus: Enhancing Your Dumbbell Front Raise
- Grip: Your choice of grip can influence muscle engagement. Using a neutral grip (palm inward, thumb pointing forward) places more emphasis on the anterior deltoid. Alternatively, a pronated grip (palm down) allows the lateral deltoid to assist, diversifying the muscle involvement.
- Variation: Expanding Your Dumbbell Front Raise Horizons
- Variable-Grip Dumbbell Front Raise: Elevate your front raise game with this variation. Start with a neutral grip (thumb forward) and, during the lift, rotate the dumbbell through 90 degrees so that your grip becomes pronated (palm down) at the top of the movement. This nuanced change in grip orientation provides a different challenge to your deltoids, making your workout more dynamic.
- Variable-Grip Dumbbell Front Raise: Elevate your front raise game with this variation. Start with a neutral grip (thumb forward) and, during the lift, rotate the dumbbell through 90 degrees so that your grip becomes pronated (palm down) at the top of the movement. This nuanced change in grip orientation provides a different challenge to your deltoids, making your workout more dynamic.
The dumbbell front raise is a valuable exercise for building strong, sculpted anterior deltoid muscles, which are essential for balanced shoulder development. By mastering proper form and exploring grip variations, you can tailor your front raise routine to target specific areas of the shoulder complex, ultimately contributing to a well-rounded and impressive physique.
Barbell Front Raise:
The barbell front raise is a potent exercise for targeting the anterior deltoid muscles, helping you develop powerful, well-shaped shoulders. In this comprehensive guide, we’ll explore the proper execution of the barbell front raise, the primary and secondary muscles engaged, and delve into a variation to enhance your shoulder workout.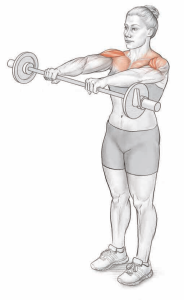
Executing the Barbell Front Raise:
- Execution:
- Begin by grasping a barbell with an overhand shoulder-width grip, holding it at arms’ length in front of your thighs.
- Lift the barbell forward and upward to shoulder level while keeping your elbows stiff.
- Carefully lower the barbell back down to your thighs to complete one repetition.
- Muscles Involved:
- Primary Muscle: The barbell front raise primarily targets the anterior deltoid, which is responsible for the lifting motion in front of your body.
- Secondary Muscles: Supporting and stabilizing this movement are the lateral deltoid, trapezius, and upper pectoralis muscles.
- Anatomic Focus: Enhancing Your Barbell Front Raise
- Hand Spacing: The spacing of your hands on the barbell can influence the muscle engagement. A narrow hand spacing places a greater emphasis on the anterior deltoid, requiring minimal assistance from the lateral deltoid. Conversely, a wider grip recruits the lateral deltoid more, providing a variation in muscle involvement.
- Variation: Single Dumbbell Front Raise
- Single Dumbbell Front Raise: This variation introduces a different dynamic to your front raise routine. Instead of using a barbell, grab a dumbbell with both hands, interlocking your fingers around the handle. The neutral grip (thumbs pointing forward) and narrow hand spacing specifically target the anterior deltoid, reducing reliance on the lateral deltoid. This variation is excellent for isolating and intensifying the work on your anterior deltoids.
The barbell front raise is a valuable exercise for building robust and well-defined anterior deltoid muscles. Incorporating proper form and hand spacing variations allows you to fine-tune your front raise routine to meet your specific shoulder development goals. By mastering this exercise, you can contribute to a balanced and impressive physique with strong and visually appealing shoulders.
Cable Front Raise:
The cable front raise is a highly effective exercise for isolating and strengthening the anterior deltoid muscles, contributing to a balanced and well-defined shoulder appearance. This comprehensive guide will walk you through the proper execution of the cable front raise, detail the primary and secondary muscles engaged, and explore variations to enhance your shoulder workout.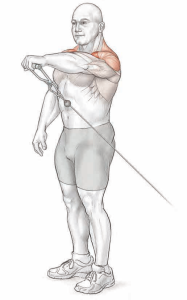
Executing the Cable Front Raise:
- Execution:
- Begin by standing with one hand, holding a D-handle attached to a low pulley with a pronated grip (palm facing down).
- Face away from the weight stack and raise the handle in an upward arc to shoulder level, ensuring that your elbow remains stiff.
- Carefully lower the handle back down to waist level to complete one repetition.
- Muscles Involved:
- Primary Muscle: The cable front raise primarily targets the anterior deltoid, responsible for lifting the weight in front of your body.
- Secondary Muscles: Assisting and stabilizing this movement are the lateral deltoid, trapezius, and upper pectoralis major muscles.
- Anatomic Focus: Maximizing Your Cable Front Raise
- Grip: Utilizing a pronated overhand grip during this exercise engages both the anterior and lateral heads of the deltoid, helping create a balanced and sculpted shoulder appearance.
- Variations: Enhancing Your Workout
- Short-Bar Attachment: In this variation, face away from the cable machine with the cable running between your legs. Grab the short bar with both hands using a shoulder-width overhand grip. This variation adds a unique challenge to your anterior deltoids.
- Rope Attachment: Similar to the short-bar attachment variation, face away from the machine with the cable between your legs. Grab the rope ends with both hands, keeping your thumbs pointed upward. The rope attachment provides a different feel to the exercise and can help target your anterior deltoids effectively.
The cable front raise is an essential exercise for isolating and strengthening the anterior deltoids, contributing to a well-rounded shoulder development. By maintaining proper form and exploring variations, you can tailor your cable front raise routine to meet your specific shoulder training goals. Incorporate this exercise into your shoulder workout regimen to achieve a sculpted and powerful shoulder appearance.
Dumbbell Standing Lateral Raise:
The dumbbell standing lateral raise is a fundamental exercise for targeting the lateral deltoid muscles, which are responsible for creating the broad, rounded appearance of the shoulders. This comprehensive guide will provide an in-depth look into the proper execution of the dumbbell standing lateral raise, the primary and secondary muscles worked, and various factors affecting the exercise.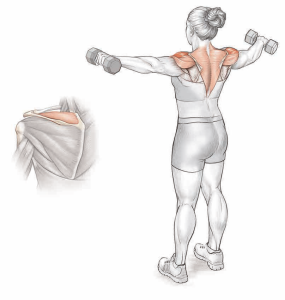
Executing the Dumbbell Standing Lateral Raise:
- Execution:
- Begin by standing upright, holding a dumbbell in each hand at arms’ length by your sides.
- Raise your arms out to the sides in a controlled arc until the dumbbells reach shoulder level.
- Lower the dumbbells back to your hips in a slow and controlled manner to complete one repetition.
- Muscles Involved:
- Primary Muscle: The lateral deltoid is the primary muscle engaged during this exercise, responsible for lifting the dumbbells out to the sides.
- Secondary Muscles: Supporting this movement are the anterior deltoid, posterior deltoid, trapezius, and supraspinatus muscles.
- Anatomic Focus: Maximizing Your Lateral Raise
- Range of Motion: To effectively target the lateral deltoid, it is crucial to perform the exercise without raising the dumbbells higher than shoulder level. This ensures that the tension remains on the deltoid muscles without excessive engagement of the trapezius.
- Grip: Maximizing the effort from the lateral deltoid involves holding the dumbbells parallel to the floor during the lift. You can vary the grip to engage different parts of the shoulder. Tilting the dumbbells with thumbs up externally rotates the shoulder, engaging the anterior deltoid. Tilting them with thumbs down internally rotates the shoulder, involving the posterior deltoid.
- Trajectory: Lifting the dumbbells directly out to the sides targets the lateral deltoid effectively. However, altering the arc of motion can engage other shoulder muscles. Raising the dumbbells from in front of the hips with a forward arc activates the anterior deltoid. If the arc occurs behind the plane of the body, the posterior deltoid comes into play.
- Resistance: Keep in mind that the resistance during the exercise varies due to gravity. It is lower at the beginning of the movement and gradually increases as the dumbbells are raised to shoulder level.
Variation: One-Arm Dumbbell Lateral Raise
For added variety and to work on imbalances, you can perform the one-arm dumbbell lateral raise. This exercise is executed one arm at a time while stabilizing your torso with your free hand on your hip.
The dumbbell standing lateral raise is a foundational exercise for developing strong and broad shoulders. By paying attention to form, range of motion, grip, trajectory, and resistance, you can tailor your lateral raise routine to effectively target specific areas of your shoulder muscles. Incorporate this exercise into your shoulder workout regimen to achieve well-rounded and powerful shoulders.
Dumbbell Seated Lateral Raise:
The dumbbell seated lateral raise is a versatile exercise designed to enhance the appearance and strength of your shoulder muscles. This comprehensive guide will delve into the proper execution of the dumbbell seated lateral raise, the primary and secondary muscles engaged, and key factors affecting the effectiveness of this exercise.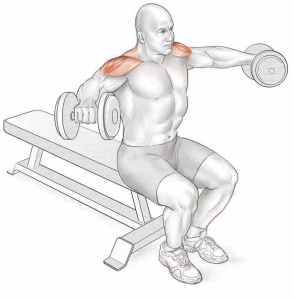
Executing the Dumbbell Seated Lateral Raise:
- Execution:
- Start by sitting upright on a bench, ensuring proper posture.
- Hold a dumbbell in each hand at arms’ length by your sides.
- Raise your arms out to the sides in a controlled arc until the dumbbells reach shoulder level.
- Lower the dumbbells back to the starting position in a controlled manner to complete one repetition.
- Muscles Involved:
- Primary Muscle: The lateral deltoid is the primary muscle actively engaged during this exercise, responsible for lifting the dumbbells to the sides.
- Secondary Muscles: Supporting this movement are the anterior deltoid, posterior deltoid, trapezius, and supraspinatus muscles.
- Anatomic Focus: Maximizing the Seated Lateral Raise
- Body Position: Performing the dumbbell lateral raise seated on a flat exercise bench provides stricter form and minimizes the use of momentum. To further support your torso and reduce lower back strain, you can use a bench with a vertical backrest.
- Range of Motion: Maintaining proper form means raising the dumbbells to shoulder level, focusing on engaging the lateral deltoid. Avoid raising the dumbbells higher, as this could shift the emphasis to the trapezius.
- Grip: To maximize lateral deltoid engagement, hold the dumbbells parallel to the floor. Adjusting the tilt of the dumbbells can engage other shoulder muscles. Tilting them with thumbs up externally rotates the shoulder, involving the anterior deltoid, while thumbs down internally rotates the shoulder, engaging the posterior deltoid.
- Resistance: It’s important to note that resistance during the exercise varies due to the influence of gravity. Initially, there’s less resistance, but it gradually increases as the dumbbells are raised to shoulder level.
The dumbbell seated lateral raise is an excellent addition to your shoulder workout routine. By focusing on proper form, body position, range of motion, grip, and resistance, you can effectively target and strengthen your shoulder muscles, leading to well-rounded and sculpted shoulders. Incorporate this exercise into your fitness regimen to achieve your desired shoulder goals.
Cable Lateral Raise:
The cable lateral raise is a dynamic exercise that can significantly enhance the strength and aesthetics of your shoulder muscles. This comprehensive guide explores the proper execution of the cable lateral raise, the primary and secondary muscles engaged, and the key factors influencing the effectiveness of this exercise.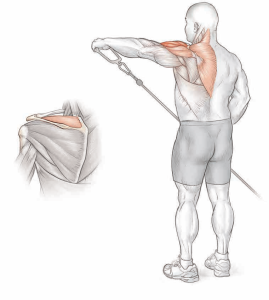
Cable Lateral Raise:
- Execution:
- Begin by grabbing the D-handle attached to a low pulley with one hand.
- Stand side-on to the cable machine, ensuring proper alignment.
- Raise your hand outward in a wide arc, moving it up to shoulder level while maintaining a stiff elbow.
- Lower the handle back down to waist level in a controlled manner to complete one repetition.
- Muscles Involved:
- Primary Muscle: The primary focus of this exercise is the lateral deltoid, which plays a pivotal role in lifting the handle to the side.
- Secondary Muscles: Supporting the lateral deltoid are the anterior deltoid, posterior deltoid, trapezius, and supraspinatus muscles.
- Anatomic Focus: Optimizing the Cable Lateral Raise
- Range of Motion: To effectively target the lateral deltoid, it’s crucial to terminate the upward phase at shoulder height. Going beyond this point may involve the trapezius. Starting with your hand in front of the opposite thigh can extend the range of motion, particularly in the initial phase of the movement.
- Trajectory: For optimal engagement of the lateral deltoid, raise your hand directly out to the side. Altering the direction can activate other shoulder muscles. Raising your hand in front of your body plane engages the anterior deltoid, while a rearward motion activates the posterior deltoid.
- Resistance: Unlike dumbbell lateral raises where resistance fluctuates, the cable pulley provides consistent resistance throughout the entire range of motion, enhancing muscle engagement.
The cable lateral raise is a versatile exercise that can help you achieve well-rounded and sculpted shoulders. By paying careful attention to form, range of motion, trajectory, and resistance, you can effectively target and strengthen your shoulder muscles. Incorporating this exercise into your shoulder workout routine will contribute to achieving your desired shoulder goals with precision and efficiency.
Machine Lateral Raise:
The machine lateral raise is a valuable exercise in any shoulder-focused workout routine. This guide delves into the correct execution of the machine lateral raise, highlights the primary and secondary muscles involved, and explores key factors that contribute to its effectiveness.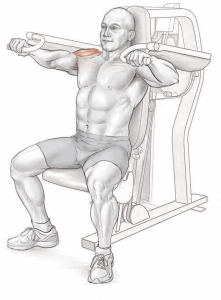
Perfecting the Machine Lateral Raise:
1. Execution:
- Begin by sitting on the machine with your elbows comfortably resting against the pads.
- Grasp the handles firmly.
- Lift your elbows until your upper arms are parallel to the floor and at shoulder level.
- Gradually lower your elbows back to your sides, maintaining controlled movement throughout.
2. Muscles Involved:
- Primary Muscle: The primary muscle targeted in the machine lateral raise is the lateral deltoid, which is primarily responsible for lifting the elbows to shoulder level.
- Secondary Muscles: Supporting the lateral deltoid are the anterior deltoid, posterior deltoid, trapezius, and supraspinatus muscles.
3. Anatomic Focus:
- Range of Motion: Machine lateral raises provide consistent resistance throughout the entire motion. During the initial phase, the supraspinatus assists, and if the elbows are raised beyond shoulder level, the trapezius muscle contributes.
- Grip: The grip you choose can influence the focus of the exercise. A pronated grip (palms facing down) encourages internal rotation of the shoulder, targeting the lateral deltoid. On the other hand, a neutral grip (palms facing in) or supinated grip (palms facing up) promotes external rotation, increasing the involvement of the anterior deltoid. It’s important to note that you can control the shoulder rotation by gripping the elbow pads instead of the machine handles.
- Trajectory: Modifying the trajectory of the lift allows you to shift the emphasis among the deltoid muscles. Raising your elbows directly out to the sides effectively engages the lateral deltoid. Alternatively, positioning your elbows forward on the pads recruits the anterior deltoid to assist in the movement.
The machine lateral raise is a versatile exercise that can help you develop well-defined shoulder muscles. By paying attention to your form, range of motion, grip, and trajectory, you can effectively target and strengthen your shoulder muscles. Incorporating this exercise into your shoulder workout routine will contribute to achieving your desired shoulder strength and definition with precision and efficiency.
Barbell Upright Row:
The barbell upright row is a classic strength training exercise that primarily targets the shoulders and trapezius muscles. This guide provides detailed insights into executing the barbell upright row correctly, discusses the key muscles involved, and explores factors that can maximize its effectiveness.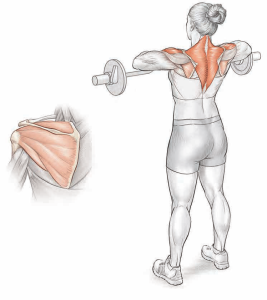
Mastering the Barbell Upright Row:
1. Execution:
- Begin by holding a barbell with an overhand grip, ensuring that your hands are positioned at shoulder width.
- Keep your arms fully extended while holding the barbell at arms’ length.
- Initiate the movement by pulling the barbell vertically upward towards your chin.
- Raise your elbows to shoulder height as you lift the barbell.
- To complete the repetition, lower the barbell back down slowly until your arms are fully extended.
2. Muscles Involved:
- Primary Muscles: The barbell upright row primarily targets the lateral deltoid and the trapezius muscle.
- Secondary Muscles: Supporting the primary muscles, the anterior deltoid, supraspinatus, infraspinatus, and teres minor are also engaged during this exercise.
3. Anatomic Focus:
- Hand Spacing: The placement of your hands on the barbell can influence which muscles are emphasized during the exercise. A wider grip tends to target the deltoid muscles more, while a narrower grip places greater emphasis on the trapezius.
- Trajectory: The path you follow while lifting the barbell can impact the muscles worked. Raising the barbell close to your body primarily targets the lateral deltoid. Conversely, moving the barbell through a forward arc away from your body requires more involvement from the anterior deltoid.
- Range of Motion: Pay attention to how high you lift the barbell. If your elbows rise above shoulder level, the trapezius muscles take over, reducing the emphasis on the lateral deltoid.
The barbell upright row is a valuable addition to any shoulder and upper body workout routine. When executed with proper form and technique, it can help you build strength in your shoulder muscles and trapezius. Keep in mind the considerations mentioned above to maximize the effectiveness of this exercise and minimize the risk of injury. Whether you’re looking to develop broader shoulders or strengthen your upper back, the barbell upright row is a versatile exercise that can contribute to your fitness goals.
Cable Upright Row:
The cable upright row is a valuable exercise in your strength training routine that primarily targets the shoulders and trapezius muscles. This comprehensive guide provides detailed insights into the correct execution of the cable upright row, highlights the key muscles involved, and explores various factors that can optimize its effectiveness.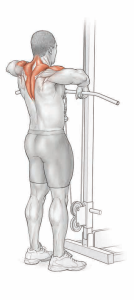
Perfecting the Cable Upright Row:
1. Execution:
- Begin by grabbing a straight bar attached to the low pulley of a cable machine.
- Hold the bar at arms’ length with an overhand shoulder-width grip, ensuring that your palms are facing down.
- Initiate the movement by pulling the bar vertically upward towards your chin.
- Raise your elbows as you lift the bar, aiming to bring them to shoulder height.
- To complete the repetition, lower the bar back down slowly until your arms are fully extended.
2. Muscles Involved:
- Primary Muscles: The cable upright row primarily targets the lateral deltoid and the trapezius muscle.
- Secondary Muscles: Supporting the primary muscles, the anterior deltoid and supraspinatus also come into play during this exercise.
3. Anatomic Focus:
- Hand Spacing: The placement of your hands on the bar can influence which muscles are emphasized during the exercise. A wider grip tends to target the deltoid muscles more, while a narrower grip places greater emphasis on the trapezius.
- Range of Motion: Pay close attention to how high you lift the bar. If your elbows rise above shoulder level, the trapezius muscles start to take over, reducing the emphasis on the lateral deltoid.
- Body Position: Your torso’s position can also affect the muscles worked. When your torso is upright, the effort primarily focuses on the lateral deltoid. If you tilt your torso forward slightly, the posterior deltoid gets involved in the movement.
Variation: Machine Upright Row
An alternative to the cable upright row is the machine upright row, which can be performed using a Smith machine. This variation provides a single plane of vertical motion, which can help you better focus your effort on the targeted muscles.
Incorporating the cable upright row into your workout routine can contribute to the development of strong and well-defined shoulders and trapezius muscles. Be sure to maintain proper form and technique throughout the exercise to maximize its effectiveness and minimize the risk of injury. Whether you’re aiming to build broader shoulders or strengthen your upper back, the cable upright row is a versatile exercise that can help you achieve your fitness goals.
Dumbbell Bent-Over Raise:
The dumbbell bent-over raise is a highly effective exercise for developing the posterior deltoid, along with several other upper back muscles. This guide provides a detailed overview of the correct execution of the dumbbell bent-over raise, the primary and secondary muscles it engages, and various factors that can enhance its effectiveness.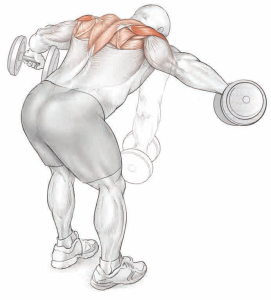
Executing the Dumbbell Bent-Over Raise:
1. Execution:
- Begin by holding a dumbbell in each hand at arms’ length.
- Stand with your feet shoulder-width apart, maintaining a straight back and keeping your head up.
- To initiate the movement, bend forward at the waist while maintaining a straight back.
- Ensure that your palms are facing each other as you hold the dumbbells.
- While keeping your elbows slightly bent, raise the dumbbells to ear level by lifting your arms out to the sides.
- Maintain control throughout the entire range of motion.
- To complete a repetition, lower the dumbbells back to the starting position.
2. Muscles Involved:
- Primary Muscle: The primary focus of the dumbbell bent-over raise is on the posterior deltoid (rear deltoid).
- Secondary Muscles: In addition to the posterior deltoid, this exercise engages the lateral deltoid, trapezius, rhomboids, infraspinatus, teres minor, and teres major muscles.
3. Anatomic Focus:
- Grip: How you hold the dumbbells can influence the degree of shoulder joint rotation. Using a neutral grip (thumbs pointing forward) emphasizes the lateral deltoid, while a pronated grip (thumbs pointing inward) shifts the focus to the posterior deltoid.
- Resistance: The resistance in this exercise varies due to gravity’s effect on the dumbbells. It starts lower at the beginning of the movement and gradually increases as the dumbbells are raised.
- Trajectory: The trajectory of the lift can be adjusted to target specific muscles. Maintaining a flat torso, parallel to the floor, places greater emphasis on the posterior deltoid, whereas having an inclined torso with an upright chest engages the lateral deltoid more.
Variation: Head-Supported Dumbbell Raise
An effective variation of the dumbbell bent-over raise is the head-supported dumbbell raise. To perform this variation:
- Stand behind an incline exercise bench.
- Bend forward at the waist until your head touches the top of the backrest, with the bench set at an appropriate height for your torso to be almost parallel to the floor.
- Support your head on the bench to restrict spinal movement and prevent using momentum to lift the dumbbells.
Incorporating the dumbbell bent-over raise into your workout routine can help you build a strong and well-defined posterior deltoid, contributing to a balanced and powerful shoulder complex. It’s essential to maintain proper form and technique to maximize results and minimize the risk of injury. Whether you’re looking to enhance your shoulder development or strengthen your upper back, this exercise offers a versatile option for achieving your fitness goals.
Dumbbell Seated Bent-Over Raise:
The dumbbell seated bent-over raise is an excellent exercise for targeting the posterior deltoid and engaging various upper back muscles. This comprehensive guide provides detailed instructions on performing the exercise, highlights the primary and secondary muscles worked, and delves into key anatomical aspects that can enhance its effectiveness.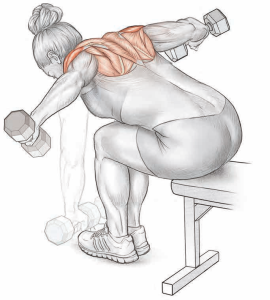
Executing the Dumbbell Seated Bent-Over Raise:
1. Execution:
- Begin by sitting on the end of a bench, feet firmly planted on the ground.
- Hold a dumbbell in each hand at arms’ length with your palms facing backward (thumbs pointing inward).
- Bend forward at the waist while keeping your chest on your thighs.
- Ensure your back remains straight and your elbows slightly bent throughout the exercise.
- Lift the dumbbells outward and upward until they reach ear level, maintaining control.
- Slowly lower the dumbbells back to the starting position to complete one repetition.
2. Muscles Involved:
- Primary Muscle: The primary focus of the dumbbell seated bent-over raise is on the posterior deltoid (rear deltoid).
- Secondary Muscles: This exercise also engages the lateral deltoid, trapezius, rhomboids, infraspinatus, teres minor, and teres major muscles as secondary contributors.
3. Anatomic Focus:
- Grip: The grip you employ on the dumbbells plays a crucial role in determining shoulder joint rotation. A pronated grip (thumbs pointing inward) targets the posterior deltoid by internally rotating the shoulder and reducing lateral deltoid involvement. In contrast, a neutral grip (thumbs pointing forward) allows the lateral deltoid to contribute more to the exercise.
- Resistance: Gravity affects the resistance in this exercise, resulting in lower resistance at the start of the movement, gradually increasing to a maximum as the dumbbells are raised.
- Trajectory: Altering the trajectory of the lift can shift the emphasis to different deltoid muscles. A flat torso, parallel to the floor, places greater focus on the posterior deltoid, while an inclined torso with an upright chest involves the lateral deltoid more.
Incorporating the dumbbell seated bent-over raise into your workout routine can be highly effective for developing the posterior deltoid and strengthening the upper back muscles. Proper form and technique are essential for optimizing results and reducing the risk of injury. Whether you’re aiming to enhance your shoulder aesthetics, improve your posture, or bolster your upper body strength, this exercise offers a versatile option for achieving your fitness goals.
Cable Bent-Over Raise:
The cable bent-over raise is a valuable exercise that specifically targets the posterior deltoid while engaging various upper back muscles. This comprehensive guide provides detailed instructions on performing the exercise, highlights the primary and secondary muscles worked, and explores essential anatomical aspects to maximize its effectiveness.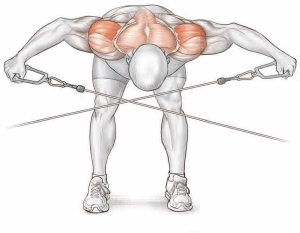
Executing the Cable Bent-Over Raise:
1. Execution:
- Stand in the middle of a cable machine and grasp the handles attached to two low pulleys.
- Hold the left-side handle in your right hand and the right-side handle in your left hand, crossing the cables.
- Bend forward at the waist with your back straight, keeping it parallel to the floor.
- Maintain a firm grip on the handles with your arms extended.
- Raise your hands in an arc, pulling the cables upward and outward until they reach shoulder level. Ensure that the cables cross over each other during this movement.
- Lower the handles to the starting position, allowing your right hand to be directly in front of your left ankle and your left hand in front of your right ankle.
2. Muscles Involved:
- Primary Muscle: The primary focus of the cable bent-over raise is on the posterior deltoid (rear deltoid).
- Secondary Muscles: This exercise also engages the lateral deltoid, trapezius, rhomboids, infraspinatus, teres minor, and teres major muscles as secondary contributors.
3. Anatomic Focus:
- Trajectory: To effectively target the posterior deltoid, ensure that your arms move directly out to the sides during the exercise. Avoid raising your hands in a forward arc in front of your head, as this can shift the emphasis to the trapezius and lateral deltoid.
- Body Position: To isolate the posterior deltoid effectively, maintain a torso position parallel to the floor, rather than inclining your chest and head upward.
- Range of Motion: You can increase the range of motion at the start by allowing the handles to uncross (moving your hands apart) as you lower them. This extended distance and deeper stretch place greater demands on the posterior deltoid.
- Resistance: Unlike dumbbell raises, where resistance varies during the lift, the cable pulley provides uniform resistance throughout the motion.
- Grip: The cable handle design limits changes in hand position or grip.
4. Variation: One-Arm Cable Bent-Over Raise
- Performing this exercise using one arm at a time introduces a unilateral approach. This variation allows you to raise your hand higher and attain a more extended stretch at the bottom of the movement, increasing the workload on the posterior deltoid. Stabilize your torso by resting your free hand on your thigh.
Incorporating the cable bent-over raise into your workout routine can be highly effective for isolating and strengthening the posterior deltoid while engaging various upper back muscles. Proper form and technique are essential for optimizing results and minimizing the risk of injury. Whether you’re looking to enhance your shoulder aesthetics, improve your posture, or bolster your upper body strength, this exercise offers a versatile option for achieving your fitness goals.
Cable Reverse Crossover:
The cable reverse crossover is a valuable exercise that primarily targets the posterior deltoid while also engaging various upper back muscles. In this comprehensive guide, we provide detailed instructions on performing the exercise, highlight the primary and secondary muscles worked, and explore essential anatomical aspects to maximize its effectiveness.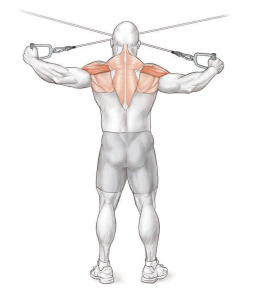
Executing the Cable Reverse Crossover:
1. Execution:
- Stand upright in the middle of a cable machine, facing the pulleys.
- Using a thumbs-up grip, grab the handles attached to two high pulleys. Hold the left-side handle in your right hand and the right-side handle in your left hand, crossing the cables.
- Maintain an upright posture with your core engaged and chest up.
- Pull your hands back and slightly down in an arc, keeping your arms nearly parallel to the floor. Continue until your hands are in line with your shoulders, forming a “T” shape.
- Maintain control of the handles as you reach the fully contracted position.
- Slowly return the handles to the starting position, allowing your right hand to be directly in front of your left shoulder and your left hand directly in front of your right shoulder.
2. Muscles Involved:
- Primary Muscle: The cable reverse crossover primarily targets the posterior deltoid (rear deltoid).
- Secondary Muscles: This exercise also engages the lateral deltoid, trapezius, rhomboids, infraspinatus, teres minor, and teres major muscles as secondary contributors.
3. Anatomic Focus:
- Trajectory: To effectively target the posterior deltoid, ensure that your arms move directly back and slightly down, almost parallel to the floor. Avoid raising your hands through a higher arc above shoulder level, as this can shift the emphasis to the trapezius and lateral deltoid.
- Body Position: To isolate the posterior deltoid effectively, maintain an upright torso position, avoiding excessive forward or backward lean.
- Range: Crossing your hands over one another at the starting position increases the range of motion and muscle stretch, making the posterior deltoid work harder.
- Grip: Maintain a thumbs-up grip to emphasize the posterior deltoid.
4. Variation: Supported Cable Reverse Crossover
- This variation allows you to perform the exercise with added support for your chest. You can do it while sitting or standing with your chest supported on the backrest of an incline exercise bench or against the pad of a preacher bench. Position the bench centrally between two cable pulleys, ensuring that they are level with or just higher than your head. This variation is gentler on the lower back, enabling you to focus on targeting the deltoid muscles effectively.
Incorporating the cable reverse crossover into your workout routine can be highly effective for isolating and strengthening the posterior deltoid while engaging various upper back muscles. Proper form and technique are essential for optimizing results and minimizing the risk of injury. Whether you’re aiming to improve your shoulder aesthetics, posture, or overall upper body strength, this exercise offers a versatile option for achieving your fitness goals.
External Rotation:
External rotation is a fundamental exercise that targets the rotator cuff muscles, specifically the infraspinatus and teres minor. Strengthening these muscles is crucial for shoulder stability and preventing common shoulder injuries. This article provides comprehensive guidance on performing external rotation exercises, understanding the primary and secondary muscles involved, and exploring variations to incorporate into your workout routine.
Executing External Rotation:
1. Execution:
- Stand side-on to a cable pulley adjusted to waist height.
- Grasp the handle with your outside hand, positioning your thumb facing upward.
- Hold your elbow firmly against your waist throughout the exercise.
- Move the handle in an outward arc away from your body, maintaining your forearm parallel to the floor.
- Ensure that your upper arm remains vertical, and your elbow stays close to your side.
- Slowly return the handle to the starting position in front of your navel.
2. Muscles Involved:
- Primary Muscles: External rotation primarily targets the infraspinatus and teres minor muscles, both crucial components of the rotator cuff.
- Secondary Muscle: The posterior deltoid provides secondary support during the exercise.
3. Anatomic Focus:
- Trajectory: During external rotation, the shoulder joint experiences outward rotation due to the combined action of the infraspinatus and teres minor. Your hand moves in a horizontal arc, with the forearm parallel to the floor, and the upper arm remains vertical. Keeping your elbow close to your side is essential for proper form.
- Range: The exercise involves a range of motion of approximately 90 degrees, resembling the movement of a clock hand between 10 and 2 o’clock.
- Resistance: External rotation exercises require a cable machine to provide resistance. Attempting this exercise with a dumbbell while standing upright is ineffective since gravity does not provide adequate resistance for the rotator cuff muscles.
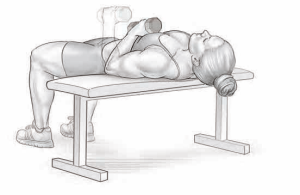
4. Variations: Dumbbell External Rotation and Reclining Dumbbell External Rotation
- Dumbbell External Rotation: Lie across a flat exercise bench, resting on your upper back with your elbows in contact with the bench. Hold a dumbbell in one hand, positioning your forearm vertically upward with a 90-degree elbow bend. Keep your elbow in contact with the bench and lower the dumbbell in a forward arc toward your waist until your forearm is roughly parallel to the floor.
- Reclining Dumbbell External Rotation: Lie side-down on the floor or a flat exercise bench while holding a dumbbell in your upper hand. This body position is similar to the incline side raise. This variation offers a different angle for targeting the rotator cuff muscles and can be a valuable addition to your routine.
Incorporating external rotation exercises into your workout routine can help enhance shoulder stability, reduce the risk of injuries, and contribute to overall shoulder health. Proper form, control, and gradual progression of resistance are essential for safe and effective training of the rotator cuff muscles. Whether you’re an athlete aiming to improve performance or an individual focused on injury prevention, these exercises are valuable for maintaining strong and stable shoulders.
Internal Rotation:
Internal rotation is a vital exercise that targets the subscapularis muscle, a key component of the rotator cuff. Strengthening this muscle is essential for shoulder stability and preventing injuries. In this article, we provide a comprehensive guide on performing internal rotation exercises, understanding the primary and secondary muscles involved, and exploring variations to incorporate into your workout routine.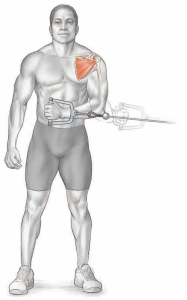
Executing Internal Rotation:
1. Execution:
- Stand side-on to a cable pulley adjusted to waist height.
- Grasp the handle with your inside hand, positioning your thumb facing upward.
- Hold your elbow firmly against your waist throughout the exercise.
- Pull the handle inward across the front of your body, maintaining your forearm parallel to the floor.
- Ensure that your hand moves through a horizontal arc across the front of your torso, with the elbow and upper arm snug against your side.
- Slowly return the handle to the starting position.
2. Muscles Involved:
- Primary Muscle: Internal rotation primarily targets the subscapularis muscle, a crucial component of the rotator cuff.
- Secondary Muscle: The pectoralis major provides secondary support during the exercise.
3. Anatomic Focus: Key Considerations
- Trajectory: During internal rotation, the subscapularis muscle causes inward rotation at the shoulder joint. Your hand moves through a horizontal arc across the front of your torso, and your forearm remains parallel to the floor. Keeping the elbow and upper arm close to your side is essential for proper form.
- Range: The exercise involves a range of motion of approximately 90 degrees, resembling the movement of a clock hand between 10 and 2 o’clock.
- Resistance: Similar to external rotation exercises, internal rotation requires a cable machine to provide resistance. Attempting this exercise with a dumbbell while standing upright is ineffective since gravity does not provide sufficient resistance for the rotator cuff muscles.
4. Variation: Dumbbell Internal Rotation
- Dumbbell Internal Rotation: Lie across a flat exercise bench, resting on your upper back with your elbows in contact with the bench. Hold a dumbbell in one hand, positioning your forearm out to the side, almost parallel to the floor. With a 90-degree bent elbow and in contact with the bench, raise the dumbbell in a forward arc until your forearm becomes vertical.

Incorporating internal rotation exercises into your workout routine is essential for maintaining balanced shoulder strength, enhancing stability, and reducing the risk of injuries. Correct form, controlled movements, and gradual progression of resistance are crucial for the safe and effective training of the subscapularis muscle. Whether you’re an athlete aiming to optimize performance or an individual focused on injury prevention, these exercises play a crucial role in overall shoulder health.
Incline Side Raise:
The incline side raise is a valuable exercise that emphasizes the supraspinatus muscle, a crucial component of the rotator cuff. Strengthening the supraspinatus is vital for shoulder stability and overall upper body strength. In this article, we provide a detailed guide on performing incline side raises, understanding the primary and secondary muscles involved, and exploring variations to enhance your shoulder workout routine.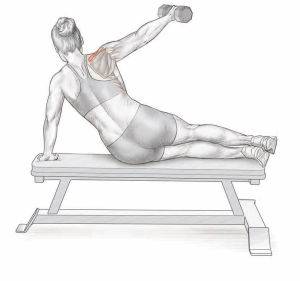
Executing Incline Side Raise:
1. Execution:
- Begin by lying sideways on an incline bench with your torso inclined at approximately 45 degrees. Your body should be supported by your underside arm.
- Hold a dumbbell in your upper hand with an overhand grip.
- Raise the dumbbell laterally to head height while keeping your elbow stiff.
- Slowly lower the weight back to waist level.
2. Muscles Involved:
- Primary Muscle: The primary focus of the incline side raise is the supraspinatus muscle.
- Secondary Muscles: The lateral deltoid and anterior deltoid play secondary roles during the exercise.
3. Anatomic Focus: Key Considerations
- Range: The supraspinatus muscle initiates the arm raise, primarily working during the first 15 to 20 degrees of abduction. In the inclined position, gravity on the dumbbell provides the most resistance during the initial phase of the raise, effectively targeting the supraspinatus.
- Trajectory: To optimize the isolation of the supraspinatus, raise the dumbbell from in front of the hips.
- Grip: A pronated grip (palm down) is the most effective grip for this exercise.
4. Variations: Enhancing Your Shoulder Workout
- Cable Lateral Raise: The cable lateral raise is an excellent variation of the incline side raise. It also engages the supraspinatus significantly, primarily during the first 60 degrees of the movement. For a focused workout on the rotator cuff, conclude the upward phase when your hand reaches chest level.
- Dumbbell Lateral Raise: The dumbbell lateral raise, whether performed sitting or standing, is another valuable variation. You can choose to work one arm at a time or both simultaneously, allowing flexibility in your shoulder workout routine.
Incorporating incline side raises into your training regimen is essential for developing a balanced and robust set of shoulder muscles. Proper form, controlled movements, and gradual progression in resistance are key factors in the safe and effective strengthening of the supraspinatus muscle. Whether you’re an athlete seeking peak performance or an individual focused on injury prevention, exercises like the incline side raise are fundamental to achieving overall shoulder health and stability.